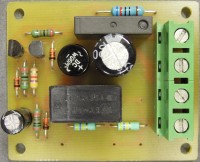
Discontinuous type switch for supplying lighting equipment
By Michael A. Shustov (Russia)
It is not an easy task to control the total load (for example lamp on/off in a long hall) using the equivalent control panels and it requires the application of a complex wire diagrams and their switching.
The Figure introduces the diagram of the switch for supplying lighting or other devices using the infinite number of series connected panels – normally closed buttons. In initial conditions the circuit voltage is delivered to the rectifier Br1 by the damping capacitor С3 and resistor R1. The Zener diode D2 bounding the voltage on the control circuit to 15 V is connected at the rectifier output. The resistor R3 and the capacitor С2 (of low capacitance) are connected in parallel to the Zener diode. Besides the capacitor C1 of high capacitance (1000 μF) is connected by the diode V3. The series-connected thyristor analogues (transistors T1, T2) and relay coil Rel are connected in parallel to the latter. The control electrode of thyristor analogue is connected to V3 diode cathode.
At short-term press of any buttons S1–Sn the supply voltage is switched off, the capacitor C2 discharges instantaneously into resistor R2 and control electrode of thyristor analogue is connected to the capacitor C1 by this resistor. The thyristor analogue is enabled at the capacitor C3 discharge. The relay responds and switches on by its contacts the load La. As the supply voltage is applied again to the circuit after button up the capacitor C1 is supported in a charge state and the thyristor analogue is in conducting state. In order to disconnect the load it is necessary to press any control button and hold it down for about a second. The capacitor C1 discharges completely, the thyristor analogue is locked, the relay and the load are closed.
Optorelay with a limiting resistor in a light emitting diode circuit may be used instead of the relay Rel. The switch may be built in a space sleeve between a lamp socket and a lamp.
From the lab: 130179 long distance push button for 230VAC lighting (v1.1)
We designed a little PCB for this project; dimensions are only 54.4 and 45.5 mm. Maybe it’ll fit inside a pattress or surface mount box but certainly inside a junction box. If necessary the corners can be filed off. If it is placed inside a normal housing (preferably plastic) place a clear visible warning not to open it in case the mains voltage is still connected. The entire circuit is connected to the mains voltage!
The relay chosen is a type with low power consumption and small footprint (approximately 5 by 20 mm). The high sensitivity coil type of the 12 V version of the G6DS series from Omron only requires 10 mA nominal coil current to activate (1 normally open contact). But it should already activate at 70 % the nominal value. The contact of the relay (single normally open) can handle 5 A with a resistive load or 2 A with a inductive load. The lead spacing of the capacitors in the mains voltage divider (C3 and C4) can be 15 mm and 22.5 mm. These two are the most common for X2 capacitors with these values. C4 should only be mounted if the mains voltage is 115 VAC.
At a mains voltage of (only) 222V our prototype consumed about 20 mA (12.3 V across R5). The current will change proportional with mains voltage fluctuations. The voltage across the relay is 12.2 V when the lamp is switched on. In this case the power supply was about 13.1 V, measured across R4. If the lamp is off the supply voltage is about 14.6 V.
Bill of materials
Resistor
R1,R2 = 510 Ω, 1 %, 0W25
R3 = 4k7, 5 %, 0W25
R4 = 2k0, 1 %, 0W25
R5 = 620 Ω, 1 %, 0W5
R6,R7 = 470 kΩ, 5 %, 0W25
Capacitor
C1 = 1000 µF, 20 %, 25 V, lead spacing 5.08 mm, diam.10 mm max.
C2 = 3u3, 20 %, 100V, lead spacing 2.54 mm, diam. 6.3 mm max.
C3 = 330 nF, 20 %, 275VAC, X2, lead spacing 15/22.5 mm, depth 11 mm max.
C4 = 220 nF, 20 %, 275VAC, X2, lead spacing 15/22.5 mm, depth 8 mm max.
Semiconductor
B1 = W06MG, bridge rectifier, 600 V, 1.5 A, WOBM
D1,D2 = 1N4148
D3 = BZX55C15, zener,15 V, 0W5, DO-35
T1 = BC547B
T2 = BC557B
Other
K1,LA1 = PCB terminal block, 2way, pitch 7.5 mm
RE1 = G6DS-1AH 12DC (Omron), relay, PCB, SPNO, coil 12 VDC/10 mA, 250AC/5A
Misc.
PCB 130179-1 v1.1


Discussion (0 comments)