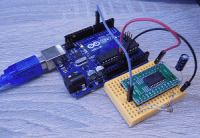
UPDI programmer for ATmega4809 and ATtiny816/817

Some of the latest Microchip AVRs require a UPDI programmer. This guide will show you how to build your own Arduino based programmer using jtag2updi.
The new Microchip AVR MCU generation using UPDI for programming are here. This are the ATmega4809 / ATmega3209 or the Tiny816, Tiny1616 for example. But what does UPDI mean to us? Firstly, we can't use our MKII ISP anymore with these chips and need new gear. But currently the only official working one is the AVR ICE and JTAGICE3. The new PICKIT4 is on its way, but some developers call it currently black coffin, as the early firmware state of PICKIT4 has already made some MCUs useless.
We keep the finger crossed that the PICKIT4 will repeat the path the PICKIT3 had, but in the meantime we are on our own. Thanks to the great work of "El Tangas" we now can use JTAG2UPDI to build a UPDI Programmer out of an Arduino. You can grab the GitHub repository or you use the prebuild .HEX file for a 16 MHz ATmega328P.
After you have prepared your programmer, you need to modify avrdude, or here make a copy of the avrdude shipped with the Arduino IDE. Copy the executable to a new location and place the avrdude.conf from the repository also there. Now you are almost ready to flash software to the new devices. Open a new terminal, for Windows e.g run cmd, and navigate to the folder you copied the avrdude and the avrdude.conf to.
You only need three wires: GND, VCC and RESET. The programming is done with the RESET-pin so you can save pins for the programming interface. Also note that the 328p used as programmer must run at the same voltagte as the target MCU you are programming. A simple setup wil look like this:

Within the RESET connection there is a 4,7k resistor. You can see the circuitry becomes pretty simple.
We will give a short example for the ATtiny816 and assume you have built a Blinky.hex file with the tools of your choice. Copy the HEX file also to the folder where you have copied avrdude to. Also get the COM-port of your Arduino board, we assume COM15 here, depending on your OS this can be something else. To programm the file use:
For the ATMega48090 to give an example, we assume a 4809_Blinky.hex and also COM15 as the programmers port. In this case the command would be:
This is not as plug and play as with other tools, but we can start using the new chips with stuff we may have already lying arround. This short description may help you to get started with these new ICs.
We keep the finger crossed that the PICKIT4 will repeat the path the PICKIT3 had, but in the meantime we are on our own. Thanks to the great work of "El Tangas" we now can use JTAG2UPDI to build a UPDI Programmer out of an Arduino. You can grab the GitHub repository or you use the prebuild .HEX file for a 16 MHz ATmega328P.
After you have prepared your programmer, you need to modify avrdude, or here make a copy of the avrdude shipped with the Arduino IDE. Copy the executable to a new location and place the avrdude.conf from the repository also there. Now you are almost ready to flash software to the new devices. Open a new terminal, for Windows e.g run cmd, and navigate to the folder you copied the avrdude and the avrdude.conf to.
You only need three wires: GND, VCC and RESET. The programming is done with the RESET-pin so you can save pins for the programming interface. Also note that the 328p used as programmer must run at the same voltagte as the target MCU you are programming. A simple setup wil look like this:

Within the RESET connection there is a 4,7k resistor. You can see the circuitry becomes pretty simple.
We will give a short example for the ATtiny816 and assume you have built a Blinky.hex file with the tools of your choice. Copy the HEX file also to the folder where you have copied avrdude to. Also get the COM-port of your Arduino board, we assume COM15 here, depending on your OS this can be something else. To programm the file use:
avrdude -c jtag2updi -P COM15 -p t816 -U flash:w:816_Blinky.hex
For the ATMega48090 to give an example, we assume a 4809_Blinky.hex and also COM15 as the programmers port. In this case the command would be:
avrdude -c jtag2updi -P COM15 -p m4809 -U flash:w:4809_Blinky.hex
This is not as plug and play as with other tools, but we can start using the new chips with stuff we may have already lying arround. This short description may help you to get started with these new ICs.


Discussion (0 comments)