Discover the Aoyue 866 Rework Station, its multiple features and accessories in this in-depth review. This rework station combines a hot-air station, a PCB preheater and a conventional soldering station in a single unit. Let's take a look.
In electronics, the question of soldering often comes up. The product reviewed here is designed to perform several functions simultaneously. It’s the Aoyue 866 rework station, which combines a hot-air station, a PCB preheater and a conventional soldering station in a single unit.
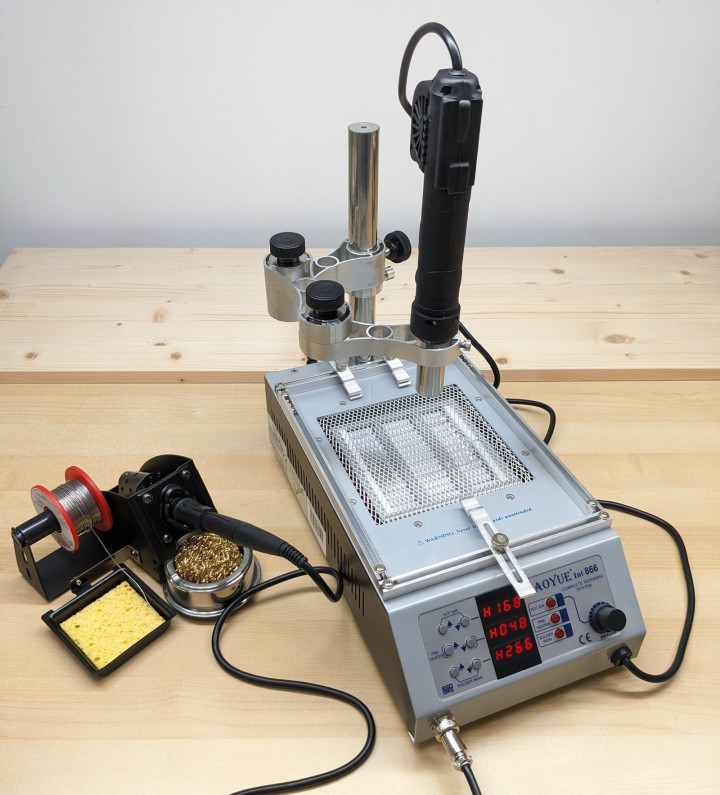
The Aoyue 866, a multipurpose device.
The Aoyue 866: A 3-in-1 Solution
This device is a three-in-one multifunction station. The soldering iron can be used for most common electronic soldering operations on through-hole and SMD components. I mentioned in my repair article the possibility of desoldering components with more than two pins using two soldering irons, one in each hand. This technique works very well for small components, but quickly reaches its limits for larger components or those with many pins.
For these, it’s useful to have a hot-air station. This requires a little practice; in standard hot-air stations, the heat “gun” is held in the hand. Air temperature and flow rate can be adjusted separately. You need to heat enough to desolder or solder correctly, but not too much to damage the PCB or components. The airflow must be sufficient to provide a good amount of heat, but not too great, otherwise smaller components will be blown away by the airflow.
The Aoyue 866 station takes up this principle, but adds an articulated arm and a column to keep the hot air handpiece at a given point, while keeping your hands free. Finally, the integrated board preheater enables heat to be supplied from below, which can be essential for even heating, while avoiding overheating the components above. In this way, the board can be brought to a temperature relatively close to the melting point of solder, but below it. Then, “just the right amount” of additional heat can be supplied by hot air. Preheating can also be crucial when soldering massive components such as large connectors, in cases where the pads are connected to large ground planes. This multifunctional tool should therefore be suitable for a wide variety of situations.
Subscribe
Tag alert: Subscribe to the tag Circuits & Circuit Design and you will receive an e-mail as soon as a new item about it is published on our website!
Aoyue 866 Specs
The Aoyue (pronounced “ow you”) 866 station features a 350 x 190 x 110 mm base incorporating a 550 W quartz tube infrared heater with a heating surface of approx. 130 x 130 mm. This preheater is stable on the workbench thanks to its weight, and has the advantage of not taking up too much space. Its temperature can be set between 100 and 450°C.
The hot air handpiece is also rated at 550 W and can be set from 100 to 480°C.
Finally, the 60 W soldering iron is adjustable between 200 and 480°C. It is connected to the preheater by a 5.8 mm-diameter, 900 mm-long cable, which is fairly flexible but a little thick. The cable sheath is PVC, so take care not to damage it with a soldering iron.
Please note that there may be differences between the power ratings given in the manual, on the Aoyue product page and in this article. There’s obviously some confusion in the documentation, but the wattages given here are those I’ve measured myself.
Unboxing
That was a hefty package!
The package includes the following:
A preheater
A hot air handpiece with 4 nozzles: 3 round, 6 mm, 8 mm, 12 mm, 10 mm square
A main column, serving as a support for the hot air, with its lock ring
A 3-section aluminium alloy articulated arm
A set of six small parts to hold the PCBs above the preheater, and associated thumbscrews
External thermocouple
Soldering iron
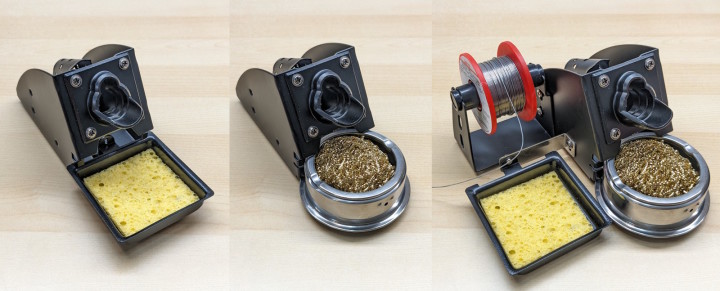
Soldering iron holder with sponge
A brass sponge tip cleaner, which is indeed brass and not plated steel
A solder spool holder
A power cable
A compact plastic toolbox containing accessories: a set of soldering iron tips, a spare heating element for the soldering iron, a spare element for the hot air handpiece, a pen-style vacuum pickup tool to lift ICs
Assembling the Station
The instructions are brief, but assembly is easy. The column is fixed to the lower frame by a single large screw. The necessary 6 mm Allen key is not supplied, but that said, it’s not really necessary. In fact, all you need to do is hold the screw head with your fingers and tighten the column by hand. As the steel of the lower frame is quite thin, it would be easily bent by over tightening with a wrench.
Then all you have to do is engage the lockring on the column (it will lock the hot air handpiece at a constant height), and the articulated arm by placing the tightening knobs on top. Finally, simply insert the hot air handpiece into the hole in the articulated arm and gently lock it with the side screw.
The iron holder is modular. You can use it either with the brass sponge, or with the classic sponge, or both at the same time (the sides are interchangeable). It’s also possible to attach a stand for a solder spool, on the left or right, as you prefer. A metallic bracket and an assortment of screws are provided.
Many possibilities for the holder. Accessories also fit on the other side.
Using the Aoyue 866
The unit is simple to operate. The hot air, preheater and soldering iron each have a dedicated On-Off button, a dedicated display and temperature control switches. It couldn’t be simpler. The front panel also features a potentiometer to adjust the hot air flow rate.
A classic Aoyue iron.
Soldering iron: the soldering iron calls for no particular comment. With its 60 W output, it is suitable for most common tasks. An extensive assortment of tips is supplied with it, and these are standard “900M” tips, so you’ll have no trouble finding replacements if necessary or if you wish to purchase a tip geometry not included as standard.
The 866 can be used as a regular soldering station.
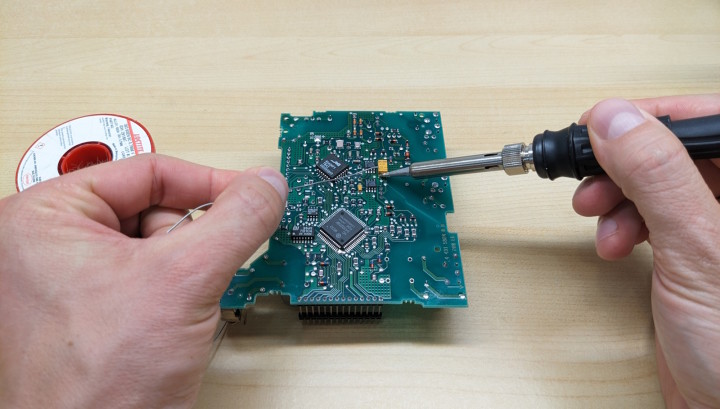
Hot air: it’s perfectly possible to use hot air without using the preheater. The cable connecting the handle to the base is 1.15 m long, giving you enough reach to the PCB you’re working on in the vicinity of the station. The 550 W heating power is sufficient to cleanly rework many small and medium-sized components.
Removing this PLCC package was a breeze.
For more massive components, such as large BGA packages or motherboards with many layers, using hot air alone is not the right strategy. In fact, the power is too low to melt the solder quickly; you have to keep heating for too long, at the risk of damaging neighboring components or the PCB. What’s more, uneven heating can damage and deform the PCB. This is where the preheater comes in handy.
Preheater: Using the preheater makes it easier to tackle difficult situations, thanks to the increased heating power and gentle heat input from below. What’s more, using the hot air by placing the handle in its holder means you can keep your hands free, to hold the tweezers or operate the settings.
The kit comes with six small aluminum brackets, which can be attached to the side rails using sliding nuts and hand screws:
Adjustable PCB holders.
To use this system on all 4 sides, which will give the PCB an excellent hold, please note that the board dimensions must not exceed 180 x 110 mm. If brackets are only used at the front and rear, the preheater can accommodate a board measuring a maximum of 180 x 160 mm. It is also possible to dispense with the clamps and simply place a larger board on top of the preheater. If you do this, there are two points to bear in mind: firstly, the PCB will not be secured, so be careful not to bump it. Secondly, with a large board covering the whole preheater, the natural airflow due to convection is now blocked. The part of the board underneath is therefore in a closed volume and risks reaching a surface temperature higher than the one you anticipate, which might desolder components on the bottom side.
Subscribe
Tag alert: Subscribe to the tag Soldering and you will receive an e-mail as soon as a new item about it is published on our website!
A Matter of Temperature
On the subject of temperature measurement, note that the temperature indicated on the middle display marked “preheater” is a temperature measured by a probe inside the radiant panel itself, not the temperature of the board. It is therefore the user’s responsibility to experiment by trial and error to find what temperature to set the preheater to for best results.
Ready for removing a Broadcom BGA package.
Aoyue supplies an external K-type thermocouple to measure the PCB temperature as close as possible to the component to be reworked. However, it’s not easy to use. There’s only one connector: you can connect either the soldering iron or the thermocouple, but not both. When the soldering iron is off, pressing the corresponding “down” button switches the display to external thermocouple mode. When I used it, it indicated an ambient temperature of 71°C, an error of 47 degrees. At 330°C, the error is 40°C.
Inexplicably, Aoyue has not provided any way to reduce that error by calibration. Conversely, in soldering iron mode, calibration is possible (see manual). I didn’t use it, as the temperature of the iron was correct according to my measurements, as was that of the hot air. So you can either mentally subtract about 40 degrees from the displayed temperature for the external sensor, or use another thermometer you've procured separately. Other than that, the tool works fine. In the following photo, I’m desoldering a chip in a BGA package on a router board.
Ta-daa! Careful, its hot around here.
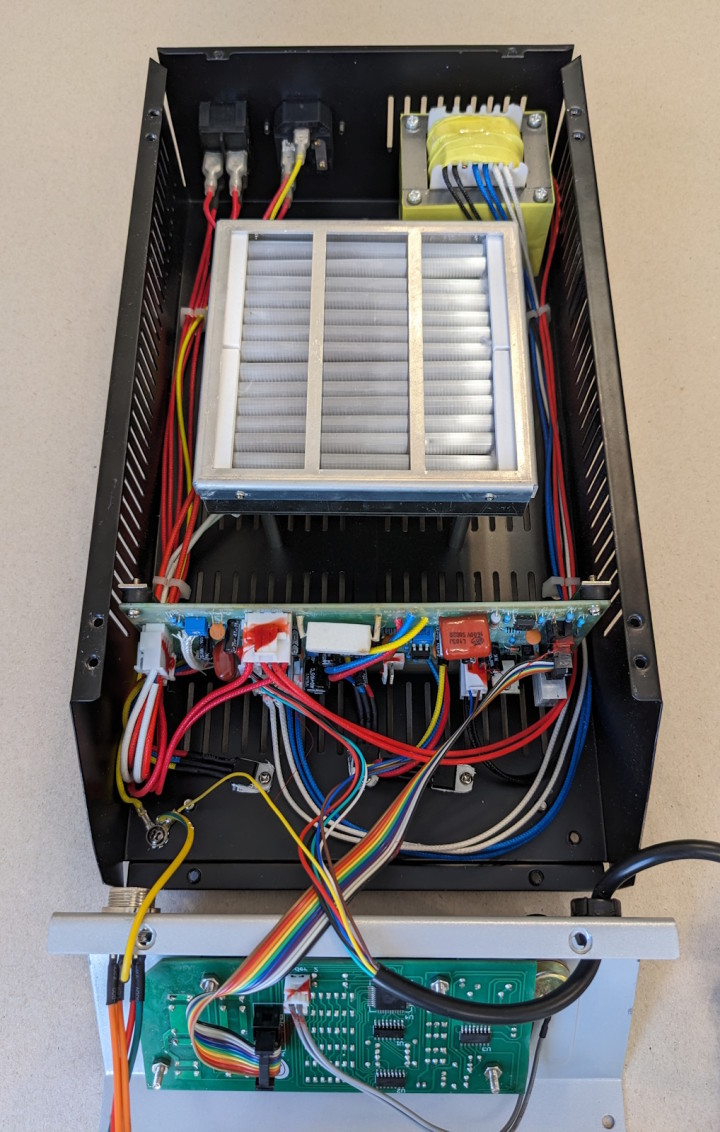
Internal Construction
The construction of the device is simple and robust. All wires running through the central part of the heater have a heat-resistant sheath. Connections are well insulated, the soldering iron transformer looks robust and connectors are secured with glue. Soldering has been carried out correctly. I did note some traces of flux which have not been cleaned up, but which will probably not interfere with operation.
The insides of the Aoyue 866 are simple.
The front panel board uses an ATmega16 from Microchip to manage the user interface and temperature settings, a 74HC595 and two ULN2003s to control the display segments. The main board, on the other hand, is single-sided and made of through-hole components, with BTA20-600 and BTA12-600 triacs accompanied by MOC3021 optocouplers to control the preheater, hot air and soldering iron heating elements.
Who Is It For?
In conclusion, the Aoyue 866 is a good choice for anyone seeking a multipurpose and affordable tool for electronics soldering. It’s well-suited for those looking to repair smartphones and game consoles which have fairly small PCBs. It could be also an option for those interested in trying their hand at low-cost BGA reballing. Note that for this, it will take a lot of training on sacrificial PCBs to get there; specific nozzles are available from Aoyue.
What sets the Aoyue 866 apart is its compact design, making it a space-saving addition to your workshop. It stands out as one of the more affordable options on the market, and the kit is comprehensive and thorough, including all the necessary accessories and even spare parts neatly organized in a little toolbox. Its mechanical and electronic simplicity will give it an advantage in terms of reliability and ease of repair.
Subscribe
Tag alert: Subscribe to the tag Review and you will receive an e-mail as soon as a new item about it is published on our website!
Read full article
Hide full article
About Jean-François Simon
Jean-Francois Simon (Engineer, Elektor) has a longstanding passion for electronics and enjoys topics as varied as circuit design, test and measurement, prototyping, playing with SDRs, and more. He likes to create, modify and improve his tools and other systems... >>
Add a rating to this article
★★★★★
★★★★★
Page 1 / 1
Login
No account yet?Register for free!
Forgot password?
Please enter your email address. Instructions for resetting the password will be emailed to you now.


Discussion (0 comments)