

An AI Code Assistant for Rapid Development
on
Accelerate software development with large language models! This tutorial explores how to leverage the Continue extension for Visual Studio Code, showcasing the benefits of an AI code assistant that excels at autocompleting, rewriting, and explaining code.
Large language models (LLM) like OpenAI’s ChatGPT are often referred to as “autocomplete on steroids” for a variety of programming languages, but they offer much more. While these neural networks essentially predict and complete the text you type, training them on extensive data sets of texts and conversations has resulted in unexpected emergent capabilities. You can even run the LLM entirely on your own hardware, ensuring that you don’t send confidential information to the cloud.
One remarkable capability is their proficiency in coding tasks. You can instruct an LLM to draft a shell script for a one-off task, refactor existing code, shed light on a compilation error, or even generate unit tests. LLMs are especially useful when coding in a programming language that you might not be familiar with. Overall, LLMs can speed up your development, if used correctly.
Even before ChatGPT’s public release in November 2022, Microsoft offered an AI code assistant, GitHub Copilot, built on OpenAI’s large language models. You can use this tool in the company’s free code editor Visual Studio Code through the GitHub Copilot extension. However, GitHub Copilot operates as a cloud-based service, requiring continuous communication with Microsoft’s servers. This can be problematic for developers working on confidential software, as code is sent to external servers.
Fortunately, recent years have seen the advent of smaller LLMs that you can run on your own hardware, provided it’s powerful enough. An NVIDIA GPU with at least 8-GB VRAM is recommended, as these GPUs are particularly suited for running LLMs at accelerated speeds. In this article, I’ll set up an Ollama server for local LLM operation and show how to install and use the Continue extension in Visual Studio Code to instruct the LLM in the background to assist you in various coding tasks.
Running LLMs with Ollama
Ollama is available for Windows, macOS, and Linux. Download the version for your operating system from the Ollama downloads page. Ollama supports NVIDIA and AMD GPUs for accelerated inference. For AMD GPUs, it’s recommended to install the latest AMD Radeon drivers to have access to all features. Moreover, you need to install the AMD ROCm software stack to enable GPU programming. For NVIDIA GPUs, installing the CUDA drivers is necessary.
One of the best LLMs you can run locally for code generation and programming assistance is Mistral AI’s Codestral 22B . It’s trained on a diverse dataset of 80+ programming languages, including Python, Java, C, C++, JavaScript, and Bash. Codestral can complete functions, generate tests, and complete partial code snippets. Download and run the model with 22 billion parameters using the following ollama command: ollama run codestral.
After downloading the 12-GB file, you can start chatting with the model through ollama’s command-line interface. However, this sizable model requires a GPU with a minimum of 24-GB VRAM, or multiple GPUs totaling 24-GB VRAM, for optimal performance and user experience. Note that the model is distributed under the Mistral AI Non-Production License, which restricts its use to non-commercial purposes and research.
If you want to be able to run a coding LLM within 8-GB VRAM, DeepSeek AI’s DeepSeek Coder 6.7B is a commendable option. The model is available in various sizes: 1 billion parameters (1B), 5.7 billion (5.7B), 6.7B, and 33B, allowing you to choose the size best suited to your hardware. Subsequently, DeepSeek Coder V2 was released, coming in 16B and 236B sizes. DeepSeek AI’s models permit commercial use.
To run the 6.7B DeepSeek Coder model, exit the previous Ollama session with /exit and run the following ollama command: ollama run deepseek-coder:6.7b-base. After downloading the 3.8-GB file, you can ask some code generation or explanation questions to the model and compare its speed and utility against Codestral.
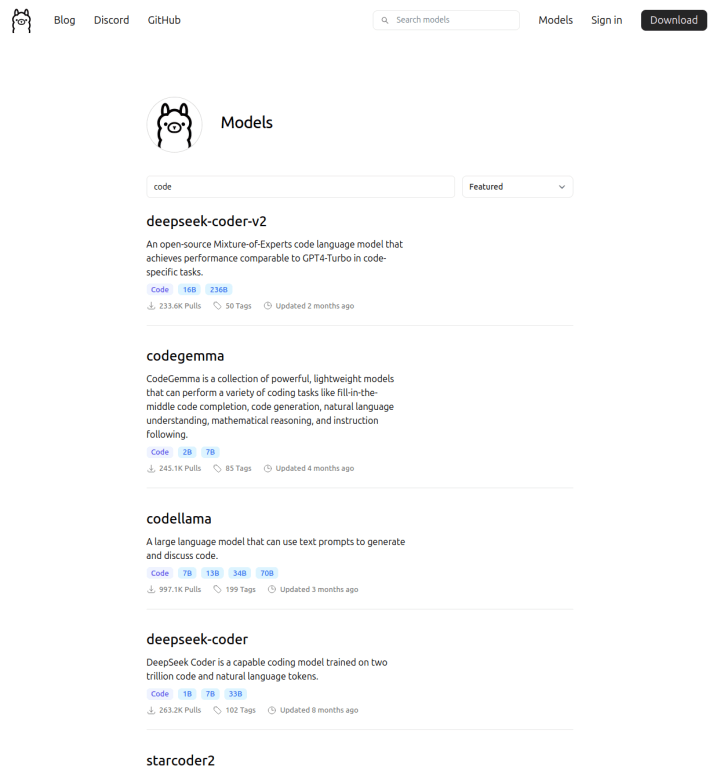
You can find other code-related LLMs in Ollama’s model library (Figure 1). Noteworthy models include Google’s CodeGemma (2B and 7B), Meta’s Code Llama (7B, 13B, 34B, 70B), and IBM’s Granite Code (3B, 8B, 20B, 34B). Always review the model’s license to understand its terms of use.
In the next part, we’ll install an excellent Visual Studio Code extension called Continue. You can configure it to use the LLM best suited to your needs. The selection of compatible LLMs is vast and includes Codestral and DeepSeek. For the purposes of this tutorial, we’ll be using models other than the two just mentioned, to give you a broader overview of the possibilities.
Installing the Continue Extension
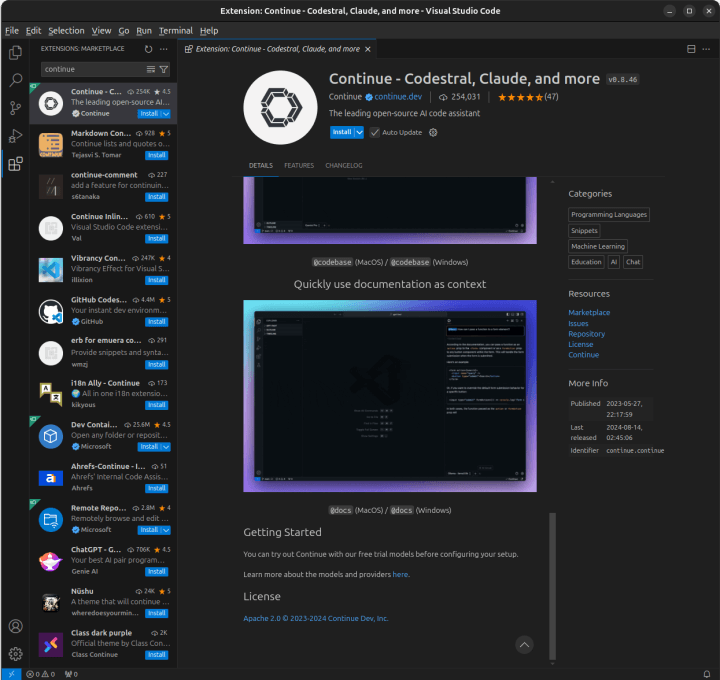
I assume that you’re already running Visual Studio Code; otherwise, download it from its website. Microsoft’s popular code editor is available for Windows, macOS, and Linux. After this, click on the Extensions icon in the side bar (the boxes icon) and search for continue. The extension Continue - Codestral, Claude, and more by the publisher continue.dev should be the first search result. Click on Install to add the extension (Figure 2).
After installation, the extension opens a tab in Visual Studio Code with a welcome message and useful instructions for first-time users. A new icon also appears in the sidebar to interact with Continue. The welcome message recommends moving this icon to the right, allowing you to see both Continue and the file explorer simultaneously. Simply drag the Continue icon from the left sidebar to the right and release it.
Choosing the Models
Continue offers a choice of LLMs, both cloud-based and local ones. For complete local operation, Continue recommends three models: Meta’s Llama 3.1 8B for chat, BigCode’s StarCoder 2 3B for code completion, and Nomic’s Embed for generating text embeddings to be able to query documents. First, download these three models for Ollama:
ollama pull llama3.1:8b
ollama pull starcoder2:3b
ollama pull nomic-embed-text
Once downloaded, click on the gear icon at the bottom right of Continue’s side bar. This opens the extension’s configuration file config.json in an editor tab. Here you can specify the models, following Continue’s configuration documentation. You’ll find various JSON keys within the file. For instance, there’s an empty list of models:
"models": [],
Specify Ollama’s Llama 3.1 model:
"models": [
{
"title": "Llama 3.1 8B",
"provider": "ollama",
"model": "llama3.1:8b"
}
],
Alternatively, setting the model as AUTODETECT allows Continue to query Ollama for all available models, letting you choose the model for chat from a dropdown list. For code completion, specify the model as follows:
"tabAutocompleteModel": {
"title": "StarCoder 2 3B",
"provider": "ollama",
"model": "starcoder2:3b"
},
Finally, specify the model for text embeddings:
"embeddingsProvider": {
"provider": "ollama",
"model": "nomic-embed-text"
},
After this, save your changes.
Regarding model selection, depending on your hardware it is possible that the suggested models Llama 3.1 8B and StarCoder 2 3B can’t fit simultaneously. See the text box “Fitting models in your GPU’s VRAM” for more information on that topic.

Using Continue
When you start developing in Visual Studio Code now, Continue operates in the background, enhancing your workflow. For instance, pressing the tab key while typing a line of code provides a suggestion coming from the code completion model (StarCoder 2 if you followed Continue’s recommendation).
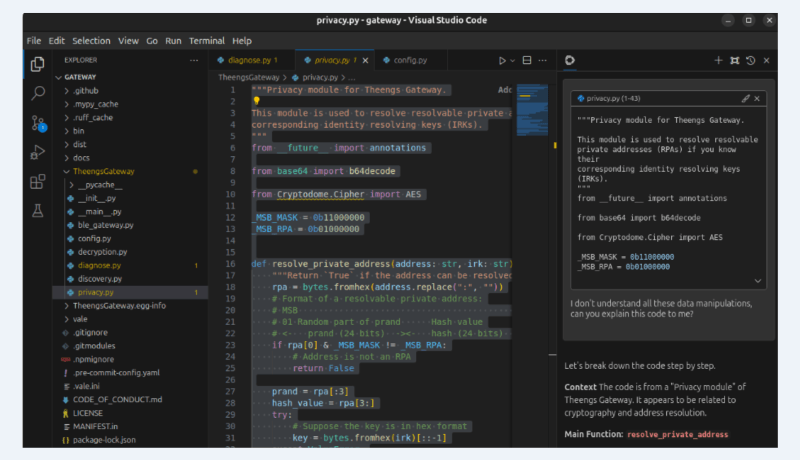
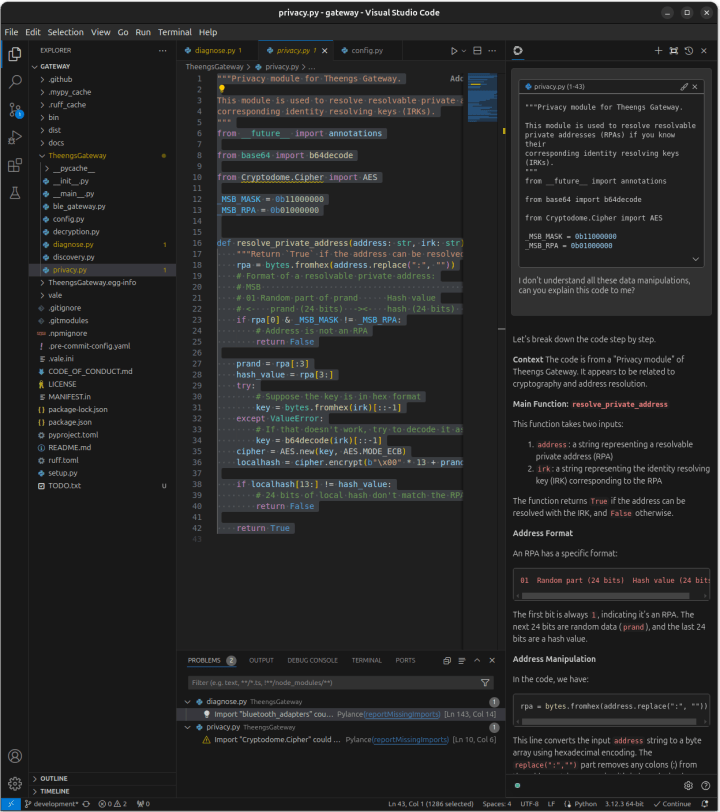
You can also ask questions about code sections. Simply select a block of code and press Ctrl+L (Cmd+L on macOS) to add it to Continue’s sidebar. You can then chat with the default model about this code (Llama 3.1 if you followed Continue’s recommendations), for example, asking it to explain the code (Figure 3). You can always ask follow-up questions and have a conversation with the model.
If you ask the model to rewrite some parts of your code, it replies with a code block. Hovering with your mouse cursor over the code block reveals icons to copy the code, insert it at the cursor’s position, or apply the suggested changes to the current file.
You can also let Continue directly edit code within the code editor. Select the part of the code you want to modify, press Ctrl+I (Cmd+I on macOS), and then instruct the model what you want to change. This is useful for refactoring, adopting a new approach, or adapting code to a new API. For each changed block of code, Continue displays a diff with buttons to accept or reject the changes. You can also press Ctrl+I again for additional instructions until you’re satisfied with the model’s edits.
The assistant can help fix errors, too. Running your code in Visual Studio Code’s terminal and encountering an error? Pressing Ctrl+Shift+R (Cmd+Shift+R on macOS) lets Continue feed the question “I got the following error, can you please help explain how to fix it?” followed by the actual error message from the terminal to the LLM. The model then replies with a potential solution. Try its suggestion, and if it doesn’t work, and you get an error again (the same or another one), just press Ctrl+Shift+R again to ask for help.
Adding Context
Until now, you’ve been using LLMs on selected parts of your code. However, you can also add context by one of Continue’s built-in context providers, which allow you to use the LLM more effectively. During any conversation with the LLM, type @code to reference specific functions or classes from throughout your project, without having to select them. With @problems you can refer to the problems that Visual Studio Code shows for your currently opened code file, such as syntax errors.
Continue also indexes the codebase you’re working on, allowing it to automatically pull in the most relevant context from throughout your workspace when answering general questions. Just type @codebase followed by your question to provide this context. It’s best to start a new session for this, which you can do by clicking on the + icon at the top right of Continue’s sidebar.
When the LLM answers your query with the @codebase context, it shows the context items it uses as “X context items”. If you click on it, a list of the precise files and lines unfolds that the LLM is using as context for its answer. In its answer, it also refers to the relevant files. This works well for general questions, like how to add a new configuration option, how to implement a subclass using another subclass as an example, or how to add command-line parameters using Python’s argparse module. You can also use @folder to ask questions about a specific folder within your project, instead of using the entire codebase as context.
If you’re developing a more than trivial program, you often have multiple source files open in Visual Studio Code. You can refer to the contents of all your open files with @open. When asking your question within this context, this should result in more relevant answers. However, the @open context provider isn’t enabled by default. You need to add the following entry to Continue’s config.json file in the contextProviders list:
{
"name": "open",
"params": {}
},
Another useful context provider is @terminal, which references the contents of Visual Studio Code’s terminal. And with @diff you refer to all the changes you’ve made in your current Git branch. This way, you can ask the LLM for a review of your work before committing your changes to the project’s Git repository.
External Context
Continue can incorporate external sources into LLM context as well. For instance, referencing a specific GitHub issue within LLM queries is possible by typing @issue. Enable this context provider with the following entry in Continue’s configuration file:
{
"name": "issue",
"params": {
"repos": [
{
"owner": "theengs",
"repo": "gateway"
}
],
"githubToken": "github_pat_xxx"
}
},
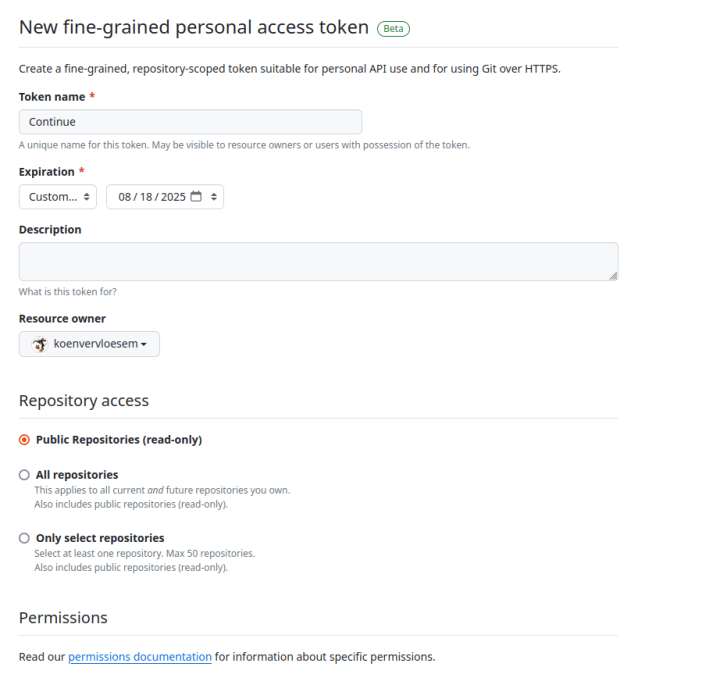
Note that you need to explicitly specify the repositories you want to be able to refer to. It’s also recommended to include a GitHub personal access token to avoid being rate-limited. When creating the access token on GitHub’s website, giving just read-only access to public repositories is enough (Figure 4). Copy the access token immediately and paste it in Continue’s configuration file because it’s only visible once.
Another useful context provider is @docs, which is enabled by default. Continue pre-indexes a number of common documentation sites, most of them about web development technologies, but also the official Python documentation and Rust documentation and the C# language reference. Just start typing @docs, choose the documentation site from the dropdown menu or type the name of the project, and then after selecting the project ask your question with this documentation site as context.
You can also add any documentation site by selecting Add Docs in the dropdown menu that appears after typing @docs. Just enter the root URL of the documentation site and the name of the project. This is useful to add the documentation of the major libraries you’re using in your project, so the LLM is aware of it when asking questions.
Built-In Commands
Continue also has some handy built-in slash commands. Simply select a block of code, press Ctrl+L to start a session with the LLM, and enter /edit followed by instructions to edit the code. Continue shows the suggested changes in a side-by-side diff editor to accept or reject individual changes.
Another command is /comment, which prompts the LLM to comment the selected code. The /commit command generates a commit message from the current Git diff with changes in your code, and /cmd generates a shell command based on your instructions and pastes it into Visual Studio Code’s terminal. You only need to review and adapt the command and then press enter to execute it.
You can also create custom slash commands, using either TypeScript code or LLM prompts. By default, Continue includes one custom command using a prompt:
"customCommands": [
{
"name": "test",
"prompt": "{{{ input }}}\n\nWrite a comprehensive set of unit tests for the selected code. It should setup, run tests that check for correctness including important edge cases, and teardown. Ensure that the tests are complete and sophisticated. Give the tests just as chat output, don't edit any file.",
"description": "Write unit tests for highlighted code"
}
],
The {{{ input }}} is a placeholder for the selected code. Then come two newlines (\n), followed by the prompt to the model. You can customize this to your liking. Then just select your code that you want to be tested, press Ctrl+L and type /test. Refine the results through follow-up questions if necessary.
Code Assistant at All Times
Continue allows you to have a code assistant available at all times without relying on cloud services or needing to pay for API access. In my experience, having a GPU with 8-GB VRAM is really the minimum to be able to run some usable LLMs to assist with coding. LLMs are steadily improving, and even though they make errors, Continue’s seamless integration with Visual Studio Code makes using LLMs as code assistants quite user-friendly. There’s no need to switch between your editor, an LLM chat site, and documentation sites anymore. Experiment to find the most suitable models for your use cases and available hardware, and you’ll have some powerful tools at your disposal to speed up your development.
Editor's note: The article, "A Powerful AI Code Assistant" (240448-01) appears in Elektor March/April 2025.


Discussion (0 comments)