Differential Probe Power Supply
May 10, 2019
on
on
An ultra-simple power solution using USB
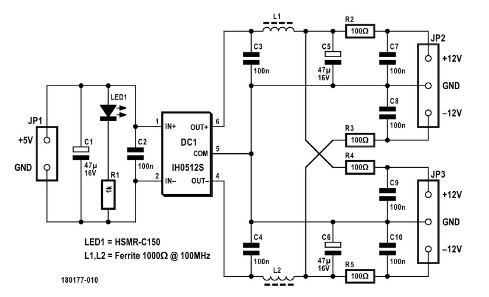
In his article published in the July & August 2016 issue, Elektor author Alfred Rosenkränzer presented a wonderfully simple differential probe for oscilloscopes, based around the AD8479 precision differential amplifier. I built one of them immediately and found it particularly suitable for measurements in the audio range, for example. But one small detail was not covered in this article: the power supply used for the probe (or for several of them). Practically all modern oscilloscopes have a USB port on the front panel for data output. Since the power consumption of a probe is very low, it makes sense to use this socket to power the probe. Figure 1 shows the schematic of the circuit I decided upon.
A standard USB cable is used to connect the probe power supply to the USB outlet on the oscilloscope; the type is unimportant, as even a charging cable is adequate. C1 and C2 filter the DC voltage from the USB port and LED1 indicates that the power is on. The heart of the circuit is the DC-DC converter type IH0512S from XP Power. It generates symmetrical ±12 V from +5 V with a maximum output current of ±84 mA, and it is galvanically isolated (with an electrical barrier between the input and output to improve safety)! The isolation voltage is 1,000 V, meaning there should be no ground problems when making measurements. The output voltage is filtered using various capacitors and ferrites, which can be omitted when working at the AD8479’s maximum measurement frequency of 130 kHz or replaced by 0-Ω resistors or wire straps.
To connect Rosenkränzer-type probes, I used 3.5-mm stereo jack sockets. These connectors are nice and compact, although they do have the disadvantage that their contacts are short-circuited momentarily when the jack plugs are inserted. In order to prevent damage, 100-Ω resistors are provided in each output circuit. Since the total current consumption of a probe is in the range of a few milliamperes (the AD8479 datasheet indicates about 850 µA; the only additional current drawn is by the operating voltage indicator LEDs D5 and D6), the voltage drop arising across these resistors is not a problem.
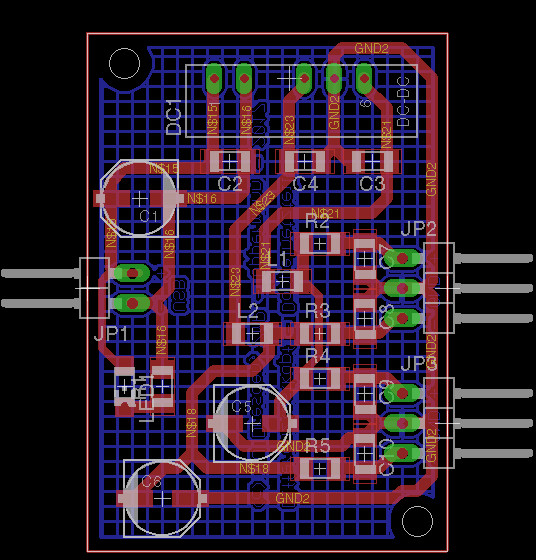
The circuit was built on a small piece of double-sided board, mainly with SMDs, with the underside used only as a ground plane. The smallest SMD package used is 1206, which is still perfectly easy to solder by hand. Figure 2 shows the layout that I created in Autodesk Eagle, which can be downloaded below (see Attachment).

The PCB fits inside a small, translucent blue plastic enclosure from Hammond Manufacturing (type 1551RTBU). The photos show a few installation and operation impressions.
Lastly a tip. In my own setup I used types 78L09 and 79L09 (i.e. ±9 V) voltage regulators for IC2 and IC3 of the probes, to increase their measuring range to ±8.7 V.
(180177)
➔ Do you want to read more ElektorLabs articles? Become an Elektor member now!
Read full article
Hide full article


Discussion (2 comments)
parveen kumar 5 years ago
admob account kaise banaye
Taetz 5 years ago
Hello Mr. Oppermann,
thanks for your friendly mentioning of my probe.
Since the bandwidth of the AD8479 is limited to 130 KHz I developed a new probe with the AD8421 which gives you 6 MHz at a gain of 2. More gain is possible, but with less bandwidth.
I just ordered blank boards. If you are interested (or somebody else) I am happy to send you more information.
There is also an analog power supply board available to power up to 4 probes.
My Email: alfred_rosenkraenzer@gmx.de
Best regards
Alfred