Solar-Powered LoRa Node Project: A Modular, Compact, and Versatile IoT Solution
on

Autonomously operating sensor nodes need wireless communication as well as an autonomous source of power. This article introduces you to a battery-powered Internet of Things (IoT) node, buffered by a solar cell, with LoRaWAN connectivity. We focus on the power supply and monitoring the different voltages remotely via Bluetooth and LoRa. But as many different sensor modules are available and there is also good software support, you can adapt the solar-powered LoRa node project easily to your specific needs.
I use the WisBlock ecosystem manufactured by RAKwireless to build a solar-powered LoRa-Node suitable for connecting sensors. The RAK19007 WisBlock Base Board 2nd Gen is a good approach to use as a baseboard for the controller board WisBlock Core and different sensor modules. The RAK4631-R is a low-power WisBlock Core based on an nRF52840 MCU from Nordic Semiconductor and a SX1262 LoRa chip from Semtech, offering Bluetooth Low Energy (BLE) as well as LoRaWAN connectivity. (Refer to the “LoRa and LoRaWAN” text box.)
The RAK4631-R is equipped with the RAKwireless Unified Interface V3 (RUI3), significantly simplifying software creation for IoT nodes. I use the RUI3 API for application programming. Furthermore, I demonstrate the configuration of the IoT device with the WisToolBox app. You can find further information about the WisBlock ecosystem on the RAKwireless website and in my e-book, IoT-Projects for Makers, including an introduction and application examples.
LoRa and LoRaWAN
LoRa, short for Long Range, is a wireless communication technology that enables long-range data transmission with low power consumption, making it ideal for IoT applications. LoRaWAN is a protocol built on top of LoRa, providing a standardized and scalable way to manage the connectivity of LoRa devices over long distances. Together, LoRa and LoRaWAN enable low-power, wide-area networking solutions for various applications. This is a very exciting technology and I will showcase it in this article.
Power Supply
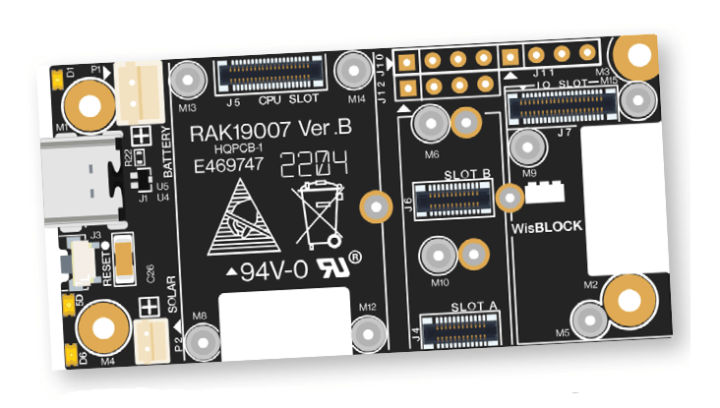
The RAK19007 is a WisBlock Base Board 2nd Gen that connects different WisBlock Modules. It provides a USB Type-C connector, connectors for power supply, and interconnection to the modules attached. Figure 1 shows a top view of a RAK19007. The section on the far left shows the available powering options with JST connectors for solar and battery and the USB-C for powering and program upload. The module supports low-power battery power supply, lithium (LiPo) battery charging, and solar panel charging of a connected LiPo battery.
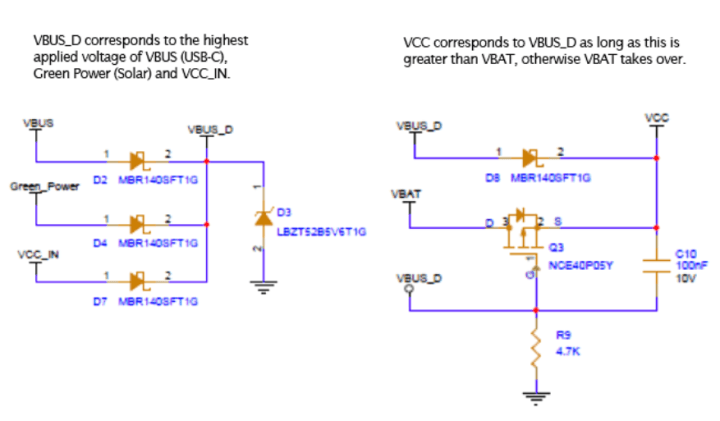
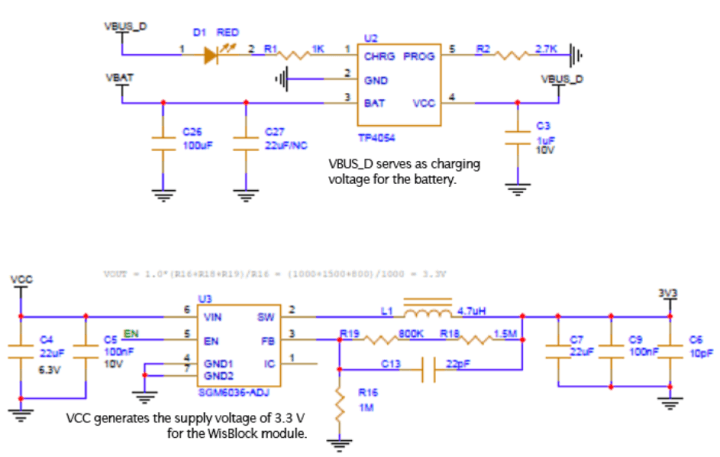
Figure 2 shows the main parts of the power supply of a RAK19007. Three possible supply voltages for RAK19007 are VBUS from USB-C, Green Power from a solar cell, and an external voltage VCC_IN. The source with the highest voltage is switched to VBUS_D. As long as VBUS_D is greater than the battery voltage VBAT, VBUS_D determines the VCC voltage. If VBUS_D is lower or non-existent, then VBAT determines the input voltage for generating the system voltage of 3.3 V for the WisBlock modules, including WisBlock Core, by an SGM6036 ultra-low power step-down converter.
Power Management
The RAK19007 does not have a power management system like AXP192 or similar; therefore, only the available voltages can be used to check the LiPo battery’s charge level. The battery voltage VBAT is measured via a voltage divider available on analog input AIN0. The analog input AIN1 is available on J11 Header for measuring the Green Power voltage. A voltage divider is required there, too. In a practical test, I will record the two voltages Vsol and Vbat and use them to form the quotient State = Vsol/Vbat. If State > 1, the battery is charged, and the solar cell supplies the device. If State < 1, the battery must source the device and will be discharged.
Using the RAKwireless Unified Interface V3 (RUI3), creating an IoT application with custom firmware is easy. The corresponding code to get the values of the voltages Vsol and Vbat is as follows:
float Vsol = readADC(AIN1);
float Vbat = api.system.bat.get();
float State = Vsol/Vbat;
Setup
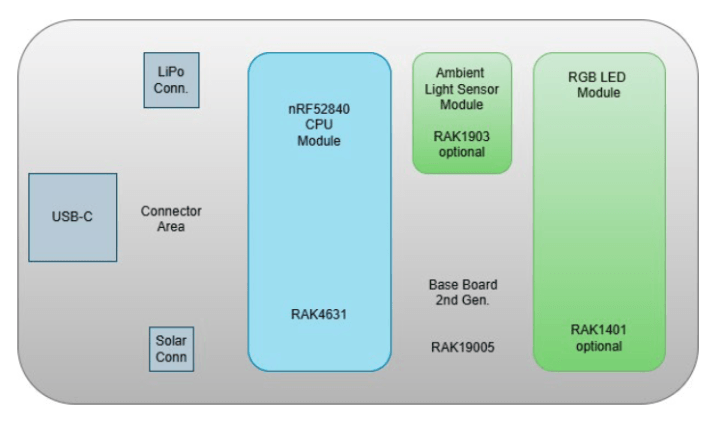
With the RAK4631-R_Sensor-Test.ino program, I first tested the internal ADC as well as the modules RAK1903 (Ambient Light) and RAK14001 (RGB LED) (block diagram in Figure 3). You can find this program on my GitHub repository. The RAK1903 WisBlock Ambient Light Sensor Module is intended to provide information about the evolution of ambient light during the day. With the RGB LED, the RAK14001 offers a signaling option beyond the blue and green LEDs on the baseboard. Both modules are optional and are not required for the intended purpose of the article.

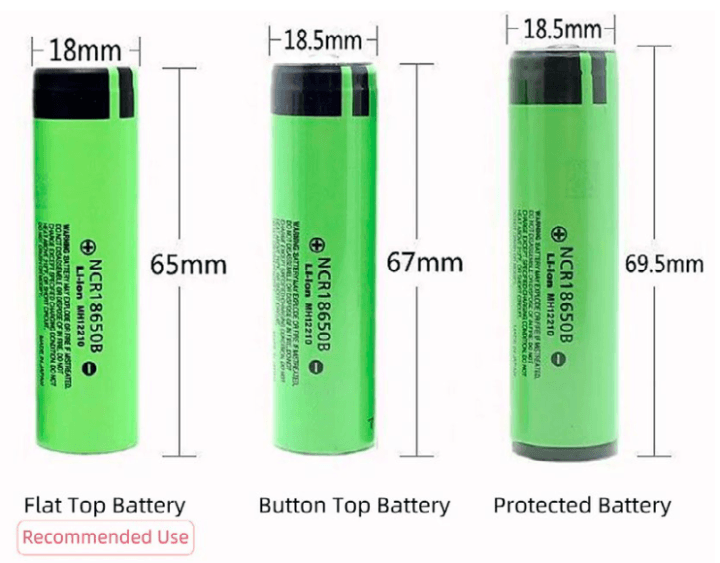
I use a RAKBox-B5 Transparent Acrylic Enclosure to safely operate the test device while keeping in mind that this enclosure is not weatherproof (Figure 4). One advantage is that this enclosure already has a battery holder for an 18650-sized LiPo. I like to use this type of LiPo battery because it is more easily manageable than other formats of LiPo batteries due to the shape of the case. LiPo batteries of type 18650 are available with different capacities. You can find an overview of various types/manufacturers here. The battery holder used here is made for a “short” LiPo battery. Pay attention to Figure 5, which shows the different variants of 18650 LiPo batteries.
Solar Panel
In the battery tests published here, a LiPo battery with 3500 mAh and a discharge current of 1000 mA to a voltage of 2.5 V achieves a runtime of 200 h. Roughly estimated, a discharge current of 1 mA could be sustained for an expected runtime of 138 days. Reducing the current consumption means the IoT node must spend most of the time in sleep mode and may wake up for measuring and data transmission only. To ensure the autonomous operation of the IoT node over a specific time, the discharge of the battery must be balanced. The RAK19007 baseboard can recharge the battery by connecting it to a solar cell when there is sufficient sunlight. A revolt MicroUSB solar panel is a simple way to conduct solar buffering (Figure 6).

The revolt MicroUSB solar panel shown in Figure 6 consists of monocrystalline solar cells with high efficiency and long life. It provides an output voltage of 5 V at a charging power solar panel of 5 W. The cable length is 3 m. The flexibly alignable mounting bracket and the IP65 protection class of the housing provide good primary conditions for outdoor installation. Due to the 3.3 V system voltage of the used RAK4631 core module, we need a voltage divider to measure the solar cell’s voltage.

For this purpose, I use a microUSB breakout board, as shown in Figure 7, to add the voltage divider. Vsol and GND go to the JST connector on the RAK19007 baseboard. The voltage VAIN1 goes to the analog input AIN1 on the J11 header. Figure 8 shows the complete test equipment for monitoring the solar cell and LiPo battery voltages.

Application Programs
The application program has to query the solar cell and LiPo battery voltages and transfer the results wirelessly. To reduce the device’s current consumption, the RAK4631 core should sleep most of the time. Using the RUI3 API, the switch to sleep is not complex to implement. The application programs introduced in the following chapters differ from standard Arduino programs. The function loop() usually contains all functionality repeated endlessly. Here, the loop() function puts the RAK4631 core to sleep only. A timer-controlled handler runs all the functionalities of the active phase. I built two versions of the application. One version transfers the measuring results via BLE UART, and the second via LoRaWAN.
BLE Application
After initialization by setup(), a timer-controlled handler queries the voltages and stores the collected readings into a data packet outputted serially via BLE. As mentioned, the loop() function puts the RAK4631 core back to sleep. You can find the program RAK4631-R_Sleep_Test_BLE.ino on GitHub here. During the sleep period, I measured the current consumption on a source voltage of 3.8 V of 270 µA. To visualize the data received by BLE, I use the Android app Serial Bluetooth Terminal 1.46 by Kai Morich, available in the Google Play Store.
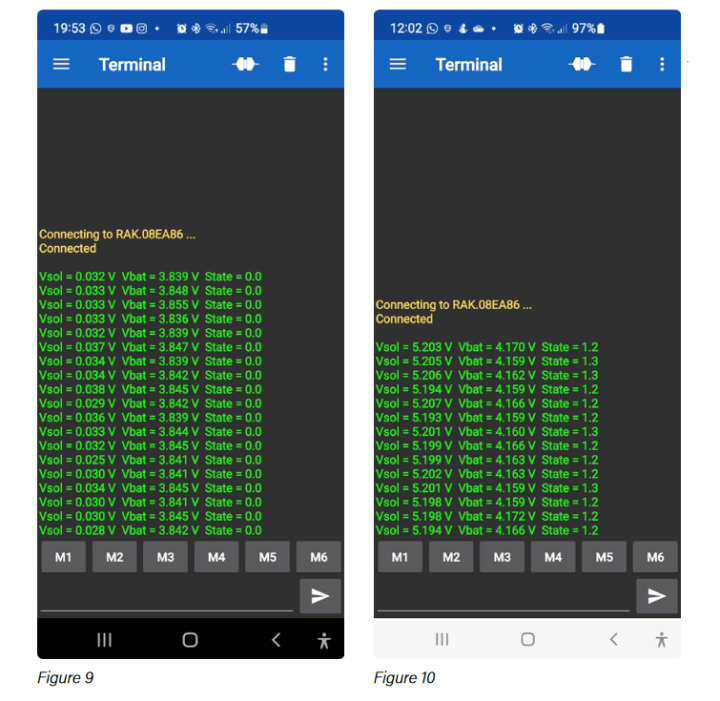
Figure 9 shows the voltage status after power-on in the evening. The State < 1 means the battery powers the device and will be discharged. The next day was sunny in October, we had a State > 1, and the solar cell delivered enough voltage to power the device and recharge the battery (Figure 10).
LoRaWAN Application
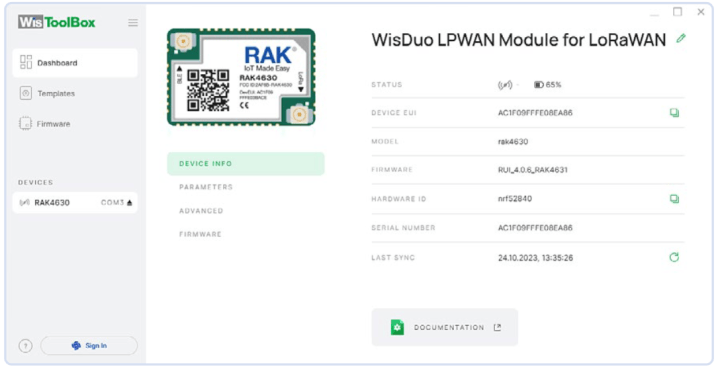
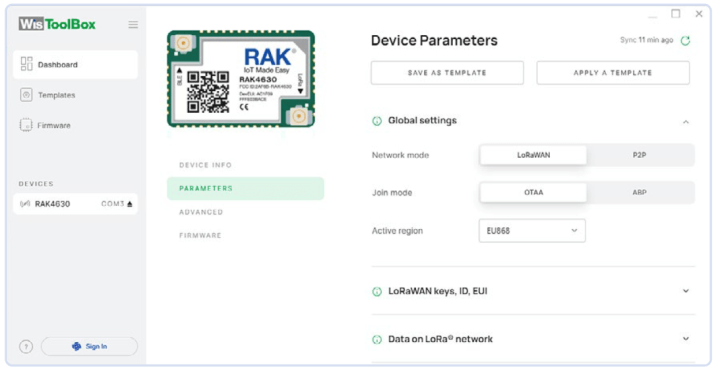
Before programming the LoRaWAN application, I used the WisToolBox desktop app to configure the RAK4631 core. The WisToolBox desktop app communicates with the WisBlock devices via USB, and after selecting the correct USB port and the RAK4631 core module, we can see the device info on the dashboard (Figure 11). You can set all parameters required for LoRaWAN configuration via the menu parameters, as shown in Figure 12 and Figure 13.
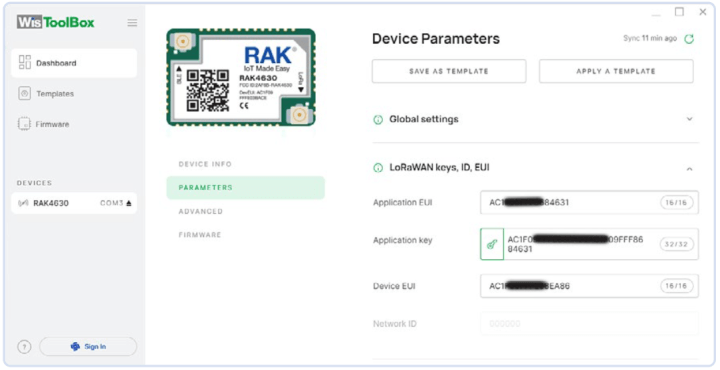
Parameters set in WisToolBox are sent to the RAK4631 core and stored in Flash memory. In the application program, their setup is no longer necessary. In my program, available on GitHub, RAK4631-R_Sleep_Test_LoRaWAN.ino, I still used the traditional way by explicit declaration. During the sleep period, I measured the current consumption on a source voltage of 3.8 V of 235 µA.
The Things Stack
Here I will be using The Things Stack Sandbox (TTSS) cluster for Europe (eu1), formerly The Things Stack (Community Edition, TTSCE), as a LoRaWAN network server (LNS). The clusters are meant for non-commercial, small-scale testing and experimentation and manage the connectivity of LoRaWAN devices. It is freely available and open-source, making it accessible for anyone to use and modify, and is supported by The Things Network.
TTSS requires registration of my device; the LoRaWAN keys, etc., shown in Figure 12 are required for registration. You can also find details on TTSS as a LoRaWAN Network Server, and Datacake as a visualization tool, in my other book titled Develop and Operate Your LoRaWAN IoT Nodes i>. On TTSS, a Fair Use Policy applies, which limits the uplink airtime to 30 seconds per day (24 hours) per node and the downlink messages to 10 messages per day per node. The payload and the frequency of the upload determine the uplink airtime. You get detailed information about the possible upload frequency with the help of an Airtime calculator.
With a payload of five bytes and a data rate DR5 (SF7BW125), the resulting airtime calculates to 51.5 ms. Between two uploads, there must be a time of 148.2 seconds minimum to comply with the fair use policy. The upload time in the application program is 5 min. After successfully registering and starting the application, the TTSS console shows the received uplink messages (Figure 14). The payload decoder used is also available on GitHub.

Results
The event details of this console output are listed in Listing 1, which shows that the specifications are met. Bandwidth, spreading factor, and the resulting airtime are as expected and marked bold.
Listing 1: The console output.
"settings": {
"data_rate": {
"lora": {
"bandwidth": 125000,
"spreading_factor": 7,
"coding_rate": "4/5"
}
},
"frequency": "867100000",
"timestamp": 4014400019,
"time": "2023-10-25T13:28:28.098315Z"
},
"received_at": "2023-10-25T13:28:28.116904692Z",
"consumed_airtime": "0.051456s",
"version_ids": {
"brand_id": "rakwireless",
"model_id": "wisblock-4631",
"hardware_version": "1.0",
"firmware_version": "1.2.0",
"band_id": "EU_863_870"
},
To visualize the data received by the LoRaWAN Network Server, I use Datacake, which can easily integrate with TTSS. Study the online documentation or the examples in the book mentioned above. After that integration, you can create a Datacake dashboard similar to Figure 15.
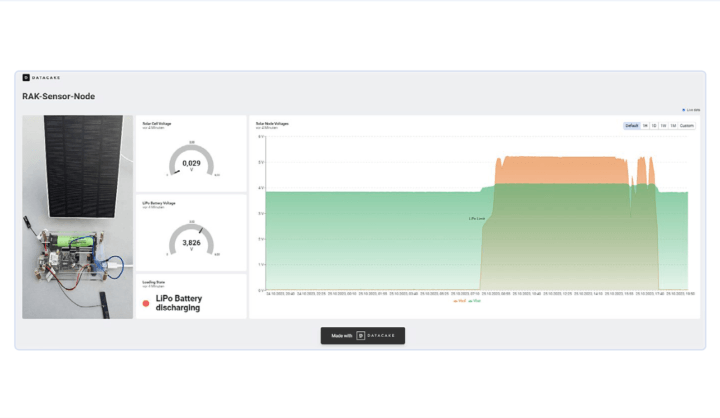
You can see the actual voltages of the solar cell and the LiPo battery and the progress of these voltages over one day. During the day, the solar cell delivers current to load the LiPo battery. The solar cell’s voltage falls below the LiPo early in the evening. Then, the battery powers the node and will be discharged naturally. The test ran over several weeks and showed that the IoT node worked reliably even under less favorable weather conditions in the fall and winter.
This article (230668-01) appears in Elektor September/October 2024.


Discussion (0 comments)