
4” TFT Analog-GPS clock on Arduino
Nothing can be compared when you can put your hard work to display on a 4” TFT display- From one end to the other end it's 480*360 pixel to play with.
4” TFT Analog-GPS clock on Arduino
Every electronic hobbyist dreams to display his work on display – be it LCD, GLCD (64*128), OLED or TFT . LCDs are the oldest type of displays. If putting your work on LCD or GLCD is great then putting it on OLED is certainly greater but nothing can be compared when you can put your hard work to display on a 4” TFT display. From one end to the other end it's 480*360 pixel to put up with and it's very very impressive.
The latest Chinese TFT displays are very cheap and works perfectly with Arduino & Raspberry Pi. The TFT ILI9488 display costs about $8 on aliexpress.com. There are two varieties available one with 26 pins 13*2 DIL and the other is with pins aligned exactly to sit on an UNO board.
See pic:
Raspberry Pi style – Good for making compact design. Like my Tambola on Arduino game.
Pic-1: Raspi type display
Pic-2: Raspi type pin position
Pic-3: Arduino type display
Arduino style – Directly sits exactly on an Arduino UNO board. The major disadvantage is that once it sits on an UNO board one can hardly use any other GPIO pins for other usages. Both these styles I've used for creating art works on Arduino & Raspberry Pi. The Arduino type has an extra SDCard attached and gets connected to the SPI (D-10,11,12,13) pins when inserted.
Hurdles: The main hurdles that I faced with these type of displays is that they are not common and all are made by mcufrends.com. Fortunately the mcufriends.com itself has made and freely distributed the MCUFRIEND_kbd.h header files which works out of the box for these displays and many other type of similar displays. The other header file that are required for this displays are Adafruit_GFX.h [both these header files are added in the archieve]
Pin connections of the TFT shield:
While the pin connections of the Arduino type is pretty clear and straight forward the same on Raspberry Pi type is not clear at all. However, here's my hard work for you to make your life easy ! [See the connection diagram for both the types]
TFT Pin (Arduino UNO type shield)
[ 3.5” TFT display ]Arduino Pin
RD -> A0
WR ->A1
RS -> A2
CS ->A3
RST ->A4
D0 ->D-8
D1 ->D-9
D2 ->D-2
D3 ->D-3
D4 ->D-4
D5 ->D-5
D6 ->D-6
D7 ->D-7
3.3 volt ->3.3 volt
Gnd -> Gnd
5 volt ->5 Volt
While the Arduino type shield is fairly easy to connect but difficult to attach other devices , the Raspberry Pi type shield is little difficult to find out the pin details but it has extremely easy & compact interface while fitted up . Here's the 26 pin DIL pin details which will go to the same pins of Arduino.
Raspberry Pi type Shield (pin detail)
See picture
These shields are basically for 3.3 volt operations. But upto 5 volt it works , However, prolong operation on 5 volt is not recommended as it gets heated up profusely. In case you want to free some other Arduino pins then you look into the mcufriend_shield.h file and re-write the connections as I shifted some connections to alternate pins.
*The Arduino UNO type shield comes with an SPI connected SDCard too.
Construction: The possibilities are limitless when you can tie up the display so easily. Here's a GPS ana-digital clock with temperature indicator built with the following Bill Of Materials.
01. 3.5” TFT display – (mcufriend.com): $8
02. Arduino UNO (clone) - $3
03. GPS receiver - $9
04. LM35/TMP36 - - $1
–-------------------------------------------------------------------------------------
The connections are easy as shown in the schematic diagrams. Since all the top portion of the UNO is covered by the TFT shield, the connections for the LM-35, GPS receiver is taken from the bottom side of the UNO shield.
Software: This is real fun ! With small strokes of code the TFT behaves differently and opens up many different ways of displaying the output. Creating a thick line, making the hands move smoothly was real challenge as the Adafruit_GFX is not so much developed but a look back to the high school trigonometry is all that you need to make it all happen for you.
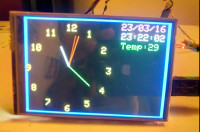
Operation: The present GPS receivers which have a built in patch antenna on top ,can locate the LEO GPS satellite very easily if you have your windows are open or glass covered. The moment it locates 2 such satellites ,the time starts ticking on the analog dial. At the same time the time is shown digitally on the right side with the temperature display at the bottom. For temperature sensor I've used a TMP36 sensor which works on 3.3 volt. However, an LM35 can also be used but you have to have 5volt supply for that.
Schematic:
Pic-4
My Prototype:
my-proto1.jpg
my-proto2.jpg
Software:
Header files:
Find a small video here:
https://www.youtube.com/watch?v=XcySk6jQQas
Bye, bye
S. Bera
Vindhyanagar
Every electronic hobbyist dreams to display his work on display – be it LCD, GLCD (64*128), OLED or TFT . LCDs are the oldest type of displays. If putting your work on LCD or GLCD is great then putting it on OLED is certainly greater but nothing can be compared when you can put your hard work to display on a 4” TFT display. From one end to the other end it's 480*360 pixel to put up with and it's very very impressive.
The latest Chinese TFT displays are very cheap and works perfectly with Arduino & Raspberry Pi. The TFT ILI9488 display costs about $8 on aliexpress.com. There are two varieties available one with 26 pins 13*2 DIL and the other is with pins aligned exactly to sit on an UNO board.
See pic:
Raspberry Pi style – Good for making compact design. Like my Tambola on Arduino game.
Pic-1: Raspi type display
Pic-2: Raspi type pin position
Pic-3: Arduino type display
Arduino style – Directly sits exactly on an Arduino UNO board. The major disadvantage is that once it sits on an UNO board one can hardly use any other GPIO pins for other usages. Both these styles I've used for creating art works on Arduino & Raspberry Pi. The Arduino type has an extra SDCard attached and gets connected to the SPI (D-10,11,12,13) pins when inserted.
Hurdles: The main hurdles that I faced with these type of displays is that they are not common and all are made by mcufrends.com. Fortunately the mcufriends.com itself has made and freely distributed the MCUFRIEND_kbd.h header files which works out of the box for these displays and many other type of similar displays. The other header file that are required for this displays are Adafruit_GFX.h [both these header files are added in the archieve]
Pin connections of the TFT shield:
While the pin connections of the Arduino type is pretty clear and straight forward the same on Raspberry Pi type is not clear at all. However, here's my hard work for you to make your life easy ! [See the connection diagram for both the types]
TFT Pin (Arduino UNO type shield)
[ 3.5” TFT display ]Arduino Pin
RD -> A0
WR ->A1
RS -> A2
CS ->A3
RST ->A4
D0 ->D-8
D1 ->D-9
D2 ->D-2
D3 ->D-3
D4 ->D-4
D5 ->D-5
D6 ->D-6
D7 ->D-7
3.3 volt ->3.3 volt
Gnd -> Gnd
5 volt ->5 Volt
While the Arduino type shield is fairly easy to connect but difficult to attach other devices , the Raspberry Pi type shield is little difficult to find out the pin details but it has extremely easy & compact interface while fitted up . Here's the 26 pin DIL pin details which will go to the same pins of Arduino.
Raspberry Pi type Shield (pin detail)
See picture
These shields are basically for 3.3 volt operations. But upto 5 volt it works , However, prolong operation on 5 volt is not recommended as it gets heated up profusely. In case you want to free some other Arduino pins then you look into the mcufriend_shield.h file and re-write the connections as I shifted some connections to alternate pins.
*The Arduino UNO type shield comes with an SPI connected SDCard too.
Construction: The possibilities are limitless when you can tie up the display so easily. Here's a GPS ana-digital clock with temperature indicator built with the following Bill Of Materials.
01. 3.5” TFT display – (mcufriend.com): $8
02. Arduino UNO (clone) - $3
03. GPS receiver - $9
04. LM35/TMP36 - - $1
–-------------------------------------------------------------------------------------
The connections are easy as shown in the schematic diagrams. Since all the top portion of the UNO is covered by the TFT shield, the connections for the LM-35, GPS receiver is taken from the bottom side of the UNO shield.
Software: This is real fun ! With small strokes of code the TFT behaves differently and opens up many different ways of displaying the output. Creating a thick line, making the hands move smoothly was real challenge as the Adafruit_GFX is not so much developed but a look back to the high school trigonometry is all that you need to make it all happen for you.
Operation: The present GPS receivers which have a built in patch antenna on top ,can locate the LEO GPS satellite very easily if you have your windows are open or glass covered. The moment it locates 2 such satellites ,the time starts ticking on the analog dial. At the same time the time is shown digitally on the right side with the temperature display at the bottom. For temperature sensor I've used a TMP36 sensor which works on 3.3 volt. However, an LM35 can also be used but you have to have 5volt supply for that.
Schematic:
Pic-4
My Prototype:
my-proto1.jpg
my-proto2.jpg
Software:
Header files:
Find a small video here:
https://www.youtube.com/watch?v=XcySk6jQQas
Bye, bye
S. Bera
Vindhyanagar
Discussion (7 comments)
ranpath22 3 years ago
Thank you very much for posting this exciting project. Is there way to to update the code to automatically adjust for daylight saving time in Australia(Melb/Syd time).
Thanking you in advance
ranpath22 3 years ago
Thank you for the reply I am actually trying to update the time automatically to our daylight saving time.Every first sunday of April we change the time UTC+ 10 hours and on the first sunday of October we go back to UTC+11.Is there a way to do this automatically in your clock?
Also I am having a small issue with the clock the hour hand hand minuite hand blinks with every second is there away to fix this issue? I am guessing this is refresh issue?
thank you very much
Regards
Sam
bera 3 years ago
What you need to do is adjust brightness of the TFT screen. tft.setBrightness (x) is the parameter you need to control. The input signal for the same may be obtained from the latitude and longitude of the area.
So for country Autralia (Melbourne / Sydney) the range of latitude and longitude to be determined first and once the Arduino finds a latitude and longitude range is within , the brightness parameter (x) will be changed accordingly.
Not tried ever but you may worth try it.
Thanks for taking interest in this project of mine.
Rgds.
Daniel Dancopy Fernandes 5 years ago
I'm repeating here what I commented on youtube ok?
I would like to use your first project that you made available here on the website (4" TFT Analog-GPS clock on Arduino) on my 3.5" ili9488 SPI Breakout display but, I don't know how to connect the pins on Arduino because here, you just explain to the TFT Shield, which are different pins; can you help me?
If you need a picture of my display, I can send you.
My display has the following pins:
MISO, LED, SCK, MOSI, DC/RS, RESET, CS, GND and VCC.
Does it work with the library?
PS. I forgot to ask you which pin connects the GPS?
Thank you
Daniel Dancopy Fernandes 5 years ago
#include <TinyGPS.h>
#include <Adafruit_GFX.h>
#if defined(_GFXFONT_H_) //are we using the new library?
#include <Fonts/FreeSans9pt7b.h>
#define ADJ_BASELINE 11 //new fonts setCursor to bottom of letter
#else
#define ADJ_BASELINE 0 //legacy setCursor to top of letter
#endif
#include <MCUFRIEND_kbv.h>
//Possíveis pinos no Mega: CLK=D52; MISO=D50; MOSI=D51; CS=D10; DC=D9
MCUFRIEND_kbv tft;
#define BLACK 0x0000
#define BLUE 0x001F
#define RED 0xF800
#define GREEN 0x07E0
#define CYAN 0x07FF
#define MAGENTA 0xF81F
#define YELLOW 0xFFE0
#define WHITE 0xFFFF
#define GREY 0x7BEF
#define mycolor1 0x6BFF
#define mycolor2 0xF71E
#define AVG_NUM 10 // number of iterations of the adc routine to average the adc readings
#include <stdio.h>
Remembering that it is for ILI9488 display;
Thanks again
bera 5 years ago
/* Connections
ILI9341
-------
VCC,LED = 3.3 Volt
Gnd = Gnd
CS = D4*
RST= D2*
DC = D15*
MOSI = D23
MISO = D19
SCK = D18
[* means can be any other pins]
Following headers to be used
#include <Adafruit_GFX.h> // Core graphics library
#include "Adafruit_ILI9341.h" // Hardware-specific library
I'm attaching a sample sketch as well
Adafruit_ILI9341 tft = Adafruit_ILI9341(CS,RST,DC); //(cs,rst,dc)
inside setup()
tft.begin()
sample sketch (5kb)
header files (357kb)
Daniel Dancopy Fernandes 5 years ago
Did you get to try out the draft 4" TFT Analog-GPS clock on Arduino?
It's been a while since I tried to use it with the Display 3.5 inch ILI9488 with esp8266 Nodemcu or esp32 but it did not work (showed some errors).
Have you tried or updated the sketch for ESP?
You told me about these other two projects: Youtube link1 & Youtube link2 but, I prefer the 4" TFT Analog-GPS clock on Arduino.
If you have something updated and you want to send me, I thank you.
If you prefer, my email is: meuviolino@hotmail.com
Note1: I have both 3.2 inch ILI9341 and 3.5 inch ILI9488.
Note2: I had sent you, attached, the photo of my display: TFT ili9488 3.5" (1.6 MB) - I think you did not see it.
Thank you very much,
Daniel Fernandes
Daniel Dancopy Fernandes 5 years ago
Daniel Dancopy Fernandes 5 years ago
My display is the same as yours, except that I bought it as ILI9488 and in the TFT_eSPI library it works fine. I will test as you said.
If you have some more sketches for this display, if you can and want to send me, I leave here my email: meuviolino@hotmail.com
My sincere thanks
bera 5 years ago
Recently I'm using ILI9486 / ILI9488 for a project of mine. It has SPI connections. Other than SPI [MISO,MOSI,SCK It needs only 3 other pins - CS, RST & DC. These 3 pins can be any of your choice. I have been using them on ESP32 and ESP8266 as well.
However, the Adafruit library is not working for this TFT. The only library works well out of the box is TFT_eSPI. Please read the setup file and do changes in the setup.h file for work.
Here's the link from aliexpress.com
https://es.aliexpress.com/item/33005785723.html?spm=a2g0s.9042311.0.0.49b163c0waK7i4
Bera
Daniel Dancopy Fernandes 5 years ago
I am trying to compile the sketch with esp8266 Nodemcu but it is showing this error highlighted in MCUFRIEND_kbv tft;
error "call to 'MCUFRIEND_kbv :: MCUFRIEND_kbv (int, int, int, int, int)' use the default argument for parameter 1, which is not yet defined".
Do you have any idea what this mistake might be?
Thank you
bera 5 years ago
Daniel Dancopy Fernandes 5 years ago
First, thank you for the sketch released.
I would like to mount this clock but, my display is a bit different from yours (I am attaching an image) and, I would like to use it with NodeMCU esp8266, so could you help me about what changes I should make in the sketch, the pins I I must connect to the gps, etc., remembering that my display is an ili9488 3.5 inches 480 * 320; Thank you very much
Daniel Fernandes
bera 5 years ago
The link is working now. Please try.
Bera
Daniel Dancopy Fernandes 5 years ago
You wrote: From the picture I understand it's the ILI9341 SPI connected TFT display.
1) If you are referring to the attached image from my display, it is a 3.5 ILI9488 SPI.
2) The link you sent me is not opening.
bera 5 years ago
From the picture I understand it's a ILI9341 SPI connected TFT display.
I did one project with ESP32 on it. The ESP8266 is same like ESP32. Just find out the SPI pins of ESP8266 and then try out this tricks here
http://berapi.ddns.net:8082/wordpress/?p=2031
Rgds.
Bera
Daniel Dancopy Fernandes 5 years ago
I tried compiling the sketch with Nodemcu and presented this error:
Arduino: 1.8.8 (Windows 10), Card: "NodeMCU 1.0 (ESP-12E Module), 80 MHz, Flash, Disabled, 4M (in SPIFFS), v2 Lower Memory, Disabled, None, Only Sketch,
In file included from D: \ Arduino \ Relays \ Display TFT \ 4â €? TFT Analog-GPS clock on Arduino \ arduino_clock \ arduino_clock.ino: 9: 0:
: C: \ Users \ Daniel \ Documents \ Arduino \ libraries \ Mcufriend_kbv / MCUFRIEND_kbv.h: 20:23: Error: 'A3' was not declared in this scope
MCUFRIEND_kbv (int CS = A3, int RS = A2, int WR = A1, int RD = A0, int RST = A4);
^
C: \ Users \ Daniel \ Documents \ Arduino \ libraries \ Mcufriend_kbv / MCUFRIEND_kbv.h: 20: 34: Error: 'A2' was not declared in this scope
MCUFRIEND_kbv (int CS = A3, int RS = A2, int WR = A1, int RD = A0, int RST = A4);
^
C: \ Users \ Daniel \ Documents \ Arduino \ libraries \ Mcufriend_kbv / MCUFRIEND_kbv.h: 20:45: Error: 'A1' was not declared in this scope
MCUFRIEND_kbv (int CS = A3, int RS = A2, int WR = A1, int RD = A0, int RST = A4);
^
C: \ Users \ Daniel \ Documents \ Arduino \ libraries \ Mcufriend_kbv / MCUFRIEND_kbv.h: 20:68: Error: 'A4' was not declared in this scope
MCUFRIEND_kbv (int CS = A3, int RS = A2, int WR = A1, int RD = A0, int RST = A4);
^
arduino_clock: 11: 15: error: call to 'MCUFRIEND_kbv :: MCUFRIEND_kbv (int, int, int, int, int)' use the default argument for parameter 1, which is not yet defined
arduino_clock: 11: 15: error: call to 'MCUFRIEND_kbv :: MCUFRIEND_kbv (int, int, int, int, int)' use the default argument for parameter 2, which is not yet defined
arduino_clock: 11: 15: error: call to 'MCUFRIEND_kbv :: MCUFRIEND_kbv (int, int, int, int, int)' use the default argument for parameter 3, which is not yet defined
arduino_clock: 11: 15: error: call to 'MCUFRIEND_kbv :: MCUFRIEND_kbv (int, int, int, int, int)' use the default argument for parameter 5, which is not yet defined
D: \ Arduino \ Watches \ Display TFT \ 4â €? TFT Analog-GPS clock on Arduino \ arduino_clock \ arduino_clock.ino: In function 'void loop ()':
arduino_clock: 106: 23: error: 'A5' was not declared in this scope
exit status 1
call to 'MCUFRIEND_kbv :: MCUFRIEND_kbv (int, int, int, int, int)' use the default argument for parameter 1, which is not yet defined
*************************
So I'll try with the Arduino Pro Mini, because its logical pins provide 3.3v, necessary for the tft display.
It should work, right?
bera 5 years ago
I did a similar project on ESP32 [instead of ESP8266], the internet says the ILI9341 & ILI9488 [SPI] mode works same... see the youtube link. It must work that way on ESP8266 ...
Youtube link1: https://www.youtube.com/watch?v=Wpny5v6ZXoE
Youtube line2:https://www.youtube.com/watch?v=cZ4pJ7_m8DQ
Daniel Dancopy Fernandes 5 years ago
How to download the sketch of the 4 "TFT Analog-GPS clock on Arduino?
I clicked the button and an extended address appears - what to do?
Thank you
bera 5 years ago
Daniel Dancopy Fernandes 5 years ago
<iframe width="700" height="600" src="https://www.elektormagazine.com/embed/labs/4-tft-analog-gps-clock-on-arduino" frameborder="0" allowfullscreen=""></iframe>
How do I download the sketch? thanks
bera 5 years ago
Thanks.
Daniel Dancopy Fernandes 6 years ago
I would like to be using a TFT ILI9488 display (no shield), so how can I make the connections on the Arduino Uno? Thank you
Alex Ursoiu 6 years ago
Nice project!
Thanks for posting it.
I'm just wondering where can I get the sketch from?
Thanks,
Cheers!
Alex
Daniel Dancopy Fernandes 6 years ago
How can I download the files? Thank you
bera 6 years ago
The SPI driver on ESP8266 for ILI9488 is available here https://github.com/azmathmoosa/ILI9488
Thanks.
Bera
Daniel Dancopy Fernandes 6 years ago
bera 6 years ago
I've tried quite sometime to put this display [ILI9488 ] to work on ESP32 so that I can have more features of it but could not succeed so far...
Bera S
bera 6 years ago
Yes, you can. Just maintain the following pin connections of the UNO
RD -> A0
WR ->A1
RS -> A2
CS ->A3
RST ->A4
D0 ->D-8
D1 ->D-9
D2 ->D-2
D3 ->D-3
D4 ->D-4
D5 ->D-5
D6 ->D-6
D7 ->D-7
3.3 volt ->3.3 volt
Gnd -> Gnd