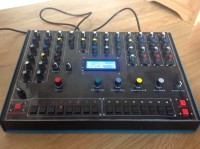
Analog Drum Box with Built-In Sequencer & MIDI control

14/06/2015: Introduction
14/06/2015: Introduction
I was always fond of the first beat boxes that were designed early 80's. Nowadays music studio's are working with a lot of cool softsynths, based on samples or virtual analog sound generation but I just love to turn knobs on analog gear, which just can't be done on a computer screen with your mouse. So I decided a while ago NOT buying an old drum box, but building it myself. So here it is, it has a 16 - 32 step sequencer built-in and MIDI control based on a elektor golden oldie, the At89S8253 flashboard, programmed in C, using Keil µVision C51. The sounds are completely analog generated, there are 12 of them: Bassdrum, Snaredrum, Maracas, HandClap, Open & Closed Hihat, Cowbell, Cymbal, Side Stick and Low, Mid & High Toms. Especially the Bass Drum and snare can be recognized in thousands of music productions still made today. When turning the decay of the Bassdrum, you can easily trigger a small earthquake :-). I designed and built most of the boards myself, but sound circuits are based upon existing machines of the early 80's, but modded to give them more tweakability. I added also an LCD display to guide the user while creating patterns and tracks. 12 patterns up to 32 steps can be created. 1 intro and 3 fill-in patterns can be created and all patterns can be played in a manual mode (so selecting the different patterns yourself when the box is playing) Or up to 6 tracks can be recorded by using the 16 programmed patterns. While the track is playing, the sounds can be tweaked live to created extra swing. I'll try to post a video soon to show what it's capable of. It's not completely finished yet, I have some µcontroller noise in the audio, but that's probably caused by the wiring...
15/06/2015: Different Modes
1. 16 Steps Mode: This mode is used to create patterns of 16 steps, typically used in 4/4 beats. So each step is a 1/16th note. While the sequencer is running, an instrument can be selected and by toggling one of the 16 step buttons, the instrument is made audible/erased at that particular step. Each pattern had a variation A & B. Switching between variations can happen at all times by using the variation selector knob. Stopping the sequencer triggers a write procedure to non volatile memory.
2. XX Steps Mode: Same as 16 steps mode, but here it is possible to create patterns longer then 16 steps
Added small audio file under PCB...
3. Manual Play Mode: In this mode you can trigger the patterns that have been recorded in the 16 Steps or XX Steps modes. Before hitting the start button, the user selects one the 12 patterns, selects an intro pattern if needed, and selects one of the 3 available Fill-In patterns. When hitting the Start button, the intro may play, or the basic pattern you selected. While running, the user can switch between patterns by simply pushing the step buttons. Or trigger a fill-in by hitting the "TAP" button. A Fill-in can be triggered at whatever step the sequencer is in. With this mode you can do a live performance that sounds different every time.
4.Compose mode: Same as manual play mode, but in this mode everything is recorded in 1 of the 6 tracks that are available. One track is able to record 128 patterns (up to 32 steps/pattern long). Today the tracks are stored in the internal 2k Eeprom of the AT89S8253, so this is a bit limited, but there's an external (8 x 8K) Eeprom available, so that in future plenty of tracks can be recorded. Also, the internal Eeprom is erased, each flash procedure :-(, the external is not :-).
5. Autoplay Mode: Simply plays one of the 6 tracks you recorded.
6. MIDI control mode: Hook the drum box up to your device that has midi out or use your computer with USB midi device , and you can program whatever patterns you want in a drum editor in whatever DAW you use. The GM drum map is supported, so a kickdrum in your DAW corresponds to a kick drum in this drum box.
10/09/2015: Adding PCB's of sound boards
I just added the PCB's of the sound boards. PCB's for power supply, output & memory board will follow. I will also add schematics later of all boards.


Discussion (2 comments)