

Firmware update ESP32 Weather Station (180468)
Software updates for the ESP32 Weather Station (180468)
This contains the updates for the ESP32 Weather Station (180468) and discribes also the new added features.
Also here you can find a list of requested new features and support for new sensormodules.
Attention:
You need to modify the PubSubClient library. Go to your library folder and search for the PubSubClient. Inside its folder search in 'src/' folder for PubSubClient.h and look for the following line:
#define MQTT_MAX_PACKET_SIZE 128
and change it to
#define MQTT_MAX_PACKET_SIZE 256
Save the file and now you can transmitt mqtt messages with more than 128 byte.
Requested new sensormodules:
| Sensor | Support planned / supported sind Firmware | Comments |
| Honnywell HPM | 1.4 | experimental support |
| Veml6070 | 1.5 | experimental support |
| Tsl2561 | 1.5 | experimental support |
Requested new features:
| Feature | Support planned / supported sind Firmware | Comments |
| SD-Card Support | no timeframe yet | |
The weater station has received bugfixes and enhancments. We will show you what has been added and how you can benifit form the new functions inside the weather station.
Till firmwareverson 1.1 the webserver was shutdown if the station was running as wifi station. This has been changed to keep the webserver running starting with version 1.2, so the user can check the station and also modify the settings fot the cloudservices. Also since version 1.2 the station now can connect to a MQTT broker and deliver the data. The configuration interface is here almost the same as for the ESP32 Bedroom Clock. As we produce data we can set the timespan between new data published to the MQTT broker. This works independent from the span for the cloudservices.
The station consumes currently about 60mA @ 13Volt (0.8W) running. This may change with newer versios of the firmware.
Configuration:
After you have assembeled and compiled and uploaded the code to the station it will come up as accesspint, if you haven't already supplied credentials to your network. This porcess can be monitored through the usb port of the ESP32 with a srial terminal set to 115200 Baud 8N1. The Station should tell you that it is in AP mode and it's SSID. If you connect to the wifi type 192.168.4.1 to access the config page:
 From here you can go to WiFi settings and configure the station for oyur wifi network. Also you can see the current data that the station has collected. If you have attached a BME280 and you don't see any data in temperatur , humidity and airpressure please recheck you wireing. In the Wifi settings select you network and enter the requiered credentials. The station will do a reboot and connect to your wifi. If this fails it will enter the accesspoint mode again and you can check your settings.
After the wifi setup you can use Upload settings to configre the two supported cloud services, Thinkspeak and SenseBox.
Since version 1.3 you also have MQTT settings to enable the station to send data to your own MQTT-broker, for example to process these like with the ESP32 Bedroomclock and also the Wireless Car Multimeter . This has been added to give you more possiblitys to keep your data in your control. The JSON string produced by the station lokks like this:
{
"data":{
"wind":{
"direction": 255.1,
"speed": 1.54
},
"rain": 0.0,
"temperature": 22.1,
"humidity": 38.4,
"airpressure": 998.4
"PM2_5":0,
"PM10":0
},
"station":{
"battery":12.84,
"charging":false
}
}
"data":{
"wind":{
"direction": 255.1,
"speed": 1.54
},
"rain": 0.0,
"temperature": 22.1,
"humidity": 38.4,
"airpressure": 998.4
"PM2_5":0,
"PM10":0
},
"station":{
"battery":12.84,
"charging":false
}
}
 In the MQTT settings you can configure the interval for the data transmission and enable or disable the usage of MQTT at all. The Interval set the distance between two MQTT messages in minutes. If you put it to zero the MQTT tansmission will be stopped. Hostname is for the name of the weatherstation. The default MQTT port is 1883 and as Server you can enter the IP or the DNS entry for the MQTT Broker. For the topic enter the one you are supposed to publish your data, and if requiered set user and password.
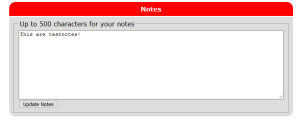
An addition from other projects it the Notes page you got. Here you can enter up to 500 character for your own notes, that are stored inside the system.
Below you find the history for the released version of the firmware:
Version 1.5.5
What is new:
- Changed MQTT interval from minutes to seconds
Fixed:
MQTT buffer was not cleared after transmission and run out of datat resulting in an empty JSON string.
Version 1.5
What is new:
- Experimental support for Veml6070.
- Experimental support for Tsl2561.
Fixed:
MQTT Cleint wasen't working du to a memory leak. Also now a change in the PubSubLibrary is requiered to be able to transmitt more than 128 byte MQTT messages.
Discription:
Bugfix release for MQTT problems
Version 1.4
What is new:
- Experimental support for Honnywell HPM in the code.
- Webinterface shows now the accumulated Rain in mm
- In AP mode the ESP is now reachable via mDNS "Weatherstation"
- Added DNSSever in AP mode, all request in this mode will be answared with the weatherstation IP
Fixed: No new bugs were fixed
Discription:
This is a minor update to fix a few weaknesses
Version 1.3
What is new:
- Weather station now keeps also in station mode the webserver running
- Name in accesspointmode is now "ESP32 Weatherstation" followed by the last digits of the macaddress
- mDNS added in accesspointmode, now responds to "ESP32 Weatherstation.local"
- MQTT support added, data can now be pushed to your own broker
- Added field for notes in he webinterface
- Structural changed for later power usage optimizations
Fixed:
No bugs were fixed
Description:
This update addesses some of the user reported trouble after trying to get the station to work. Also the MQTT feature is added to allow you to control your produced data and process them locally.
Version 1.2
internal release, not intended for public use
Version 1.1
What is new:
- This is a pure bugfix release, no new features have been added.
Fixed:
- No longer gets stucked if no BME280 is connected
Description:
This will corretly let you station run if no BME280 is connected to the station.
Version 1.0
Description:Initial release for the Firmware, for more details reffer to the original article.
Discussion (9 comments)
met98 4 years ago
in the configuration.yaml
sensor: - platform: mqtt name: "Direzione est" state_topic: "meteo/dati" unit_of_measurement: "" value_template: >- {% set wind_dir = value_json.data.wind.direction %} {% if wind_dir | float==0 %}Nord {% elif wind_dir | float==45 %}Nord Est {% elif wind_dir | float==90 %}Est {% elif wind_dir | float==135 %}Sud Est {% elif wind_dir | float==225 %}Sud Ovest {% elif wind_dir | float==270 %}Ovest {% elif wind_dir | float==315 %}Nord Ovest {%- endif %} - platform: mqtt name: "Velocita est" state_topic: "meteo/dati" unit_of_measurement: "km/h" value_template: >- {% set wind_speed = value_json.data.wind.speed | round(2) %} {% if wind_speed | float<2 %}Calmo {% elif 2 < (wind_speed|float) <=12 %}Leggero {% elif 13 < (wind_speed|float) <=30 %}Moderato {% elif 31 < (wind_speed|float) <=40 %}Fresco {% elif 41 < (wind_speed|float) <=62 %}Forte {% elif 63 < (wind_speed|float) <=87 %}Burrasca {% elif 88 < (wind_speed|float) <=117 %}Tempesta {% elif wind_speed | float>=118 %}Burrasca {%- endif %}{{ value_json.data.wind.speed | round(2) }} - platform: mqtt name: "Pioggia est" state_topic: "meteo/dati" unit_of_measurement: "media in mm" value_template: "{{ value_json.data.rain }}" - platform: mqtt name: "Polveri PM2.5 est" state_topic: "meteo/dati" unit_of_measurement: "µg/m³" value_template: "{{ value_json.data.PM2_5 }}" - platform: mqtt name: "Polveri PM10 est" state_topic: "meteo/dati" unit_of_measurement: "µg/m³" value_template: "{{ value_json.data.PM10 }}" - platform: mqtt name: "Luminosita est" state_topic: "meteo/dati" unit_of_measurement: "Lux" value_template: "{{ value_json.data.Lux }}" - platform: mqtt name: "Concentrazione Raggi UV est" state_topic: "meteo/dati" unit_of_measurement: "unita" value_template: "{{ value_json.data.UV }}" - platform: mqtt name: "Batteria est" state_topic: "meteo/dati" unit_of_measurement: "Volt" value_template: "{{ value_json.station.battery | round(1) }}" - platform: mqtt name: "In carica est" state_topic: "meteo/dati" unit_of_measurement: "" value_template: "{{ value_json.station.charging }}" - platform: mqtt name: "Temperatura est" state_topic: "meteo/dati" unit_of_measurement: "°C" value_template: "{{ value_json.data.temperature | round(1) }}" - platform: mqtt name: "Umidita est" state_topic: "meteo/dati" unit_of_measurement: "%" value_template: "{{ value_json.data.humidity | round(0) }}" - platform: mqtt name: "Pressione est" state_topic: "meteo/dati" unit_of_measurement: "hPa" value_template: "{{ value_json.data.airpressure | round(0) }}"met98 4 years ago
document.getElementById("MQTT_PASS").type == "text";
change to
document.getElementById("MQTT_PASS").type = "text";
Now work
adamda 4 years ago
if I ordered the ESP32 Weather Station – Kit (180468-71), will this KIT includes the ESP32 Pico or is it necessary to order the ESP32 separated?
Thanks in advanced and Greetings
Daniel
B. Lange 4 years ago
After a *bit* of searching we found the problem in data/index.html @ line 940:
document.getElementById("MQTT_PASS").type == "text";
this should read
document.getElementById("MQTT_PASS").type = "text";
Then it works :-)
If you could update the source accordingly .....
Regards
Benno
Owen Grey 4 years ago
I have added some of my code now and I get individual instances in my broker as it should be, so the original code seems not to work.
On arduino monitor I get mqqt pub failed" but my code works fine.
p klop 4 years ago
I have enclosed a snapshot how things are configured. I used release 2.8.0 of Nick O'Leary PubSubClient.
Did you also changed the PubSubClient.h settings max packet size?
Owen Grey 4 years ago
I have my weatherstation working but it is with my code attached, it would of been nice to get it working as it should first before I changed it.
I can live with it as is because now my weather details are formatted like every thing else in mosquitto server.
weatherstation
temperature =23.5
humidity =47
pressure = 1000
lux = 23
etc....
thanks for the help by the way!
MHO 4 years ago
Until now I have no clue what is wrong. Who can help out.
I flashed version 1.4 to the ESP32 D4 PIco.
Webserver is created.
I connect succesfully to the Webserver with SSID: ESP Weather Station <mac address>
However when I connect with webbrowser client to address 192.168.4.1 the
Response is a 404-error with text "The requested file doesn't exist".
The serial monitor shows the following:
13:57:36.853 -> WiFi: STA
13:57:36.853 -> SSID unknown
13:57:36.853 -> Connecting failed. Starting AP
13:57:36.947 -> Configuring AP: ESP32 Weatherstation 40:39:8d
13:57:36.947 -> AP IP: 192.168.4.1
13:57:36.947 -> Start MDNS: okay
13:57:36.947 -> Webserver started
13:57:36.947 -> InitWifi done
13:57:40.083 -> Read EEPROM
13:57:40.083 -> MQTT Thread Start
13:57:40.083 -> MQTT disabled, going to sleep
13:58:18.008 -> dhcps: send_nak>>udp_sendto result 0
13:58:22.930 -> dhcps: send_nak>>udp_sendto result 0
13:58:23.024 -> dhcps: send_offer>>udp_sendto result 0
13:58:30.043 -> [E][Parsing.cpp:275] _parseArguments(): arg missing value: 0
13:58:30.043 -> [E][WebServer.cpp:617] _handleRequest(): request handler not found
13:58:30.043 -> Got request for: /success.txt
13:58:30.090 -> File '/success.txt' doesn't exist
13:58:30.137 -> [E][WebServer.cpp:617] _handleRequest(): request handler not found
13:58:30.137 -> Got request for: /success.txt
MHO 4 years ago
The /data directory was not written to the flash area.
Steps to take:
- install in your arduino tool directory a tool called ESP32 Sketch Data Upload.
Article can be found here: https://randomnerdtutorials.com/install-esp32-filesystem-uploader-arduino-ide/
- Then use the tool to upload the content of the data directory.
Eeh voila it works. The webpage is visible.
MHO 4 years ago
The issue is that I can not find any reference in the 1.4 code to this file. There is a data directory with index.html. However, the weatherstation software does not contain a success.txt file.
I was wondering if it is part of the default arduino library files like webserver.cpp or webserver.h
Greetings,
Marcel
Mathias Clauszen 4 years ago
for the log i can see that the webbrowser is trying to load "success.txt"
13:58:30.043 -> Got request for: /success.txt
13:58:30.090 -> File '/success.txt' doesn't exist
that is a bit strange. Also make sure that you have also put the webbages with the ESP32 uploadtool to your station.
Best Regards
CalM
ElektorLabs 5 years ago
the Software gets some fundamental rework as we are working on a updated harware revision. The work done for the last version 1.5 will be included int the software as well so some other nice goddies like sd-card support. We try to get also some new protorcols supported and try to fix some parts that looked not that nice. Further progess will be found here: https://www.elektormagazine.com/labs/remake-elektor-weather-station
JakkeTet 5 years ago
did some tinkering with my son and pushed to GitHub, work in progress
• Removed SDS011 PM sensor and replaced by PMS5003 or PM-E5 (hippocampus)
◦ because more particle sizes are detect with this sensor
• Adapted project to platform.io
• Added upload to Ubidots For Education (was a little tricky but works...)
• Added some more & adapted Adafruit sensors like:
◦ Adafruit_BME280
◦ Adafruit_TSL2591 lux sensor
◦ Adafruit_VEML6075 UV sensor
◦ used a real 5K 360° 5K potmeter for winddirection, put some 501ohm R in both + & - for better calibration of potmeter.
◦ windspeed will be added later and probably based on a pro model anemometer and probably pulsed, to be decided.
◦ Adafruit_MAX31865 RTD P1000 for precision T° measurements, can be 2-3 or 4-wire measurement and can be placed away from housing for precision measurements.
◦ humidity will be Elektor ENS210 but not yet ordered :-)
◦ rainmeter may be home development
Work in (slow) progress ;-)
Feel free to comment!
Jacques.
JakkeTet 4 years ago
Have been tinkering during our forced "stay@home" time on this project and decided to split completely from the Elektor project. It was nice to have the Elektor example to start with and I learned a lot from it! A big THANKS!!! for the Elektor people!!! but development is a continuing proces and at a certain moment the differences become too large. The software was completely rewritten and I think no Elektor stuff was still included in it, also the hardware doesn't bear any ressemblance anymore because we developped our own PCB.
I think a magazine like Elektor still has a tremendous influence on engineers and would-be engineers and tinkeres like myself :-) and should continue their mission!
The only idea that was kept from Elektor is the use of the ESP32 Pico because it's just so easy & powerfull & cheap.
If you want to stay informed you are invited to consult regularily our Github @ https://github.com/JelmerT/esp32weatherstation
for eventual comments jacques--at--tiete--dot--org
Stay tuned & keep safe!
Jacques.
Ich habe während unserer erzwungenen "stay@home"-Zeit an diesem Projekt getüftelt und beschlossen, mich vollständig vom Elektor-Projekt zu trennen. Es war schön, mit dem Elektor-Beispiel zu beginnen, und ich habe eine Menge daraus gelernt! Ein großes DANKE!!!! für die Elektor-Leute!!! aber die Entwicklung ist ein kontinuierlicher Prozess, und zu einem bestimmten Zeitpunkt werden die Unterschiede zu groß. Die Software wurde komplett neu geschrieben, und ich denke, dass kein Elektor-Material mehr darin enthalten war, auch die Hardware hat keine Ähnlichkeit mehr, weil wir unsere eigene Platine entwickelt haben.
Ich denke, eine Zeitschrift wie Elektor hat immer noch einen enormen Einfluss auf Ingenieure und "Möchtegern-Ingenieure" und Tüftler wie mich :-) und sollte ihre Mission fortsetzen!
Die einzige Idee, die Elektor vorenthalten wurde, ist die Verwendung des ESP32 Pico, weil er gerade so einfach & leistungsstark & billig ist.
Wenn Sie auf dem Laufenden bleiben wollen, sind Sie eingeladen, regelmäßig unser Github @ https://github.com/JelmerT/esp32weatherstation zu konsultieren.
für eventuelle Kommentare jacques--at--tiete--dot--org
Stay tuned & keep safe!
Jacques.
JakkeTet 4 years ago
I think a magazine like Elektor still has a tremendous influence on engineers and would-be engineers and tinkeres like myself (
Our PCB used for development (1518kb)
JakkeTet 4 years ago
Es gibt auch eine Reihe von Parametern, die bei der Verwendung von PTFE angepasst werden müssen
Siehe meine Parameter im Code
void configureUvSensor(void){
Serial.println("Configuring VEML6075");
// Set the integration constant
uv.setIntegrationTime(VEML6075_100MS);
// Get the integration constant and print it!
Serial.print("Integration time set to ");
switch (uv.getIntegrationTime()) {
case VEML6075_50MS: Serial.print("50"); break;
case VEML6075_100MS: Serial.print("100"); break;
case VEML6075_200MS: Serial.print("200"); break;
case VEML6075_400MS: Serial.print("400"); break;
case VEML6075_800MS: Serial.print("800"); break;
}
Serial.println("ms");
// Set the high dynamic mode
uv.setHighDynamic(true);
// Get the mode
if (uv.getHighDynamic()) {
Serial.println("High dynamic reading mode");
} else {
Serial.println("Normal dynamic reading mode");
}
// Set the mode
uv.setForcedMode(false);
// Get the mode
if (uv.getForcedMode()) {
Serial.println("Forced reading mode");
} else {
Serial.println("Continuous reading mode");
}
// Set the calibration coefficients
uv.setCoefficients(2.22, 1.33, // UVA_A and UVA_B coefficients
2.95, 1.74, // UVB_C and UVB_D coefficients
0.001461, 0.002591); // UVA and UVB responses
// Set the calibration coefficients for PTFE window 0.7mm thick & 10mm dia.
// uv.setCoefficients(2.22, 1.17, // UVA_A and UVA_B coefficients
// 2.95, 1.58, // UVB_C and UVB_D coefficients
// 0.007923, 0.008334); // UVA and UVB responses
}
Sascha Löbbert 4 years ago
https://de.aliexpress.com/item/32873192071.html?spm=a2g0s.9042311.0.0.69854c4dh7duHp
Should work perfect with LUX und UV Sensor. Solar panel is not needed, so it will be removed.
Sascha Löbbert 5 years ago
JakkeTet 5 years ago
No direct alternatives available.
J.
JakkeTet 5 years ago
These PCB's are just a simplified version of the Elektor circuit for more in-depth prototyping. e.g. no "charging" circuit because not needed, a lead-acid battery in a outside housing is NOT a good idea...
I also included a 8X8 hole matrix for "adjustments & add-ons" :-)
Jacques
JakkeTet 5 years ago
The light and UV sensors are a bit more complicated, the ambient light sensor will have a simple acrylate matte dome but the UV's will be installed in a separate window that is made from several layers (min. 0,5 mm) of PTFE (Teflon) gasket tape. This tape has a good transmittance of the total UV range, professional sensors are also made with this. The idea is to install these light sensors slightly oblique and according to the ecliptica so there will be a better reading facing the sun.
I may install an overall polished stainless shield around in order to keep the electronics cool in summer.
Hope this helps!
Jacques
Sascha Löbbert 5 years ago
JakkeTet 5 years ago
Grüss,
Jacques
Sascha Löbbert 5 years ago
Mathias Clauszen 5 years ago
nice modification to the hardware. If it is done i would love to see some pictures of your build.
Regards
CalM
JakkeTet 5 years ago
work in (slow) progress :-)
see https://github.com/JelmerT/esp32weatherstation
also designed a more general PCB for development with more I/O possibilities adapted to our needs but still based on the nice Elektor pcb, see https://github.com/JelmerT/esp32weatherstation/tree/master/Hardware/ESP32Weatherstation
see drawing of pcb (without powerplanes for clarity)
JakkeTet 5 years ago
Jacques
Alain HERVE 5 years ago
Alain
MaxW 5 years ago
This would make it very easy tu process the data in smart home systems like Loxone
See https://www.loxone.com/enen/kb/communication-with-udp/