

FPGA Developement Board (120099)
FPGAs are unquestionably among the most versatile but complex components in modern-day electronics. An FPGA contains a maze of gates and other circuit elements that can be used to put together your own digital circuit on a chip.
FPGAs are unquestionably among the most versatile but complex components in modern-day electronics. An FPGA contains a maze of gates and other circuit elements that can be used to put together your own digital circuit on a chip. In this series of articles we use an FPGA development board designed in the Elektor Labs to show how easy it is for any electronics enthusiast, whether professional or amateur, to work with these programmable logic devices.
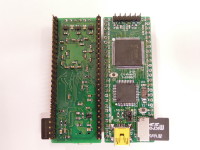
An FPGA developement board that doesn't need a JTAG programmer.
Taming the Beast - a simplified approach to working with FPGAs
Taming the Beast (2) - How to build an LED blinker with 250 Kgates
Taming the Beast (3) - Counting to 100 with 250 Kgates
Taming the Beast (4) - Make-belief with 250 Kgates
Taming the Beast (5) - Programming 250 Kgates in VHDL
An FPGA developement board that doesn't need a JTAG programmer.
Status: v1.2 prototypes constructed.
Two working prototypes.
v1.3 pcb design update. Fiducials added, silk screen modified for a more professional look.
Generated pick and place files using ULP in eagle.
Update 01 October 2012
I have been working on a demo board for elektor live.
Update 23 November 2012
The production model was correctly assembled and the firmware was functional.
Discussion (2 comments)
Joachim Ballandat 6 years ago
tony1tf 6 years ago
Do you want my board? - I have little time to do anything with it nowadays, amongst all the other stuff. Email me at tabbey01@gmail.com
Tony
Joachim Ballandat 6 years ago
Sincerely yours
Joachim Ballandat
ClemensValens 6 years ago
Ruudje 11 years ago
Plus points:
Much faster upload of the config file to the fpga chip; it’s about 1 second now instead of 4 seconds for the original firmware.
Faster SD mounting and file access for the usb mass storage device. On my XP system the read speed is about 3 times that of the original firmware, write speed is about 2 times faster.
Less code and ram usage (no buffers are used in ram, and only one low level SD interface is used).
On the downside though:
The low level files are written in assembly. This is because the library was intended for small avr devices. But it has been tested quite well in other applications and should not need any maintenance or changes.
Furthermore I have added some features like a crude serial interface. If you use this firmware you will be able to connect to the board using a terminal program like ht or putty and issue some commands. The interface is crude, so arrow keys are not supported. While entering the commands you can only use the backspace to erase erroneous characters.
At the moment the commands are: (NOT case sensitive)
This will reset the FPGA
This will instantly configure the fpga using the file named “filename” (the file must first be copied to the SD, but you don’t need to reset the board and can test multiple files). The usb devices will stay connected to the host while the fpga is reconfigured.
This will make “filename” the new startup file (instead of config.bin)
This will display some system info like what kind of SD card is inserted and whether the fpga is successfully configured.
To install:
replace the files in the FPGA_board_Config_v1_0 directory by the files in the attached zip file.
Compile the firmware (make all)
And write the new firmware to the board using FLIP
I have also included a precompiled file hexfile.zip
Regards
Ruudje
ps.
The precompiled hexfile is not compiled using the WinAVR version which was used for the orginal firmware, hence it is a little shorter than it would be if it was compiled with the older version. I used gcc 4.8.
BUT the firmware does compile and work just fine using the older avr-gcc version.
Precompiled hex file (13kb)
ClemensValens 11 years ago
tony1tf 11 years ago
ClemensValens 11 years ago