
Magnetic Levitation - The Easy Way
A Magnetic Levitation project with standard components only - including a modified cheap standard relay as the electromagnet - and powered by a 5 V @ 50 mA USB power bank.
A floating object is always a fascinating eye-catcher, which I like to place on my desk. Many conversations at this table had a nice smalltalk beginning with it.
So in the last years I have recreated some "magnetic levitation" projects from various publications.
But I was never really satisfied with the results.: Too big, too unstable, gigantic power consumption(;-), the flight stability was not very good and especially the necessary electromagnet always had to be somehow winded around a screw by myself. The results were often not very nice to look at, but above all hardly reproducible.
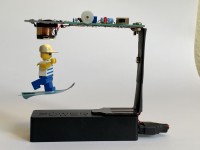
So I had gained a lot of experience and a mechanical construction and a simple electrical circuit was created, which proved itself in all test setups:
Here you can see a video of the final setup: https://vimeo.com/430336526
# The HALL magnetic sensor used is an A1302 or its successor A1308 - the cheaper and widely used SS49 or similar types are NOT suitable.
# The necessary comparator is a LM311
# The magnetic coil is a cheap modified 5V standard relay with built-in switching transistor from the world of microcontroller actuators
# Two neodymium permanent magnets in disc form with 10mm or 12mm diameter are almost always used to make a LEGO man, a screw or even a table tennis ball float
# The power supply should not be very expensive. In the end it works very well with only 5V and only about 50mA. So a USB powerbank can be used as power supply - and can also be used as a safe stand.
# As a positioning aid, the relay's flyback diode has been replaced by a white LED with series resistor, which only lights up when the object is at the right height and hovers.
I had a lot of fun with this and hope this will make it easy for someone else to build such a "levitation project".
Good luck!
PS: Much more detailed documentation and more fotos at https://peterneufeld.wordpress.com/2020/06/20/magnetic-levitation-the-easy-way/
And the story goes on at https://peterneufeld.wordpress.com/category/levitation/
So in the last years I have recreated some "magnetic levitation" projects from various publications.
But I was never really satisfied with the results.: Too big, too unstable, gigantic power consumption(;-), the flight stability was not very good and especially the necessary electromagnet always had to be somehow winded around a screw by myself. The results were often not very nice to look at, but above all hardly reproducible.
So I had gained a lot of experience and a mechanical construction and a simple electrical circuit was created, which proved itself in all test setups:
Here you can see a video of the final setup: https://vimeo.com/430336526
# The HALL magnetic sensor used is an A1302 or its successor A1308 - the cheaper and widely used SS49 or similar types are NOT suitable.
# The necessary comparator is a LM311
# The magnetic coil is a cheap modified 5V standard relay with built-in switching transistor from the world of microcontroller actuators
# Two neodymium permanent magnets in disc form with 10mm or 12mm diameter are almost always used to make a LEGO man, a screw or even a table tennis ball float
# The power supply should not be very expensive. In the end it works very well with only 5V and only about 50mA. So a USB powerbank can be used as power supply - and can also be used as a safe stand.
# As a positioning aid, the relay's flyback diode has been replaced by a white LED with series resistor, which only lights up when the object is at the right height and hovers.
I had a lot of fun with this and hope this will make it easy for someone else to build such a "levitation project".
Good luck!
PS: Much more detailed documentation and more fotos at https://peterneufeld.wordpress.com/2020/06/20/magnetic-levitation-the-easy-way/
And the story goes on at https://peterneufeld.wordpress.com/category/levitation/
Discussion (1 comment)