

Outside Temperature via Bluetooth BLE 4.0 [140190-I]
Will I benefit from a good day? How do I have to get dressed? I put forward an external thermometer to you which communicates with your iPhone or Android in Bluetooth 4.0. The central circuit is a BL600 of Faird Technology in Bluetooth Low Energy 4.0.
Will I benefit from a good day? How do I have to get dressed?
I put forward an external thermometer to you which communicates with your iPhone or Android in Bluetooth 4.0. The central circuit is a BL600 of Faird Technology in Bluetooth Low Energy 4.0. The application is connected to the case which returns the temperature.
September 30th:
- Bluetooth communicates properly
October 3rd:
- Eenergy saving works very well 5µA !!!
- NEW PCB ready (version 1)
December 15th:
- NEW PCB (version 2)
- first version IOS application work well with log function (CTN)
December 29th:
- the BL600 program is after all finish => 5µA
January 6th:
- the first version of documentation (read only)
- IOS Application soon on Apple Store
(This project can be use for moisture plants)
January 13th:
- PCB ready (version 3
January 18th:
January 24th:
February 21th
- New iOS program version 1.7
- READY
April 28th
- New PCB (last one)
May 12th
- iOS Application on Apple Store (iPhone 4S and greater) : https://itunes.apple.com/fr/app/ble-temperature/id792030065?mt=8
- Android Application on Play Store (Android 4.3 and greater) : https://play.google.com/store/apps/details?id=com.JA.blethermometer
- 3 units were made (Marion, Siegfried and me)
September 2014
- the PCB is validated
- the iOS version 3.0 will be validate in 15 days
- the Bluetooth BL600 program 3.0 is OK
- the Android will be ready soon (Bluetooth work very well, i need to implemante the calculate)
- the documentation s being reviewed
YOU CAN CONTACT ME TO GET THIS PROJECT AND GIVE ME A BACK
Jennifer
Discussion (4 comments)
Lucky 10 years ago
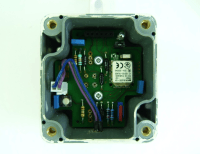
Assembling the Bluetooth temperature module is quite straight forward (most through-hole components), except for the BL600 module itself, so start with that one first.
This module should preferably be soldered by hot air or reflow oven, using soldering paste. It can also be done with a normal soldering iron with a real small tip and thin (e.g. 0.5mm) solder wire, needless to say that this requires higher soldering skills, don’t even try it if you’re not sure if you can do it. To align it with the soldering pads, there are three holes in the PCB. Three 1.6mm machine screws or pins can be fitted in these holes during soldering, which should keep the BL600 steady until it’s soldered to (most of) the pads, remove them afterwards. Do a thorough visual check after soldering (solder bridges!), and use the continuity test on your multimeter to check for shorts. Unfortunately there is no way to measure if the module ‘pins’ (which are in fact underneath the module) are properly soldered to the pads on the PCB, so if the thermometer doesn’t work: check, check and check again, reflow solder connections if necessary.
After that, the rest of the components are really easy to fit on the PCB.
NOTE: put the battery Bt1 aside for the moment, do NOT mount it on the PCB until you have the thermometer working.
Next step is to program the BL600 with the smartBASIC application designed for this project. Download the programming environment from Laird’s website (www.lairdtech.com). You must register first before you can download the files we need for this (Support Center -> Bluetooth Firmware Downloads). It took a few hours before I received my login credentials in email. Connect the thermometer to your PC with a 3V3 (!) USB->serial interface like the Elektor FT232R USB/Serial Bridge/BOB, which will also power the thermometer for now. PLEASE NOTE: a 3V3 FTDI can also do the job, but VCC on this cable is at 5V! Your BL600 will not survive supply voltages > 3V6, so use a separate 3V3 power supply in this case, leaving the VCC of the FTDI cable unconnected!
Last but not least, download –depending on the mobile device you want to use- either the Android app from Google Store (https://play.google.com/store/apps/details?id=com.JA.bletemperature&hl=en) or the iOS app …. from the https://itunes.apple.com/vg/app/ble-temperature/id792030065?mt=8. Of course this device should support Bluetooth 4.0 to be able to communicate with the BL600 module!
Lucky 10 years ago
Assembling the Bluetooth temperature module is quite straight forward (most through-hole components), except for the BL600 module itself, so start with that one first.
This module should preferably be soldered by hot air or reflow oven, using soldering paste. It can also be done with a normal soldering iron with a real small tip and thin (e.g. 0.5mm) solder wire, needless to say that this requires higher soldering skills, don’t even try it if you’re not sure if you can do it. To align it with the soldering pads, there are three holes in the PCB. Three 1.6mm machine screws or pins can be fitted in these holes during soldering, which should keep the BL600 steady until it’s soldered to (most of) the pads, remove them afterwards. Do a thorough visual check after soldering (solder bridges!), and use the continuity test on your multimeter to check for shorts. Unfortunately there is no way to measure if the module ‘pins’ (which are in fact underneath the module) are properly soldered to the pads on the PCB, so if the thermometer doesn’t work: check, check and check again, reflow solder connections if necessary.
After that, the rest of the components are really easy to fit on the PCB.
NOTE: put the battery Bt1 aside for the moment, do NOT mount it on the PCB until you have the thermometer working.
Next step is to program the BL600 with the smartBASIC application designed for this project. Download the programming environment from Laird’s website (www.lairdtech.com). You must register first before you can download the files we need for this (Support Center -> Bluetooth Firmware Downloads). It took a few hours before I received my login credentials in email. Connect the thermometer to your PC with a 3V3 (!) USB->serial interface like the Elektor FT232R USB/Serial Bridge/BOB, which will also power the thermometer for now. PLEASE NOTE: a 3V3 FTDI can also do the job, but VCC on this cable is at 5V! Your BL600 will not survive supply voltages > 3V6, so use a separate 3V3 power supply in this case, leaving the VCC of the FTDI cable unconnected!
Last but not least, download –depending on the mobile device you want to use- either the Android app from Google Store (https://play.google.com/store/apps/details?id=com.JA.bletemperature&hl=en) or the iOS app …. from the https://itunes.apple.com/vg/app/ble-temperature/id792030065?mt=8. Of course this device should support Bluetooth 4.0 to be able to communicate with the BL600 module!
ClemensValens 10 years ago
Hi Jennifer,
Any idea a when this will be ready?
Regards,
Clemens
Aubinais 10 years ago
Aubinais 10 years ago
ClemensValens 11 years ago
Hi Jennifer,
Cool! How can I find the app? Can I use it on an iPad? Android app?
How about turning this into a small weather station? Temperature is one thing, but pressure & humidity may help you to decide if you will need a coat all day or not.
Regards,
Clemens
Aubinais 11 years ago