Sand Clock

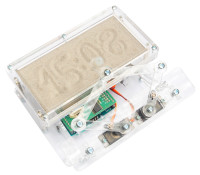
This supercool gadget writes the time into a layer of sand. After an adjustable time the sand is flattened out and everything begins all over again.
Eye-catcher par excellence
This supercool gadget built around an Arduino Uno, was published in the German Make Magazine who in turn were inspired by the plot clock from FabLab Nuremberg. Our refined design does not use an erasable whiteboard marker like the FabLab version, but instead writes the time into a layer of sand. After an adjustable time the sand is flattened out by two vibration motors and everything begins all over again.
The mechanical parts of the clock mainly consist of laser cut acrylic. Acrylic is readily available and is very well suited for laser cutting resulting in very nice and shiny flame polished edges. Like the original plot clock, the sand clock uses three miniature servo motors. For the ease of mounting and due to the higher accuracy with less slack we have opted for metal gear servo motors.
The sand is flattened out using two 6 mm vibration motors. In order to get good results without the sand accumulating in various spots, the position and orientation of these motors is quite critical. Needless to say that we have gone through a lot of experimentation to get this working properly.
The heart of the sand clock is formed by two servo motors driving the writing pen via a pantograph mechanism. Calculation of the servo motor positions in order to achieve a desired (x,Y) position of the pen is based on the principle of inverse kinematics. As the pantograph mechanism is not too complex, the resulting mathematical formulas are relatively simple and still can be dealt with by an Arduino.
To keep the construction of this clock as easy as possible, we've designed an Arduino shield with all necessary parts. Just plug it into the Arduino, connect the servo motors and the vibration motors and you're ready to go.
As the motors draw quite some current, the Arduino 5 V supply is not suitable so we decided to provide a separate power supply for the motors using a 78xx replacement type DC/DC converter.
Timekeeping is done using a PCF2129A precision RTC from NXP. It has an in-built crystal with a base accuracy of 3 ppm and can be accessed via I2C. A CR2032 lithium coin cell provides a backup time of 10 years or more.
The Arduino sketch allows for easy calibration of the servo motors via an USB connection with a computer. The calibration parameters are stored in EEPROM. Once calibrated, the clock is ready to go.


Discussion (7 comments)