The leddification of my dear old tungsten lamp

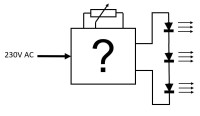
The leddification of my dear old tungsten lamp Why is it so difficult to replace the halogen rod lamp in a traditional up light or up/down light with LEDs ? O.K., one can buy a replacement rod lamp with LEDs, but it is rarely dimmable and, like the halogen lamp at full power, it emits much too much light. When it is dimmable, it requires a new, expensive dimmer and still the minimum light level is rather high. This project is a mainly a LED dimmer witch can dim from 0,4 % to 100 %
one of the lamps has a dimmer in the power cord.
So I went searching for something electronic that could do the dimming:
Input 230V AC, 50Hz
Output: up to 700 mA into 3 white LEDs of 3 W each.
Dimmable.
It was difficult to find.
If a led driver was dimmable it stated in the documentation “control by 0 to 10 V” or “control by PWM”, without supplying the required 10 V or the power to feed a PWM generator.
I also found “dimmable to 25%”.
Then I found the Sparkfun FemtoBuck. Controllable by an Arduino UNO according to the information on the manufacturers website. Around this dimmable LED driver I designed my new floor dimmer and successfully replaced the halogen rod by an aluminium strip with 3 leds of 3 Watt each. The for dimming required PWM signal is generated by a Atmel ATtiny85-20PU. The leds are dimmable from candle light to eye blinding @ 660mA.
For other lamps I created a very compact version of the same schema, but with a separate power supply, in order to get it fixed inside the lamp housing.
One of the lamps has two bowls and requires 2 * 3 leds, which can be fed from a 24 Volt power supply, in my case Meanwell IRM 20-24. For the 3 led version I use the Meanwell IRM 15-15. They share the same footprint in Kicad, so in the schemes it is always IRM 20-24.
Only throught hole components
Dimmer software upgrade November 2021
The conversion of 3 halogen lamps into LED lamps has been successful.After some time the light level of one of the lamps became a bit unstable.Of course this was the lamp which was most difficult to modify, the lamp above the dining table. It was unclear whether it was a malfunctioning potentiometer of some kind of interference. I choose to attack both possible sources an replaced the potentiometer and upgraded the software.
Instead of measuring the position of the potentiometer once and using the measured value direct for the PWM control, the software now measures the position of the potentiometer 64 times, with pauses in between, resulting in a measuring cycle of 20 msec.This removes most influence of the 50 Hz mains.
A hysteresis was added in the calculations to avoid switching between adjacent PWM levels when the potentiometer is positioned on the edge between two levels.
The new version is available under the tab “software”.


Discussion (2 comments)