DigiButler (2)
assembly, test and software installation

Continue reading this article with an Elektor Membership.
Join tens of thousands of engineers and electronics enthusiasts worldwide as a
member. Enjoy access to Elektor Magazine, the Elektor library, exclusive discounts,
early notification about Academy Pro products, and more. Select a membership
today and start exploring everything Elektor has to offer. Log in here if you are already a member.

PRINT (Gold)
- 8x Elektor Magazine (Print)
- 8x Elektor Magazine (Digital)
- Integrated Industry Section
- Access to the Elektor Archive*
- Access to over 5,000 Gerber files
- At least 10% Member Discount on Elektor Store*
Free shipping within the US, UK & Ireland.
*Member discount and unlimited archive access only for full GOLD or GREEN members. Trial members have limited access to the online archive.

DIGITAL (Green)
- 8x Elektor Magazine (Print)
- 8x Elektor Magazine (Digital)
- Integrated Industry Section
- Access to the Elektor Archive*
- Access to over 5,000 Gerber files
- At least 10% Member Discount on Elektor Store*
* Member discount and unlimited archive access only for full GOLD or GREEN members. Trial members have limited access to the online archive.

BUY THIS ARTICLE (PDF)
Materials
Gerber file
CAM/CAD data for the PCB referred to in this article is available as a Gerber file. Elektor GREEN and GOLD members can exclusively download these files for free as part of their membership. Gerber files allow a PCB to be produced on an appropriate device available locally, or through an online PCB manufacturing service.
Elektor recommends the Elektor PCB Service service from its business partner Eurocircuits or AISLER as the best services for its own prototypes and volume production.
The use of our Gerber files is provided under a modified Creative Commons license. Creative Commons offers authors, scientists, educators and other creatives the freedom to handle their copyright in a more free way without losing their ownership.
Extra info / Update
5 May 2008
The microcontroller type MC68HC908JB16 used in the original TBLCF document is no longer in production. The MC908JB16JDWE is the replacement part and available as a free sample using the Freescale website.
19 August 2008
Produced corrected parts list and schematic for inclusion (on paper) with kits 071102-71.
Shipping of initial 300 kits to start on Friday 22 August (back orders).
Unprogrammed boards expected week 36 - received. - shipping week 37.
More programmed boards expected: t.b.a. - received. - shipping week 37.
2 September 2008
The MCU on the board (U1) will run warm to the touch (approx 40-50 degrees C). This is normal and within manufacturer specifications — see the MCF52231 datasheets.
3 September 2008
By popular request bare boards for the TBLCF tool will be included in the Elektor SHOP. The PCB order code will be 071102-2. Boards will be available by week 38. TBLCF operation and construction is explained in great detail in TBLCF manual_v14.pdf, courtesy Daniel Malik.
3 September 2008
All programmed DigiButler boards contain an early version of the firmware that causes the unit to respond to static IP address 192.168.0.151 with all remaining functionality as described in the magazine articles, including WAP access and web pages. A static IP address is useful if not essential for applications where secure remote control is required and the authorised user cannot be aware of DHCP-assigned IP addresses after a router reset (e.g. following a power failure).
To be able to LINK successfully to DigiButler, your router should support the IP range 192.168.0.1 for client devices. If necessary, consult the documentation available for your router. Many, but not all, routers allow the client IP address range to be changed using their configuration utility. 100 Mbit/s support is required on the router, or on the PC if this is connected directly to DigiButler. A crossed Ethernet cable is required for connection to a PC LAN port.
In cases where:
a). the user has no ability to define 192.168.0.151 as a suitable client IP address on the router;
b). the user has no facility to set up 192.168.0.1 as the client IP address range on the router (i.e. allowing DigiButler to reside at 192.168.0.151);
c). the user wishes to employ the router’s DHCP server functionality in combination with DigiButler,
then the necessary procedures and items to have available are described below, courtesy John Stuart on the Elektor UK forum.
For interest, the original DigiButler firmware was developed using CodeWarrior for ColdFire Architectures version 6.3 (still a free download from the DigiButler project web page), with advice from Freescale to refrain from the use of version 7.0 because of issues with the MCF52231. Meanwhile CodeWarrior has progressed to versions 7.1 and quite recently 7.2.
Detailed procedure
Below please find advice on how to modify and compile the DigiButler source code enabling it to get an IP address automatically through DHCP. The use of the TBLCF programmer to flash the new firmware into the DigiButler is also covered. A functional TBLCF unit or equivalent Coldfire programming tool is required.
Firstly here are the files you will need:
1. CodeWarrior for Coldfire Architectures 7.1. This can be found here: www.freescale.com/webapp/sps/site/overview.jsp?nodeId=01272600610BF1
2. archive 071102-11.zip. This can be found at www.elektor.com/digibutler. It is under the heading "Free downloads" as "Software." The same is also available on the CD-ROM supplied with Elektor’s DigiButler kit 071102-71.
3. setup.xml; also available from the above project page (‘DHCP Update’).
4. mcf5223_sysinit.txt (possibly); also available from the above project page (‘DHCP Update’)
The first step is to install CodeWarrior 7.1. Once this is done you need to extract the project files from archive 071102-11.zip. Extract all the files from 071102-11.zip into a folder. Then open the folder called "Versions CW 7.0"; inside there should be another zip called SW_Main_Board_31_03_08.zip. Extract this zip and you should have a folder called SW_Main_Board, this folder contains all the project files and source code.
The directory that contains the CodeWarrior project files is ..\SW_Main_Board\build\m5223evb. In the folder m5223evb there is a file called elektor.mcp. Either drag and drop elektor.mcp into CodeWarrior, or when inside CodeWarrior, go to File then Open and choose elektor.mcp. Now on the left in CodeWarrior you should see a directory of all the source files.
To enable DHCP you should make two changes. The first is in main.c. Open main.c by double clicking on its name in the directory (it is in the "project files" folder). Find the following code in main.c:
#if 1
IP_ADDRESS(192,168,0,151);
DEF_GATEWAY(192,168,0,1);
SUBN_MASK(255,255,255,0);
#else // IP: 0.0.0.0 Gateway: 0.0.0.0 Mask: 255.255.255.0 - Now DHCP client works properly
IP_ADDRESS(10,171,88,10);
DEF_GATEWAY(10,171,88,254);
SUBN_MASK(255,255,255,0);
#endif
Delete this code and replace it with:
#if 0
IP_ADDRESS(192,168,0,151);
DEF_GATEWAY(192,168,0,1);
SUBN_MASK(255,255,255,0);
#else // IP: 0.0.0.0 Gateway: 0.0.0.0 Mask: 255.255.255.0 - Now DHCP client works properly
IP_ADDRESS(0,0,0,0);
DEF_GATEWAY(0,0,0,0);
SUBN_MASK(255,255,255,0);
#endif
The next change is in ipport.h, this is found in the folder \common\ColdfireLite\headers. Find the following code:
// EMG - To enable DHCP, uncomment the line below
//#define DHCP_CLIENT 1 /* include DHCP client code */
Delete this code and replace it with:
// EMG - To enable DHCP, uncomment the line below
#define DHCP_CLIENT 1 /* include DHCP client code */
Now compile the code by going to the Project menu and choosing make or by pressing F7. Hopefully it will compile without any errors. You are now ready to flash the DigiButler with new firmware.
Open the folder "TBLCF" that was in 071102-11.zip. Inside this folder extract the files from "tblcf_v10.zip". Closely and accurately follow the instructions in manual_v14.pdf to install the TBLCF drivers and flash the TBLCF. Once you have finish setting up the TBLCF go to the Tools menu and choose "Flash programmer" in CodeWarrior. Click on the "Load Settings" button and choose setup.xml. Now CodeWarrior is ready to flash the DigiButler.
Before programming make sure that you have right jumper setting on the DigiButler board. Jumper 2 should be on and pins 1 and 2 of jumper 2 should be connected.
Connect the TBLCF to the programming port of the DigiButler, then plug the TBLCF into your computer, then power up the DigiButler. Click on the "Erase / Blank Check" button in CodeWarrior. Click Erase and wait for a success message to appear. If the erase fails, try again and if it still fails restart CodeWarrior.
Next click on the "Program / Verify" button then click on Browse. Go to the folder SW_Main_Board\obj and choose web_coordinator.S19. Now click program and wait for a success message.
Now the DigiButler is programmed you can run the software by going to Project then Debug or by pressing F5. If a dialogue box appears, click Yes. The debug window should now open. Click on the run button at the top left of this window (it is the button with an arrow and a bug on it.) You may need to press the run button twice to start the program. Alternatively if you do not want to debug just press the reset button on the DigiButler board to start the program.
If after programming you get the message "@@@@ LINK IS DOWN @@@@" over the serial port, use a software workaround found in the latest TCP/IP stack. Reprogram the DigiButler as detailed above. In CodeWarrior, open the file called mcf5223_sysinit.c that is in the cpu directory. Select all the code and delete it. Copy the code from mcf5223_sysinit.txt (download from the project page) and paste it into mcf5223_sysinit.c. Compile and flash the code to the DigiButler. Now the problem should be solved.
Notes:
1. You must always erase the MCU before programming.
2. You may need to restart CodeWarrior between each programming. This may just be a bug in the setup.
3. After programming the serial baud rate will be 115200. This can be changed in the file m5223evb.h by changing this line:
#define UART_BAUD 115200 /* 19200*/
Replace 115200 with the baud rate you want.
4. Active and knowledgeable DigiButler users may be found here: www.elektor.com/forum then select the ‘DigiButler (April & May 2008)’ topic. Please read available postings carefully.
5 September 2008
Elektor have formally requested Freescale to resume their free samples service for the MC908JB16JDWE IC used on th TBLCF board. Approximately 350 samples were shipped to Elektor readers over the period May-July 2008.
15 September 2008
TBLCF boards can be ordered from Elektor. All back orders for DigiButler kits and bare boards have been cleared.
16 September 2008
Free samples of the MC908JB16JDWE can be ordered again from Freescale. In the samples request form, enter Elektor DigiButler as the name of the project you are developing. We repeat that the supply of free samples to individual customers in certain countries is at the discretion of Freescale and not controlled by Elektor in any way.
2 October 2008
After an interruption of about one week, the MC908JB16JDWE has free sampling enabled again on the Freescale website. In the samples request form, enter Elektor DigiButler as the name of the project you are developing.
Freescale advises that altough orders for free samples are accepted, supplies are currently subject to delays due to production shortage.
.
Component list
Revised for PCB marked: 00286_2, June-10-2008
Shipping as of 22 August 2008
1. Components pre-fitted on board
Resistors
R3 = 12kΩ, SMD 0805
R4 = 390Ω, SMD 0805
R5 = 10MΩ, SMD 0805
R6,R7,R8,R9 = 51Ω, SMD 1206
Capacitors
C2,C3,C4,C12,C13,C14 = 220nF ceramic, SMD 0805
C9,C10,C11 = 100nF ceramic, SMD 0805
C17 = 220nF ceramic, SMD 1206
C5,C6 = 22pF ceramic, SMD 0805
C7 = 1nF ceramic, SMD 0805
C8 = 100nF ceramic, SMD 1206
C16 = 10nF ceramic, SMD 1206
Inductors
FB1,FB2 = BLM31PG601SN1 ferrite bead, SMD 1206
Semiconductors
U1 = MCF52231CAF6 (Freescale)
2. Components to fit on board
Resistors
R1 = 22Ω SFR16S
R2,R17,R18 = 10kΩ SFR16s
R15 = 470Ω
R10-R13 = 75Ω SFR16S
R14 = 270Ω
R16 = 1kΩ SFR16S
RN1 = 7-way 4kΩ7 SIL
RN2 = 5-way 10kΩ SIL
RN3 = 7-way 10kΩ SIL
Capacitors
C1,C23,C24,C26,C19,C27-C30 = 100nF ceramic, lead pitch 5mm
C15,C20,C21 = 4μF7, solid, SMD1206
C18 = 2nF2 1000V ceramic (TDK)
C22 = 330μF 16V, electrolytic, radial
C25 = 220μF 6.3V, electrolytic, radial
Semiconductors
D1 = 1N4004
D2 = LED, 3mm, green
D3 = 1N4148
D4 = LED, yellow, 3mm
Q1 = BC546B
U2 = LD29080DT33R (STMicro)
U3 = MAX3232ECPE
Miscellaneous
F1 = 0.5A slow, 5x20mm
J1 = 26-way double-row pinheader
J2 = RJ45 socket, PCB mount
J3 = DC adaptor socket, PCB mount
J7 = 10-way double-row pinheader
J6 = 8-way double-row pinheader
J5 = 9-way sub-D socket (female), angled pins, PCB
J14 = 2-way terminal block, 5mm lead pitch
JP1 = 3-way pinheader with jumper
JP2 = 2-way pinheader with jumper
RE1 = G6D-1A-ASI-DC5 (Omron)
S1,S2 = pushbutton, EVQ-PAE05R Panasonic)
T1 = H1102 Ethernet transformer (Pulse)
Y1 = 25MHz quartz crystal
Fuse holder, PCB mount
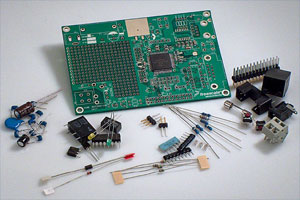
Kit of parts, Elektor Shop # 071102-71, contains CD-ROM 071102-81, all parts and SMD-prestuffed circuit board 071102-1
PCB, Elektor Shop # 071102-1, available separately.
PCB for TBLCF, Elektor Shop # 071102-2 (optional, see text)


Discussion (0 comments)