

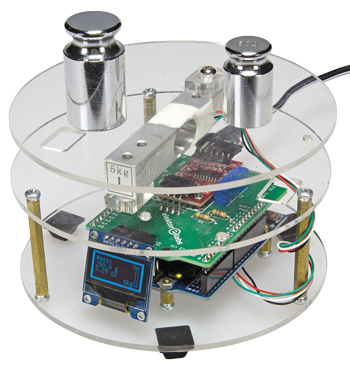
DIY Kitchen Scale
Weigh up to 49.05 kg∙m/s^2 with Arduino
This is a MEMBER ONLY article. You need a subscription to read this article.
- Unlimited access to online Member Only articles
- 3 new editions Elektor Magazine (digital)
- More than 5000 Gerber files
- 20% member discount on e-books (at elektor.com)
- 10% member discount on Products (at elektor.com)
Available from €5.33 per month.
What is Members Only
Elektor is committed to providing high-quality content on electronics, catering to tens of thousands of paying members. As part of this commitment, Elektor has launched Premium, an initiative that offers exclusive online articles to members sometimes even before they appear in the magazine.
Every day, members can access in-depth articles that showcase the best of Elektor's premium content.
This initiative aims to reward members with early access. Once logged in, members can easily enjoy this exclusive content and engage in discussions about featured projects. While Premium adds to the existing resources available, Elektor will continue to provide a wealth of free information.
Join the Elektor community today to take advantage of Premium and other benefits!
Gerber file
CAM/CAD data for the PCB referred to in this article is available as a Gerber file. Elektor GREEN and GOLD members can exclusively download these files for free as part of their membership. Gerber files allow a PCB to be produced on an appropriate device available locally, or through an online PCB manufacturing service.
Elektor recommends the Elektor PCB Service service from its business partner Eurocircuits or AISLER as the best services for its own prototypes and volume production.
The use of our Gerber files is provided under a modified Creative Commons license. Creative Commons offers authors, scientists, educators and other creatives the freedom to handle their copyright in a more free way without losing their ownership.
Extra info / Update
* OLED display
* Arduino-based
Component list
150708-1: Kitchen scale PCB, bare
150708-71: Kitchen scale kit of all parts
Component List
Resistors
R1,R2 = 4.7kOhm
P1 = 10kOhm 15-turn trimpot
Miscellaneous
K1 = 4-way SIL pinheader socket, 0.1” pitch, horizontal
K2 = 6-way SIL pinheader socket, 0.1” pitch, horizontal
1 pc 6-pin SIL pinheader, 0.1” pitch, vertical
2 pcs 8-pin SIL pinheader, 0.1” pitch, vertical
1 pc 10-pin SIL pinheader, 0.1” pitch, vertical
S1,S2 = tactile switch, PCB side mount
HX711 breakout board
2 pcs M2×10 mm bolt
4 pcs M2 nut
PCB # 150708-1 from Elektor Store
Discussion (0 comments)
cbucs 7 years ago
vidalv 5 years ago
My remarks, I do not find the use of potentiometer or at least on my proto it has no effect.
The BP calibration to rebounds ... so he launches the calibration several times.
The memorization BP must remain depressed to freeze the measurement, in fact an On / Off button would be better!
Finally, and I think it's important, if we calibrate with low weight 50g 100g when we want to measure Kig the measure is wrong. Maybe there are 'robust' shots between the two parts of the pressure sensor or I missed something?
PS: Too bad we can not attach an image in the post ....
DON W 4 years ago
bera 4 years ago
Thanks for taking interest in this project of mine. The plexiglass pieces that you mentioned here are just three plates to create -
1. Base plate - for holding the electronics.
2. Middle plate - for fixing the strain gauge bottom on it.
3. Top plate - For fixing the other end of the strain gauge, for placing the load on it.
...
When you place load on the top plate, the strain gauge deflects wrt the middle plate which is the measure of weight.
The bottom and the middle plates are fixed by three long nut-bolts while the top plate is directly fixed on the strain gauge for load measurements.
The transparent plexi glass is very sturdy and looks good. However, in absence of it, any plate of size 4" diameter [or more] can work.
You may look my original project here - https://www.elektormagazine.com/labs/5-kg-kitchen-scale-built-on-arduino
Bera
DON W 4 years ago