

Arduino IoT gateway for Fibaro HC2
I developed this small gateway between a Fibaro HC2 and the Arduino IoT, to allow me to retrieve and display informations.
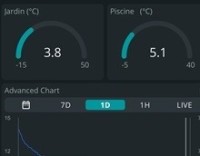
My domotic system at home allows me to know the temperature of each room, the garden and the swimming pool.
In my office I have a small illuminated display (built using the Elektor kit www.elektormagazine.com/labs/scrolling-text-display-160491) which constantly scrolls to indicate the NTP time, the garden temperature and the temperature of my swimming pool and in my kitchen 2 small displays respectively indicate the temperature of the garden and the temperature of the swimming pool).
The sensors are connected to my Fibaro HC2 gateway and my challenge was to send this information to my displays, and also to a dashboard developed on Arduino IoT. the screen shots show the result obtained. The hardware simply consists of a small Heltec ESP32 module with an Oled display. A button allows you to activate the display for 5 minutes. The module is connected via WiFi to the local network of my house.


Updates from the author
ybourdon 1 year ago
You must first create a device (I have used ESP32 Heltec WifI kit 32 board).
Then you create a Thing (see attached screen copy to see the variables that will be updated on Cloud.
Then use my firmware compile, create your dashboard and enjoy !
Everything is simple and well explained by Arduino team !
Schematic is very simple .
I have used a standard Heltec WiFi hit 32 board along with a push switch to display time and temperatures on Oled screen for 5 minutes (screen saver).
ESP32_Temperature.zip (6kb)
WIFI_Kit_32_schematic.pdf (545kb)