

BBC micro:bit T-board + weather station (150652)
This T-Board allows easy connection of the BBC micro:bit to a breadboard and doubles as a weather station and power supply.
The BBC micro:bit is a fun little microcontroller board that, thanks to the BBC, is widely available for a reasonable price. It has a 32-bit ARM Cortex M0 processor with integrated Bluetooth Low Energy (BTLE) radio, a 5x5 LED matrix, a 3D accelerometer and a 3D magnetometer (a compass, if you like). It also has an edge connector that breaks out 19 GPIO pins of the main MCU plus 3 V and GND.
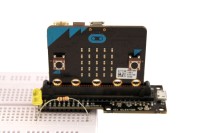
To provide easy access to the edge connector we have designed a little board with a compatible socket for it. Since many people like using breadboards for their experiments our little board was designed as a T-board in order to minimize the covered breadboard surface. Two rows of 11 pins break out the contacts of the edge connector to breadboard-compatible pitch. The micro:bit T-board can also be used without a breadboard, just as a means to keep the micro:bit in upright position. This is useful for, say, sensor applications that make use of the LED matrix to display data. Fixation holes are available to attach the board to something else.
Officially the micro:bit is powered from a battery pack consisting of two AAA cells. It can also be powered from the micro USB connector. However, with our T-board the power connectors are at the top edge of the board (opposite of the edge connector) potentially making the assembly a bit unstable in upright position and so we put a 3 V voltage regulator on the board. Now you can power the micro:bit from the bottom too.
Many people like to monitor weather parameters like temperature and humidity, which is why we put a BME280 weather sensor on the micro:bit T-board. This sensor measures not only temperature and humidity, it also measures (atmospheric) pressure. Actually this high-tech sensor was designed with mobile applications in mind to which it can add context awareness (skin detection, detection of change of room, vertical velocity, etc.), but it can also help in predicting the weather. On the T-board the sensor is hardwired in I²C mode (it can also do SPI) and is connected to the I²C bus of the edge connector. The BBC micro:bit can be programmed in C/C++ with ARM’s free mbed online IDE. We have prepared an mbed compatible program that can be compiled for the micro:bit. The driver for the BME280 can also be downloaded from Elektor.Labs’ GitHub space.
A word about the micro:bit edge connector. Five of its contacts are extra wide pads with banana-plug-compatible holes in it. The edge connector is double sided, but only one side of it is used. Its contacts are on a 0.05” grid and all in all the 21-pin connector corresponds to a 40-way, 2-row, 0.05” (1.27 mm) pitch connector. This is more or less a standard size and sockets for it can be found, although you have to look hard. Expensive and/or large volume types are available on demand, but that is not what we want. If you have any suggestions as to where we might find cheap, micro:bit compatible connectors, please let us know. Manufacturer and type numbers are highly appreciated. The potential market is one million pieces…
For our prototype we have used cheap sockets from RS Components that, unfortunately, are slightly too wide, extending a few millimeters beyond the micro:bit. This means that you must center the micro:bit carefully in the socket to avoid shorting contacts. To improve the socket, its extra space on both ends can be filled with some material (like a small resistor), but it would of course be better to have a snug-fit socket.
Discussion (2 comments)
urs ma 8 years ago
I'm confused reading this article and seeing two different boards
The post is about a small "edge" board with direct USB connection.
To order I find only the
BBC micro:bit weather station - PCB with SMDs mounted (150652-71)
Is the other one sold out or did I search wrong?
thanks for solving that puzzle
urs
Hedwig 8 years ago
HaSch 8 years ago
I compiled the program to micro.bit using the mbed online IDE and transferred to the board. Result: the blue LED is flashing but I can't see any else activity of the program.
Hans
HaSch 8 years ago
Best regards,
Hans
Conrad Djedjebi 8 years ago
Here is a way to show the bme280 sensor's datas on the LED Matrix of the micro:bit :
First add to your project mbe280's and microbit's libraries (picture1).
Then create a new instance of Microbit class (same for BME280 class). Now we are going to see the whole kit (T-Board + microbit) as a Microbit object.
To display the temperature mesured by the bme280 sensor on the Microbit's LED Matrix, we may write something like this :
uBit.display.print("T");
uBit.sleep(800);
uBit.display.scroll(round(bme280.temperature(),150);
uBit is an instance of Microbit class. I am using the functions "scroll" and "print" from the subclass "display". The timers are giving people the time to read the values on the matrix (otherwise it is to fast for eyes). Since the function "scroll" can manage values of type "double", the "round" function converts the double type value of bme280.temperature() to an int32_t. ("round" function from math.h, tgmath.h and some other available libraries was not supported, so I created my own round function).
At this step, your code won't compile correctly because, I assume, your current program is using a timer called "wait_ms" somewhere in the main. As we are using Microbit's instance (uBit), we must also use Microbit's class timers. So replace all the wait_ms by uBit.sleep (picture2).
The steps above show roughly how to use the microbit as a weather sensor and also a weather displaying box
I hope those information will help you in your work
Best regards
Conrad, LAB's team
Timer must be changed (22kb)
Jean Paul Arbel 8 years ago
But from zip elektor file (bme280_zip_nrf51_microbit.zip), I 've got some errors after compiling.
Thank's for your work, Clemens !
HaSch 8 years ago
Yes, I imported as ZIP. I agree with you that it must work. I'm away from home for a while but when I'm back I will give it another try.
ClemensValens 8 years ago
I also published this program on mbed and when you use that, then it compiles fine.
It is probably easier to start with a new micro:bit project that already includes the micro:bit object and then add the bme280 stuff to it. There is no reason for it not to work, it is just plain C++ code doing a bit of I2C communications.
HaSch 8 years ago
I imported microbit library into bme280_zip_nrf51_microbit and I got the following errors while compiling. I didn't make any changes to the code.
ClemensValens 8 years ago
P.S. Note that there is a special code formatting button, on the right in the menu above the comment edit window. Please use that so nothing is lost due to html tag filtering. Example with C++ as language: Looks nice, eh?
HaSch 8 years ago
I took the example "microbit-component-display" which looks like this ;-):
/* See
 * http://lancaster-university.github.io/microbit-docs/advanced/
 * for docs about using the micro:bit library
*/
#include "MicroBit.h"

MicroBitDisplay display;

int main()
{
    while(1)
        display.scroll("ELEKTOR MICRO:BIT WEATHER STATION");
}
For to work I had to import MicroBit.h library into the BME280 projekt and now the trouble started; I got multiple errors compiling bme280 and even microbit-component-display and I have no idea how to fix.
ClemensValens 8 years ago
HaSch 8 years ago
I expected to see the output of the program on the LED matrix of the micro:bit board.
ClemensValens 8 years ago
Anyway, the micro:bit also functions as an mbed USB serial converter so if you have the mbed drivers installed correctly you can open a serial terminal program and connect to the mbed serial port. That is where the data is shown. 9600 baud should work.
HaSch 8 years ago
I don't know how to get data on which serial port?
ClemensValens 8 years ago