
Create an ESP32 Project With PlatformIO: A Guide for Beginners
on
Using PlatformIO with Visual Studio Code offers a powerful, flexible, and easy-to-use environment for microcontroller firmware development. The combination of ease of configuration, broad platform support, advanced development tools, and a large community makes this setup an excellent choice for those just starting out in the field of embedded programming. This article describes an example of integrating PlatformIO and VSC to create a design for reading humidity and temperature values with a digital sensor and an ESP32 module.
PlatformIO
PlatformIO is an open-source integrated development environment (IDE) that is increasingly used in the hobby but also, and more importantly, in the professional field. An integrated development environment is software that provides developers with a comprehensive tool for writing, testing software code and debugging. An IDE integrates several essential tools and features to simplify the software development process, improve productivity, and provide a consistent environment for the entire project lifecycle. It usually includes:
- An advanced text editor that supports the syntax of the programming language being used, with features such as syntax highlighting, auto-completion and indentation.
- Tools for compiling source code into executable machine language.
- A built-in debugger to detect and correct errors in the code during program execution.
- A system that facilitates the addition, management and updating of libraries and project dependencies.
- A controlled execution environment for testing the software under development.
- Systems for integration with version control tools (such as SVN, Git, Mercurial etc.), project management features, and an easy and intuitive user interface.
A popular IDE that is widely used is, for example, Visual Studio Code (VSC).
Actually, PlatformIO is not a true stand-alone IDE, but operates as a plugin (i.e., an add-on software) that can be integrated into various development environments, including Visual Studio Code (VSC), Atom, and Eclipse. Currently, Visual Studio Code is the main IDE supported by PlatformIO, probably also the one most chosen by professional developers.
By integrating PlatformIO into Visual Studio Code, developers can benefit from several features; in fact, PlatformIO is designed to simplify and improve the process of microcontroller firmware development. It supports a multitude of microcontrollers of various kinds, including the various versions of Arduino but also other microcontrollers and ESP8266/ESP32-based boards.
In essence, one of the distinguishing features of PlatformIO is its compatibility with various platforms, including Arduino, Espressif IoT Development Framework (ESP-IDF) and many others. This allows developers to choose the platform best suited to their needs, while using (which is of no small importance) always the same IDE.
It supports several programming language options, such as C, C++, Python and is compatible with libraries already made for Arduino. PlatformIO greatly simplifies the management of project dependencies and the various versions of libraries (both self-created and third-party) that can be included, and offers advanced compilation tools. Thus, developers can easily incorporate external libraries into their projects without having to worry about installation details.
Furthermore, PlatformIO supports library version management, making the development process more robust (as well as simple). The IDE offers comprehensive support for debugging and provides advanced tools for device monitoring and control during firmware execution. Ultimately, PlatformIO offers a unified, flexible, intuitive, and relatively easy-to-master environment that simplifies the development process and contributes to more efficient project management.
In this guide, we will see how to create and manage a PlatformIO-based project specifically for the ESP32 microcontroller, which will be connected to a DHT22 sensor to detect instantaneous ambient temperature and humidity values and display them on the PlatformIO console.
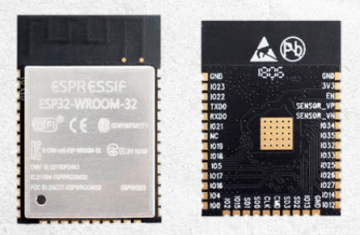
The ESP32 Module
ESP32 is a low-power microcontroller developed by Espressif Systems, known for its versatility and computational power. Based on Tensilica’s Xtensa LX6 architecture, the ESP32 integrates several advanced features that make it ideal for a wide range of applications in Internet of Things (IoT) and embedded computing. Salient technical features of the ESP32 include:
- Dual-Core architecture: the ESP32 features two Xtensa LX6 cores, which enable parallel operations and improve overall system performance.
- High clock frequency: with clock frequencies of up to 240 MHz, ESP32 offers high processing power to handle complex applications.
- Wireless connection: integrated with Wi-Fi and Bluetooth connectivity, enabling wireless communication with other devices and networks effortlessly.
- Built-in flash memory: ESP32 has memory, providing enough space for firmware and data loading.
- Numerous and varied I/O peripherals, such as GPIO, UART, I2C, SPI and PWM ports, allowing easy interaction with other devices.
- Signal processing unit (DSP): ESP32 is equipped with a DSP that enhances processing capabilities for audio and signal processing applications.
- Low-Power Mode: supports low-power modes to extend battery life in battery-powered devices (the so-called “deepsleep”).
- Open-Source Development Environment: Espressif supports an open-source development environment through the use of frameworks such as Arduino and PlatformIO, simplifying the programming and development process.
- Security: ESP32 incorporates advanced security features, including hardware encryption, making it suitable for projects that require a higher level of protection.
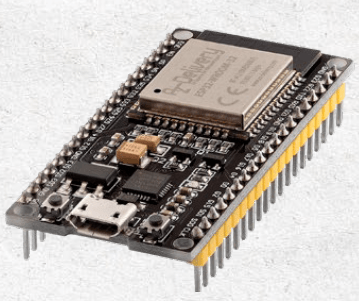
Because of these features, ESP32 is widely used to develop IoT projects, smart sensors, home automation devices and more. ESP32 is a processor that requires, at least for our purposes, an additional electronic part whose function is to provide it with the proper power supply and to interface it to a USB port on a computer so that it can be programmed (i.e., transfer to its internal memory the firmware that will be written and compiled on PlatformIO) and to communicate with it via the serial port (on PlatformIO’s Serial Monitor console).
The DHT22 Sensor
Since we will be using it in this mini-project, let us spend a few words on this sensor, which is, moreover, quite well known among insiders. The DHT22, aka AM2302, is a digital temperature and humidity sensor that offers a reliable and accurate solution for monitoring environmental conditions. This device is widely used in home automation projects, environmental monitoring, and weather applications. The DHT22 sensor uses a capacitive sensor to measure relative humidity and a thermistor to measure temperature. Here are some of its salient technical features:- Accuracy and reliability: the DHT22 offers high accuracy in both temperature and humidity measurement.
- Wide measuring range: the sensor can detect temperatures in the range of -40°C to +80°C and relative humidity in the range 0…100%.
- Digital signal: the DHT22 directly transmits digital signals through a single pin, simplifying interfacing with microcontrollers such as Arduino or ESP32, which then do not have to acquire and digitize an analog signal.
- Fast response time: the sensor is known for its fast response time of about 2 seconds.
- High resolution: it provides data with a resolution of 0.1°C for temperature and 0.1% for humidity, allowing detailed accuracy in measurements.
- High noise immunity: due to its capacitive measurement technology, the sensor is relatively immune to external interference.
Interfacing with the DHT22 is generally simple, requiring only a microcontroller and a dedicated library.
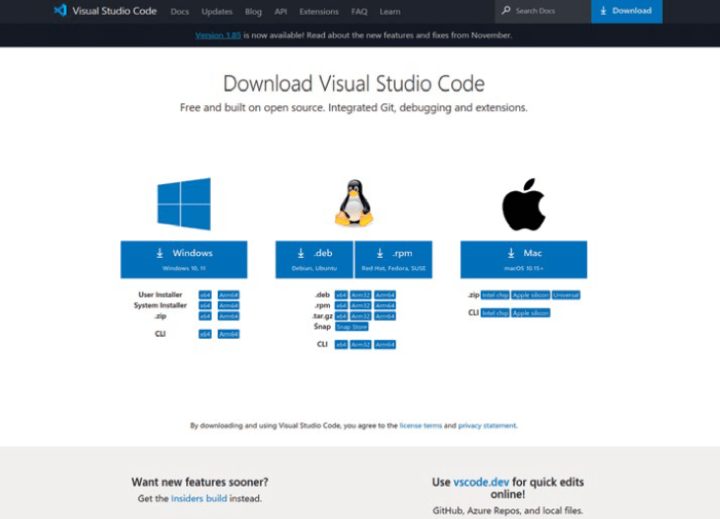
Installation of Visual Studio Code and PlatformIO
As previously mentioned, PlatformIO is a plugin to the Visual Studio Code IDE, so the first step is to install that IDE. The direct link to the download page can be found here. As can be seen from Figure 1, such software is available for major operating systems (Windows, various distributions of Linux, macOS). Once we have downloaded the appropriate file for our own OS, we install it.
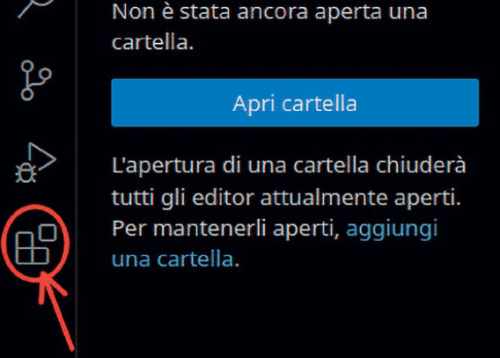
Whichever version is chosen, a welcome page will appear when the program starts. Closing it will bring up the main page of the IDE on the left column of which buttons appear (including the one marked in red in Figure 2). That is used to search for and install the plugins (aka extensions) desired on VSC. By clicking on it, the search window on the left column opens.
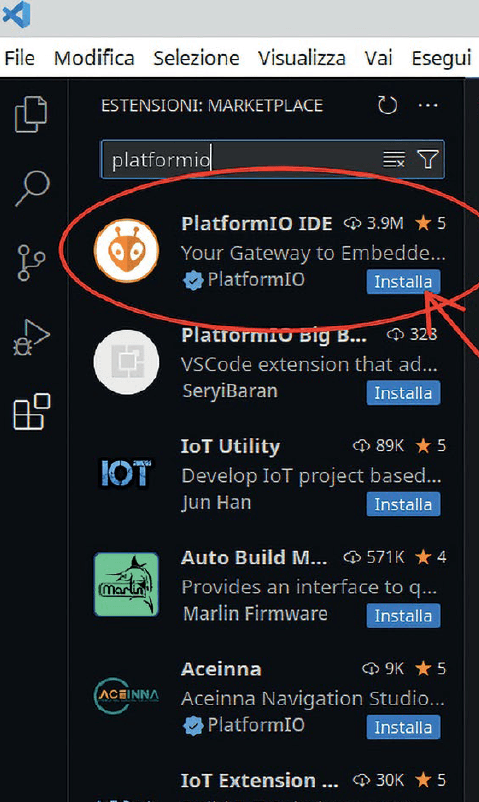
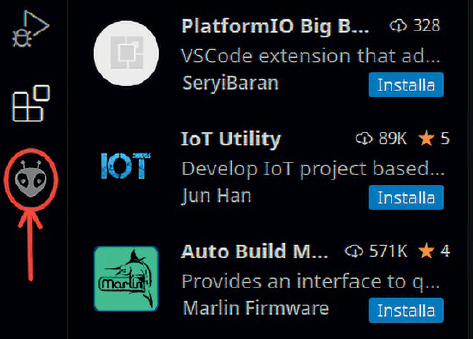
To find any plugin, simply type its name on the rectangular box at the top left. Typing platformio will bring up the plugin in the list, so all we have to do is click on the Install button of the PlatformIO plugin as shown in Figure 3. In a few minutes, it will be installed, and its presence will be indicated by the small new icon on the left column, as visible in the image on Figure 4. Now, PlatformIO is installed and ready to be used.
Creating the Project on PlatformIO
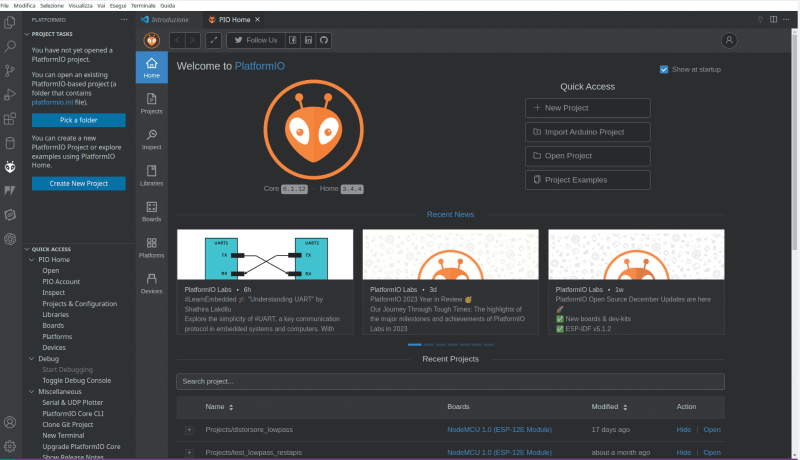
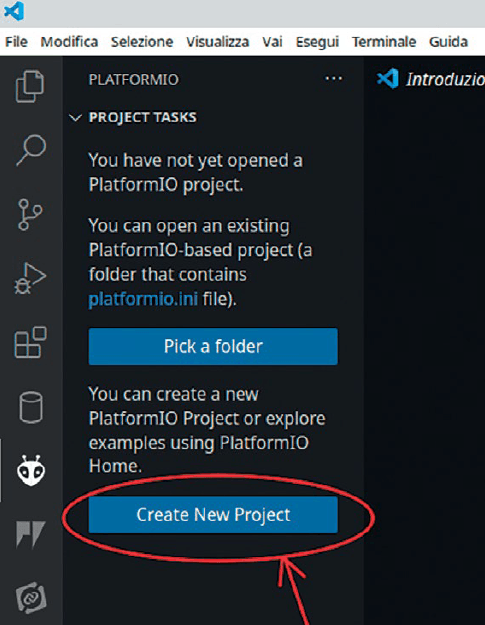
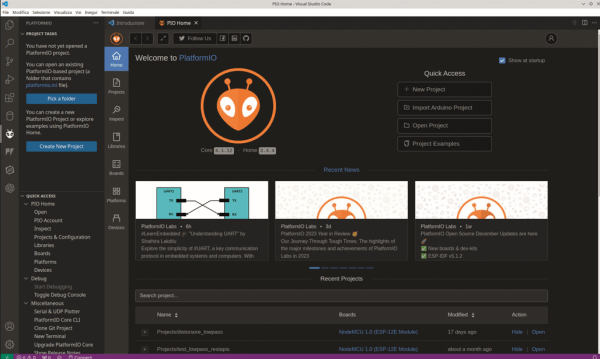
First, once the VSC is started, we need to click on the PlatformIO icon. The main page will open, on which we need to click the Create New Project button (Figure 5). A new welcome page will open (Figure 6), where one must click the + New Project button. This action will open a simple project wizard that will ask us to enter the name of the project, the platform and the framework used, as visible in Figure 7.
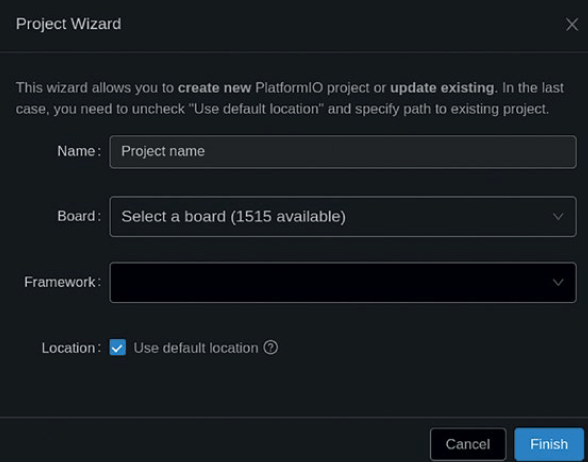
The project name can be any (e.g., testESP32) while the choice of board model depends on the one we have. Typing ESP32 in the box labeled Board will show a list of all available ESP32-based boards. In the present case, we have chosen the AZ-Delivery ESP-32 Dev Kit C V4 board. As Framework, we have left the Arduino entry unchanged. The Location checkbox is used to tell PlatformIO whether to use the default one as the working folder or if you want to specify a different folder. Let’s leave the default one.
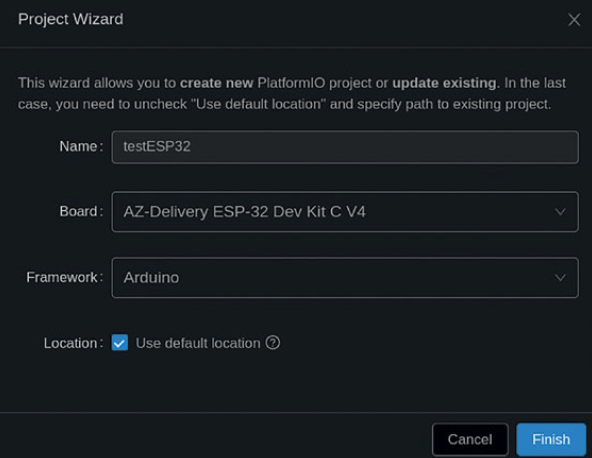
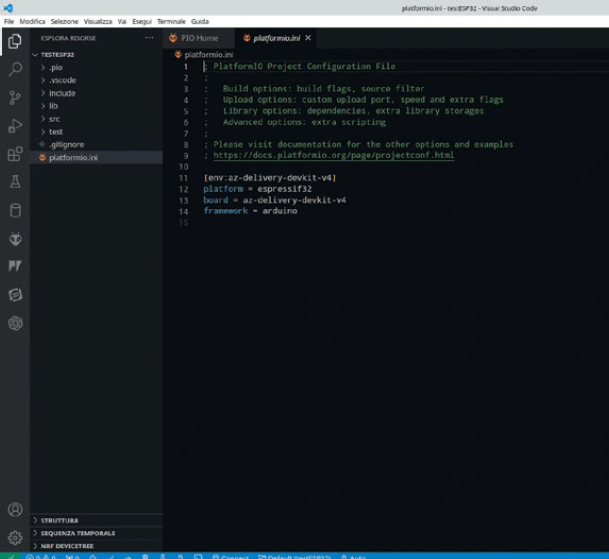
The result of these choices can be seen in Figure 8. Clicking the Finish button will create the project. After a few seconds, the screen visible in Figure 9 will appear. PlatformIO shows on the left the tree structure of the project, while in the workspace it shows the platformio.ini file (also part of the project) that collects the project settings. Currently, the settings present are the only ones provided when compiling the wizard.
In the project structure (the tree on the left) there are a few folders. One of these is called includes and is currently empty. Its function is to collect any files to be included in the project (typically .h files). Another folder is called src and contains the file main.cpp which will be the main file of the sketch, that is, the one where the program is to be written.
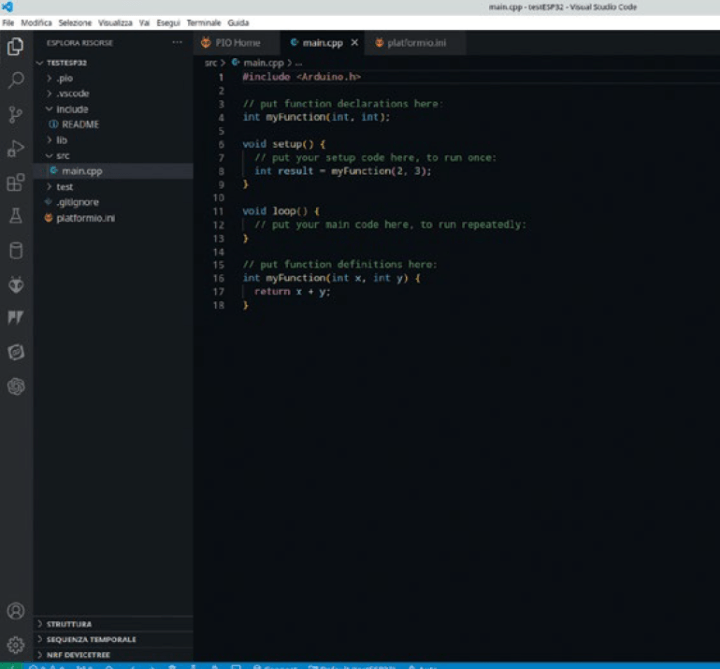
Figure 10 shows the contents of that file. Notice that the two main functions used in sketches for Arduino appear: setup and loop. In the file system, the project will appear organized as in Figure 11.

Note: The operating system used to make this guide is Linux. It is possible that on Windows and macOS the organization of the files on the file system will be different. But the interface of PlatformIO will always be the same, regardless of the operating system used.
Adding Libraries to the Project
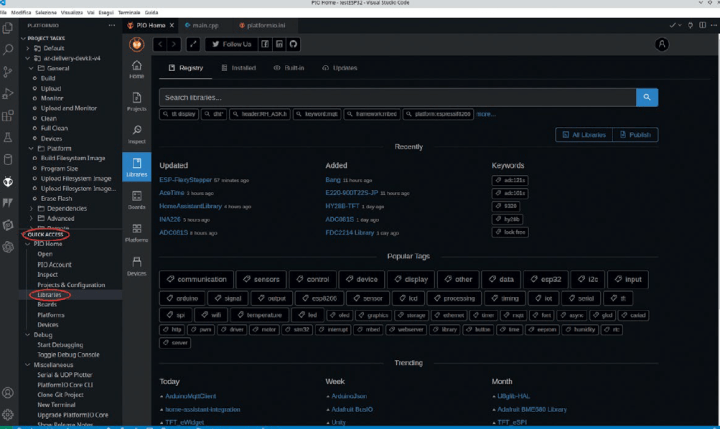
Adding libraries to the project is a fairly simple operation. Suppose we want to add the DHT sensor library for ESP (which is used to read the data transmitted by the DHT22 temperature and humidity sensor). First, we need to go to the left column of the IDE and click on the PlatformIO icon. This will open the main page of PlatformIO, where the QUICK ACCESS section becomes available. One of its entries is Libraries. Clicking it will open the libraries search window, visible in Figure 12.
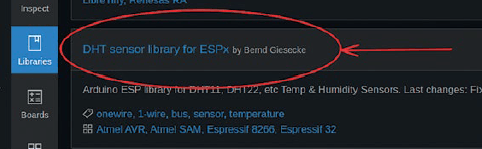
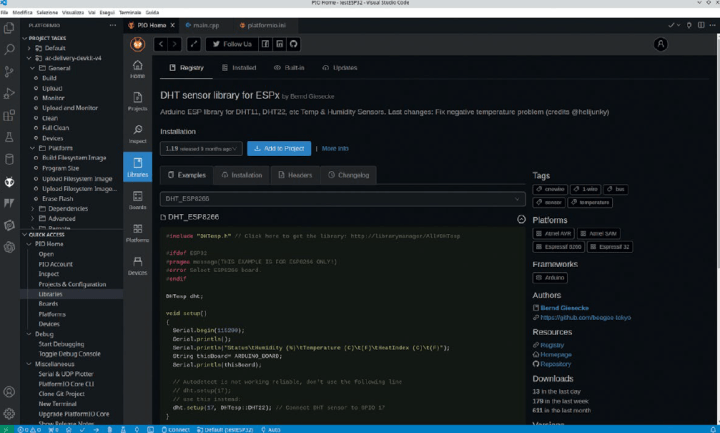
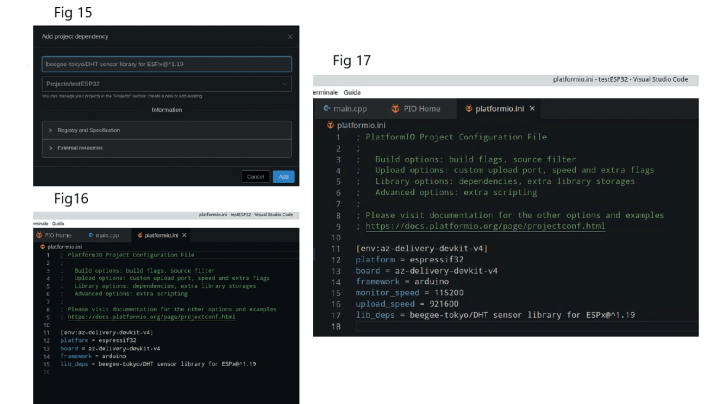
By typing DHT22 in the search box, several results will appear. The choice falls on the DHT sensor library for ESPx by Bernd Giesecke, as visible in Figure 13. Clicking on it will open the library page (Figure 14). To install the library, simply click the Add to Project button, select in the next wizard the project of interest (in our case testESP32) as shown in Figure 15 and click the Add button. PlatformIO will automatically download the library within the project folder. It will also add it to the platformio.ini configuration file, as shown in Figure 16.
This is the standard procedure for adding a library to the project. An alternative procedure is to directly edit the platformio.ini file by adding the entry lib_deps = followed by the list of libraries to be added. In our case, it would have been sufficient to add the line:
lib_deps=beegee-tokyo/DHT sensor library for ESPx@^1.19
In conclusion, libraries can be added with the search page or, if you know the name, with the path, directly to the platformio.ini file. To use the library just added to the project it will have to be included, for example, in the file main.cpp, by adding the line #include "DHTesp.h" immediately after the line #include "Arduino.h".
On the platformio.ini file we also add the following lines:
monitor_speed = 115200
upload_speed = 921600
so that it appears as in Figure 17. These two commands are used, respectively, to set the speed of the serial port for communication with the computer and the speed at which the sketch is uploaded to the memory of the microcontroller.
Testing the Project
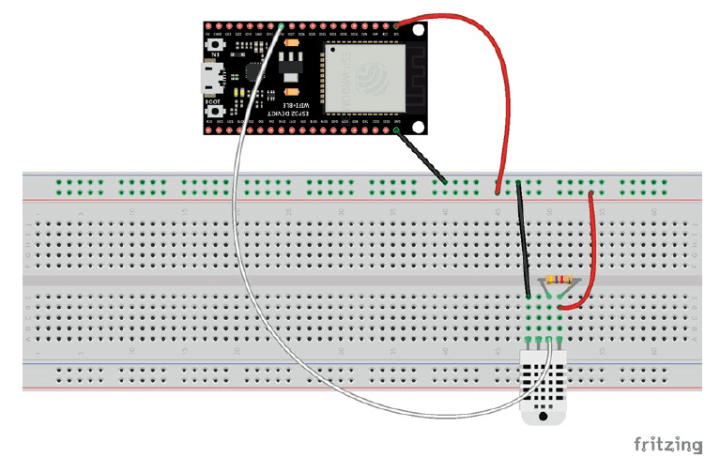
To get a working example of the newly created (thus empty) project, we decided to connect the microcontroller to a DHT22 sensor, read the measured values of ambient temperature and humidity in real time, and display them through PlatformIO’s Serial Monitor. In addition to the microcontroller and sensor, we needed a 4.7 k resistor, some wires and a breadboard to make the simple circuit visible in Figure 18. As can be seen from the picture, unfortunately, the size of the ESP32 NodeMCU did not allow it to be placed on the breadboard, so it was left out.
The Sketch
Listing 1 is contained in the main.cpp file. The sketch begins with the inclusion of the necessary libraries. Next, the dht object of type DHTesp, which is used to manage the sensor, is instantiated. Then the GPIO of the ESP32 that will read the data from the sensor (in our case 14) is assigned.
Variables are defined that will contain the measured values and those that manage the timing of the measurements (in this case the readings will occur every 3 s). It would be good not to go below this value because the DHT22 takes about 2 s to make a measurement.
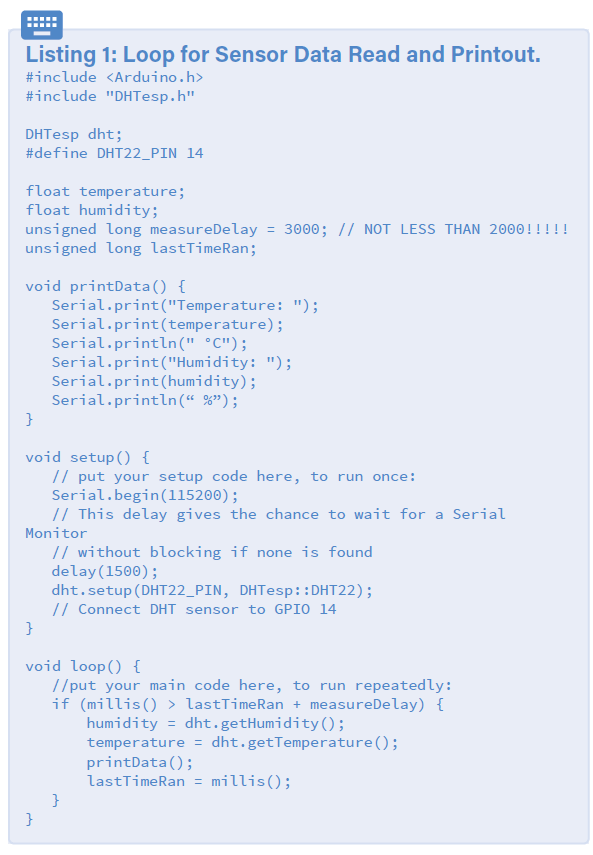
Next comes the printData() function, which reads the temperature and humidity variables and prints them to PlatformIO’s Serial Monitor, giving them minimal formatting. The setup function initializes the serial port (through which prints to the Serial Monitor will pass) and connects GPIO 14 to the sensor.
Finally, the loop function detects, every measureDelay ms, the measurements made by the sensor and stores them in the two variables temperature and humidity. It then calls the printData() function to print the results. All of this is done cyclically. To load the sketch onto the board, simply click on the button indicated with the number 1 in Figure 19.
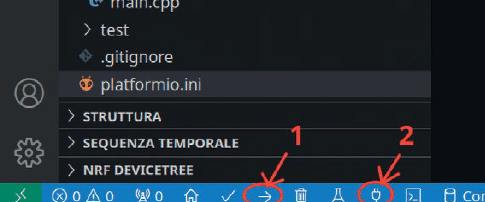
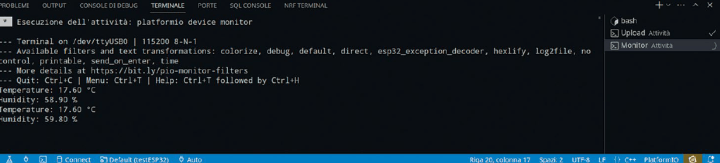
The sketch will first be compiled and then, if no compilation errors occur, loaded into the internal memory of the ESP32 microcontroller. To visualize the results, the Serial Monitor must be activated by clicking the button indicated with the number 2, still in Figure 19. Figure 20 shows the results printed on the Serial Monitor.
Ready for Coding?
As can easily be seen, creating a project with PlatformIO and adding any libraries is all in all a fairly simple and standardized operation. PlatformIO combines ease of use with comprehensive functionalities, which have not been examined here, since it is not the purpose of this guide.
Advanced library management and easy installation of dependencies further simplify the development process, allowing more focus on creating the project, rather than on configuring the environment. In addition, native integration with Arduino and its large developer community provide additional benefits, allowing access to a vast ecosystem of shared resources and solutions.
Using PlatformIO for ESP32 represents a significant step toward a more efficient, organized, scalable and professional development process. The platform provides the tools needed to explore innovative ideas, create complex designs and accelerate the development cycle, making the programming experience smoother and therefore more rewarding.
This article (240370-01) appears in Elektor November/December 2024.
Editor’s notes: Interested in ESP32 projects ,PlatformIO, and more? This project originally appeared in Elettronica IN.
![]()


Discussion (2 comments)