
Elektor Lab Notes 15: eXpansion Boards, LoRa, Raspberry Pi, Circuit Special, and More
on
Saad Imtiaz (Senior Engineer, Elektor)
New Developments in Expansion Boards and LoRaWAN Projects
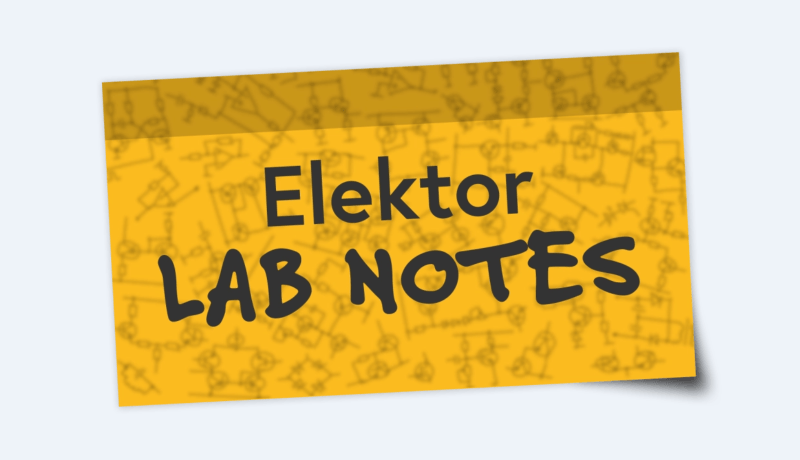
Elektor's eXpansion Board: I've been busy developing Elektor's eXpansion Board, designed to enhance the capabilities of the Seeed Studio XIAO microcontrollers. This board significantly expands the XIAO's I/O options, offering six I2C connections (four with Grove connectors and two Qwiic), as well as all the IOs provided by the XIAO, including SPI and UART connectors. This expansion board is set to become my go-to tool for future projects due to its versatility and comprehensive connectivity options. Detailed coverage of this board will be featured in the upcoming editions of Elektor Magazine, so stay tuned for more information.
LoRaWAN Project: I've also started an exciting new project I've been eager to tackle: a Solar-Powered LoRaWAN node designed for agriculture and greenhouse applications. This project aims to create a versatile base LoRaWAN sensor node that can be easily expanded with additional sensors as needed. All electronics will be housed in custom 3D-printed enclosures to ensure durability and adaptability. The primary goal is to develop a robust and flexible LoRaWAN solution that can be tailored for various applications, providing a powerful tool for modern agriculture.
Jean-François Simon (Engineer, Elektor)
LoRa Without LoRa Hardware: LoRa is an advanced wireless communication protocol, coupled with complex transceivers that generate “chirps”, which are variable-frequency signals (moving either upwards or downwards) used to encode several bits at a time while spreading the spectrum, resulting in a better combination of throughput and range. So, to communicate with commercial LoRa equipment, you need to use an official compatible transceiver... Right? In this video, CNLohr does the opposite.
He set himself the challenge of exploring how far LoRa packets can be broadcast without a proper LoRa chip, with just a standard microcontroller. When a square wave is generated by toggling a pin between its high and low states, a fundamental signal is generated at frequency f, but also harmonics at frequencies 3*f, 5*f, 7*f, etc. What if one of these harmonics falls right into the LoRa band? By carefully toggling a pin, Charles successfully sent LoRaWAN messages to a commercial LoRa gateway several hundred meters away. His experiment involved various microcontrollers, including the CH32V203 and ESP32-S2, and tested in multiple environments to achieve different distances. The amount of trial and error, reverse engineering, and creative problem-solving skills needed is absolutely insane. Thank you, Charles — a truly inspirational video.
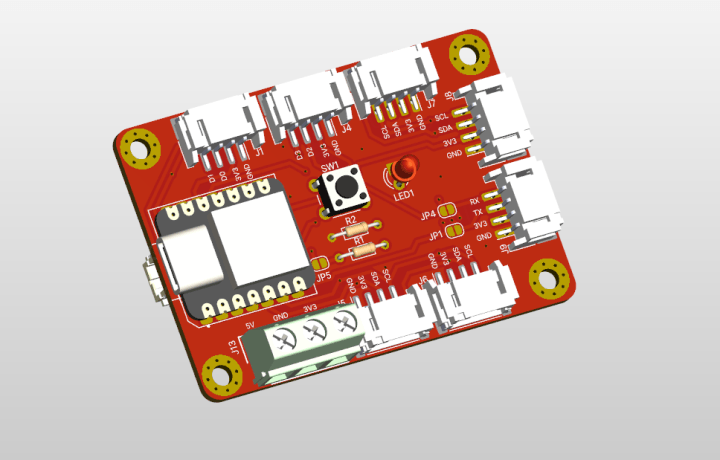
Transforming A Raspberry Pi Into A Remote: The previous project reminded me of the rpitx project developed by F5OEO. It’s a library that lets you do the same kind of thing on a Raspberry Pi, also exploiting the principle of harmonic generation. It’s very interesting from a scientific and technical point of view, but obviously it’s an experimental project. No need to remind you that it is forbidden to transmit without an amateur radio license and without a highly selective bandpass filter, so as to transmit only in the authorized band, at a power lower than the maximum threshold authorized by law. It’s up to every reader to make sure they’re using their Raspberry Pi legally. The creator of the River’s Educational Channel on Youtube uses it in his excellent two-part project. In the first part, he decodes the data frames used to control a ceiling fan using a cheap SDR dongle, and in the second part he uses rpitx to control the fan directly from the Raspberry Pi. A fun, well-documented project. You can also find related articles on his site here and here.

Jens Nickel (Editor-in-chief, Elektor Magazine)
Remote control for wireless loudspeakers: My friend Marco and I have made significant progress on our pet project. We have worked on the boxes dedicated to volume control, and built three of them. The box contains an ESP32-S3 controller, a small motor controller PCB, and two custom-designed PCBs: one for the Alps motor potentiometer and another for an external ADC to sense the resistance of the motor potentiometer, thus giving feedback to the ESP32. Additionally, there is a LED bar and an IR receiver at the front side.
One box described above, a bicycle battery, an amplifier, and a wireless audio receiver, were housed in a grey outer box with a power switch. To keep costs down, we used a €15 electrical enclosure with minor modifications and used hot-glue to attach the internal components. Believe me, finding a reliable switch for 40 V DC was quite a challenge!
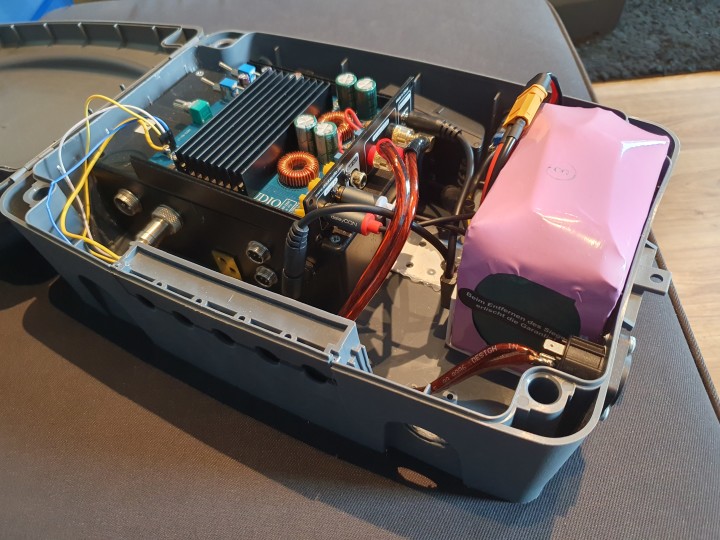
Each of these three large gray boxes can supply power and control the volume of one loudspeaker or subwoofer. To have a high-quality, high-power audio system to showcase, I recently purchased a JBL 218S subwoofer, and I am thrilled with it. We are eagerly awaiting good weather in Cologne to make the first field tests with the entire system!
A current measurement box and a destroyed shunt resistor: The project also involves making other modules, such as one for measuring current, power, and energy to determine the remaining charge of Li-Ion batteries. Each of these modules features its own MQTT-speaking ESP32, allowing for diverse applications (we know that not many typical Elektor readers will need to power loud audio equipment in the field :-) ). For our current measurement module, I initially experimented with an INA169 breakout board and my colleague Saad's AmpVolt PCB, which worked well for 12 V and a relatively small Class-D amplifier. However, when connected to the 36-V battery and the much more powerful Nobsound G2 PRO, the higher currents, especially at power-on, caused issues. After some strange measurements, I discovered that the shunt resistor on the INA169 breakout board had a value of several tens of kΩ. I then ordered a 10-A Hall sensor module from the Grove system, which resolved the issue. With no music playing, the amp draws around 3 W. It's always amazing to me how the volume increases with each additional watt. In fact, in my living room, I risk damaging my ears when the system consumes 6 W of power per loudspeaker—not to mention disturbing the neighbors.
C. J. Abate (Content Director, Elektor)
Elektor's engineers and editors have been busy since our last Lab Notes update. In particular, we've been working hard on the Circuit Special 2024. We've also been updating our topic pages on the website. Let's consider each one.
Circuit Special Update
Here are some of the circuits and projects you'll find in the issue.
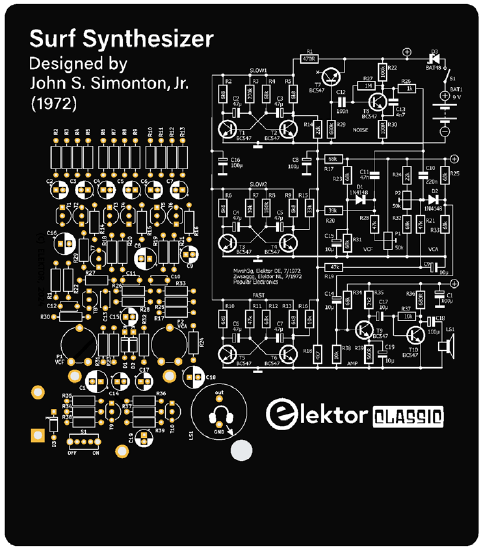
- A new Elektor Classic circuit: a surf synthesize! The design is an advanced sea sound generator. It functions as a true analog music synthesizer, adhering to the principles of voltage-controlled subtractive sound synthesis popularized by pioneers like Robert Moog (think of the Elektor Formant). While it lacks a voltage-controlled oscillator (VCO) because it uses a noise generator as its sound source, it features a voltage-controlled filter (VCF), a voltage-controlled amplifier (VCA), and three low-frequency oscillators (LFO).
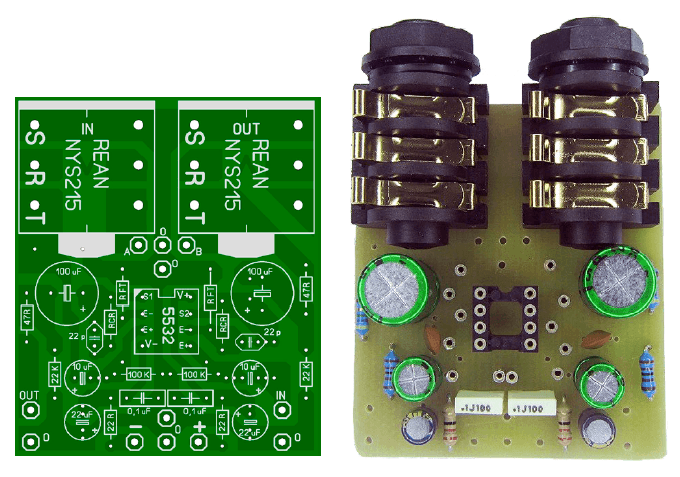
- The "Jack-In and Jack-Out Project": In an audio chain, it can be advantageous to have an insertion point for additional signal-conditioning devices, such as a dynamics compressor/expander, reverb generator, or other audio effects. This design simplifies the integration of these devices and ensures loop continuity when they are not in use.
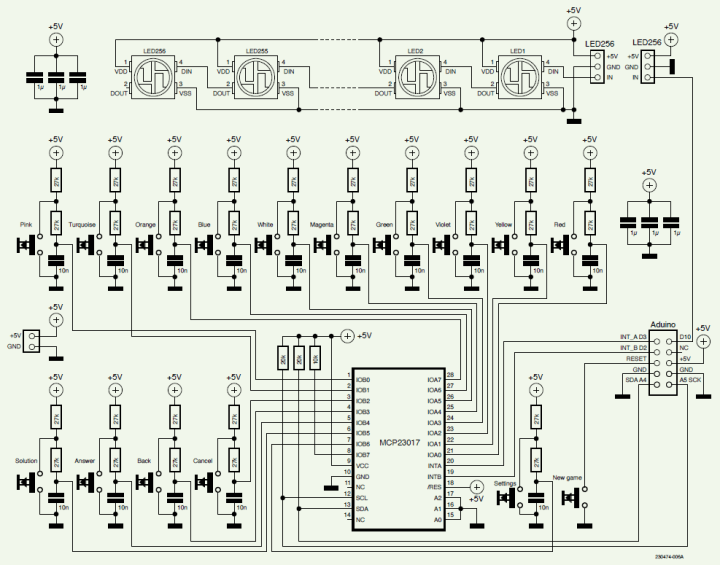
- An Arduino-controlled classic code breaking game: Experience the classic Mastermind game like never before! Originally captivating millions since its 1970s debut, Mastermind has been reimagined with the latest technology, featuring Arduino and WS2812 LEDs for a fresh, modern twist. Immerse yourself in a realm of logic and strategy with two innovative new versions, crafted to challenge both seasoned players and newcomers alike. Rediscover the excitement and complexity of this legendary code breaking game in a whole new light.
We are preparing dozens more. The issue will hit newsstands in August 2024! Until then, you can enjoy last year's Circuit Special.
Topic Pages
We've selected 10 overarching topics to cover year round, and each has its own webpage. On each page, you'll find various content relating to the topic and its subcategories: DIY electronics projects, background articles, engineering tutorials, design tips, interviews, news, and product reviews. Check them out.- Arduino
- Circuits & Circuit Design
- Embedded & AI
- Espressif
- IoT & Sensors
- Power & Energy
- Prototyping & Production
- Raspberry Pi
- Test & Measurement
- Wireless & Communication
Bookmark your favorites and tune in for regular updates, new articles, and exciting DIY electronics projects.

Discussion (0 comments)