ESP32: A whole bunch of useful projects
April 04, 2019
on
on
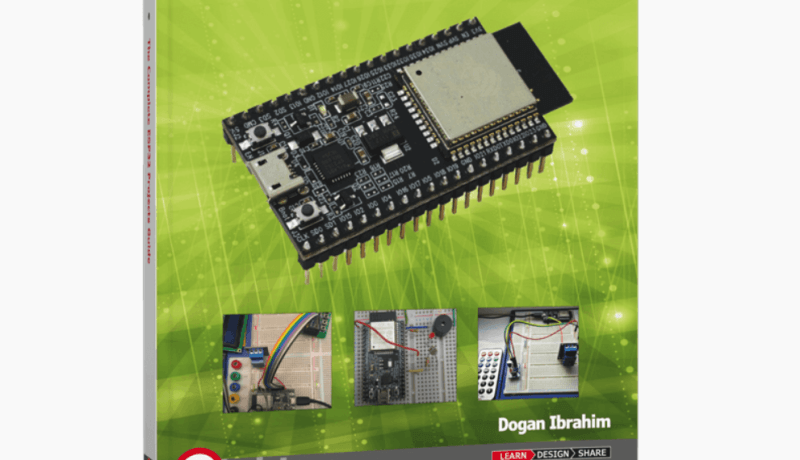
Just a few years back, the ESP8266 made its debut on the maker and development board scene and became an instant hit. The controller makes it possible to equip your own projects with Wi-Fi capabilities at a cost of just a few euros. Initially, the ESP8266 was mainly used as a second controller to provide network access for another controller via a serial port. More and more projects began using the spare processing power of the low-cost ESP8266 chip to also provide general I/O control so that in many cases no additional control processor was required. This prompted Espressif, the chip’s manufacturer, to bring out the next generation of boards containing an additional (more powerful) processor together with the ESP8266 module. These new generation ‘ESP32’ boards feature two 32-bit core processors, an additional power-efficient coprocessor, 36 GPIO pins, Bluetooth, 512 KB SRAM, and much more, making it a complete solution for a wide range of applications - not just a convenient method to add network capabilities to a project.
I really liked the layout of the project descriptions which are logically structured. After a written summary of the project and its learning objectives, a block diagram, a circuit diagram and a picture of the interconnections on a breadboard shows exactly how it can be built. Next comes a description of the software, which also includes easy-to-understand pseudocode and of course the listing. It goes without saying that you can download the source code for the projects from the Elektor website. To make it even easier for newcomers, the Elektor Shop is also offering a complete ESP32 Smart kit including an ESP32 DevKit C module, two plug-in prototyping boards (which should be laid out alongside each other so that the ESP32 straddles the two), wire jumpers and all the various components used in the projects. These include light, humidity and temperature sensors and also a display, a keypad matrix, a servo motor, a buzzer, a microphone module and much more.
On page 276 of the book we get to the subject of network programming - for me that seems about right. As I mentioned above, the ESP32 is not just a Wi-Fi controller with some additional peripherals, but a very flexible and powerful general-purpose controller suitable for both entry-level and professional projects. Even the guys at the Elektor Lab love the ESP32 and use it where they can as their go-to control module — so this book will also be a good start to help understand the source code of all kinds of Elektor projects.
Chapter 7 discusses the topics Wi-Fi network, TCP, UDP, and HTTP before it deals with sending values from the DHT11 humidity and temperature sensor to the ThingSpeak cloud platform which is covered in the next chapter.
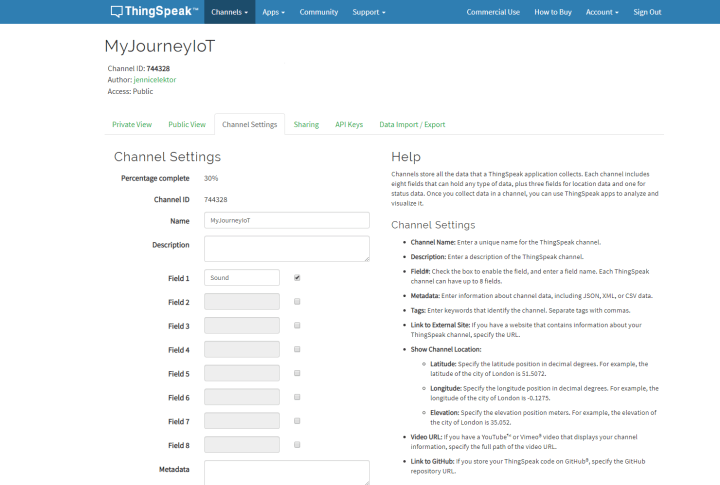
As with the other openSenseMap and AllThingsTalk cloud platforms that have been used in various Elektor projects so far, you will need to register with ThingSpeak, create a device (this is the board that takes readings), and then type what kind of sensors are used (one device can have multiple sensors). ThinkSpeak represents a device through a channel. So I created a new channel and then registered a field for a sensor that transmits level readings (see screenshot).
In my series "My Journey into the Cloud" I always used MQTT to send sensor values to the cloud. ThingSpeak works differently, measurement values are simply sent using the HTTP GET request method to retrieve information from the server. You have to connect to the ThingSpeak server via TCP and then transmit using TCP:
AAAAAAAAAAAAAA is the API key assigned by ThingSpeak when creating a channel. XXX is the reading for the first field.
I succeeded (following the instructions in the book, with the kit and sample programs) to build the application very quickly. However, nothing happened at first on ThingSpeak… luckily I quickly noticed why. Although the author had declared a string APIKEY at the beginning of the example code — which I dutifully filled out using the API key of my own ThingSpeak page — the APIKEY string was not referenced anywhere else in the code. The author had just hard-coded his own API key in the code further down in the main body… so much for standard coding practices. Nothing serious, but I am left with the feeling that the code has been hastily cut and pasted without careful consideration how it can be better structured for more general use.
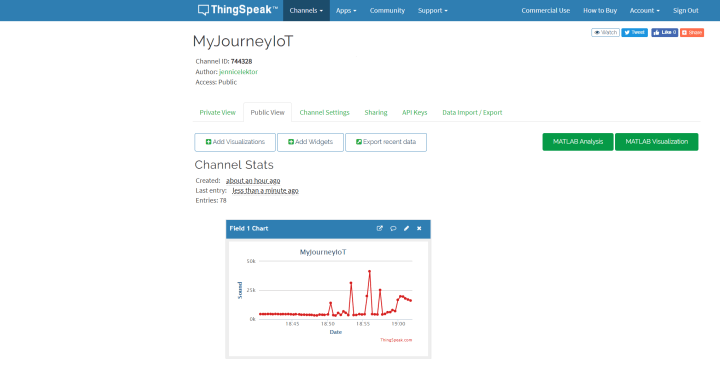
In the screenshot you can see the noise level recorded by me on my ThingSpeak page.
If you want to understand the example, you need to create your own channel on ThingSpeak and enter the API key there into the SoundToThingSpeak sketch (download below) - as well as the SSID and password of your router network.
The application is still expandable: Together with the light, temperature and humidity sensors included in the kit, you could, for example, remotely monitor the environmental conditions at home whilst you sit back and enjoy another pina colada at a beach bar somewhere in the Maldives.
Of course, I could not resist tinkering with the code and adapted the sketch from my last review to ThingSpeak. Instead of the display, this time I used an RGB LED to indicate the connection status. Instead of an LDR, I used the DHT11 sensor supplied with the kit. The code can also be found in the downloadable zip file for this review. If you compare the sketch with the one from my last review, you can see the changes I made to the GUI functions (an RGB LED instead of a display). Instead of MQTT, I use HTTP which simplifies the main loop. The WiFi SSID, password and the API key do not need to be hard-coded in my second example, but I can use the familiar web interface from my series. Enter the ThingSpeak API key under SENSOR ID / TOKEN. Under 'BROKER ADDRESS' enter 'api.thingspeak.com'. The files in the libraries download folder need to be placed into your Arduino-Libraries folder, as well as the libraries necessary for addressing the DHT sensor (from Adafruit, see book).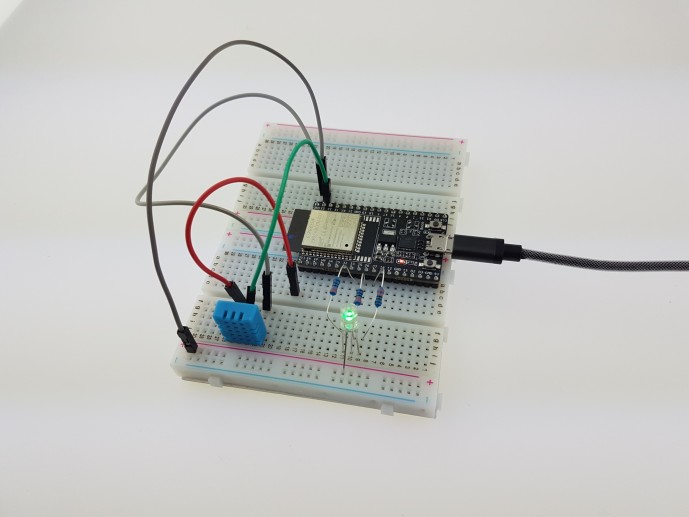
In the last three chapters Dogan Ibrahim leaves the Arduino IDE behind and introduces coding with MicroPython using Espressif’s IoT Development Framework (esp-idf). This uses FreeRTOS to make better use of the two high speed processors and manage the built-in peripherals with a task-based approach. This subject is only touched on in a few pages and its one that really deserves a whole book dedicated to it to explore the full power of the hardware. I am not sure if such a book is available yet.
My thoughts
To sum up, this book provides a comprehensive guide which (together with the component kit) I can highly recommend especially for beginners interested in measurement and control projects. It is also a good starting point for newcomers migrating from Arduino boards such as the UNO who want to get to know the more powerful ESP32 platform. If your focus is on network programming and cloud projects, there are other books available which cover these topics.
ESP32 projects for beginners ...
Dogan Ibrahim takes this fact into account in his book 'The Complete ESP32 Projects Guide'. In the first two chapters, the ESP32 and the popular developer board ESP32 DevKit C are presented, which gives an impression of the performance of the chip. But with the theory, the author does not spend long. In Chapter 3 he shows how the Arduino IDE needs to be configured for the controller, and this should not cause any great problems even for complete noobs. Immediately afterwards, we get stuck into the example projects. First off there are some simple games using LEDs. The gives beginners the opportunity to gain confidence using the input and output capabilities of the chip and illustrates some basic coding structures for program writing. In Chapter 5, measurement values from sensors are read out, touch surfaces are sampled and a display is activated. The way to program Arduino to respond to pin change of state and the use of timer interrupts is also shown.I really liked the layout of the project descriptions which are logically structured. After a written summary of the project and its learning objectives, a block diagram, a circuit diagram and a picture of the interconnections on a breadboard shows exactly how it can be built. Next comes a description of the software, which also includes easy-to-understand pseudocode and of course the listing. It goes without saying that you can download the source code for the projects from the Elektor website. To make it even easier for newcomers, the Elektor Shop is also offering a complete ESP32 Smart kit including an ESP32 DevKit C module, two plug-in prototyping boards (which should be laid out alongside each other so that the ESP32 straddles the two), wire jumpers and all the various components used in the projects. These include light, humidity and temperature sensors and also a display, a keypad matrix, a servo motor, a buzzer, a microphone module and much more.
... and advanced
Chapter 6 of the book contains projects with more extensive source code. Among other things a basic waveform generator is built and a keypad and display is used for a calculator and a code lock project. The next project to make an SD card reader/writer looked really interesting but the necessary SD-card reader module is not included in the kit. The same applies to the next project which needed an IR receiver module to decode IR signals. It would certainly be helpful if both these modules and a relay module were also available as an upgrade from the Elektor Store.On page 276 of the book we get to the subject of network programming - for me that seems about right. As I mentioned above, the ESP32 is not just a Wi-Fi controller with some additional peripherals, but a very flexible and powerful general-purpose controller suitable for both entry-level and professional projects. Even the guys at the Elektor Lab love the ESP32 and use it where they can as their go-to control module — so this book will also be a good start to help understand the source code of all kinds of Elektor projects.
Chapter 7 discusses the topics Wi-Fi network, TCP, UDP, and HTTP before it deals with sending values from the DHT11 humidity and temperature sensor to the ThingSpeak cloud platform which is covered in the next chapter.
My own IoT demo
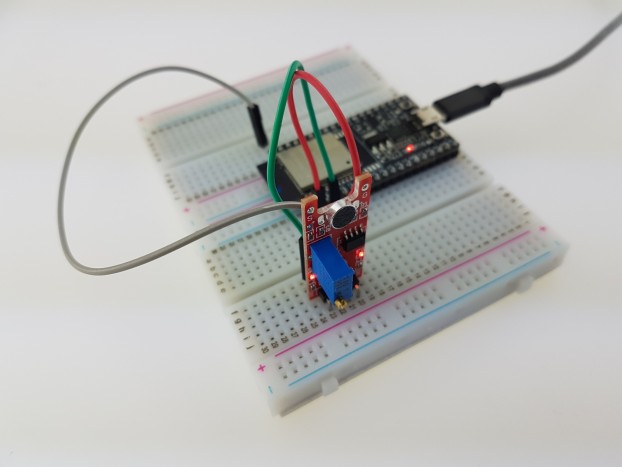
As an old IoT fan, I have built this example, but modified it a bit; instead of the temperature and humidity sensor I used the small microphone module in the kit to measure the sound level (the source code for my example is below). To do this I quickly sample the analog output values from the microphone module, average its value over 256 samples and count how often the next sample values exceeds or falls below a certain threshold in order to detect large signal excursions. Every few seconds, the counter value is transmitted to the Internet.
As with the other openSenseMap and AllThingsTalk cloud platforms that have been used in various Elektor projects so far, you will need to register with ThingSpeak, create a device (this is the board that takes readings), and then type what kind of sensors are used (one device can have multiple sensors). ThinkSpeak represents a device through a channel. So I created a new channel and then registered a field for a sensor that transmits level readings (see screenshot).

In my series "My Journey into the Cloud" I always used MQTT to send sensor values to the cloud. ThingSpeak works differently, measurement values are simply sent using the HTTP GET request method to retrieve information from the server. You have to connect to the ThingSpeak server via TCP and then transmit using TCP:
GET /update?api_key=AAAAAAAAAAAAAAAA&field1=XXX HTTP/1.0
Host: https://api.thingspeak.com
Host: https://api.thingspeak.com
AAAAAAAAAAAAAA is the API key assigned by ThingSpeak when creating a channel. XXX is the reading for the first field.
I succeeded (following the instructions in the book, with the kit and sample programs) to build the application very quickly. However, nothing happened at first on ThingSpeak… luckily I quickly noticed why. Although the author had declared a string APIKEY at the beginning of the example code — which I dutifully filled out using the API key of my own ThingSpeak page — the APIKEY string was not referenced anywhere else in the code. The author had just hard-coded his own API key in the code further down in the main body… so much for standard coding practices. Nothing serious, but I am left with the feeling that the code has been hastily cut and pasted without careful consideration how it can be better structured for more general use.
In the screenshot you can see the noise level recorded by me on my ThingSpeak page.

If you want to understand the example, you need to create your own channel on ThingSpeak and enter the API key there into the SoundToThingSpeak sketch (download below) - as well as the SSID and password of your router network.
The application is still expandable: Together with the light, temperature and humidity sensors included in the kit, you could, for example, remotely monitor the environmental conditions at home whilst you sit back and enjoy another pina colada at a beach bar somewhere in the Maldives.
Of course, I could not resist tinkering with the code and adapted the sketch from my last review to ThingSpeak. Instead of the display, this time I used an RGB LED to indicate the connection status. Instead of an LDR, I used the DHT11 sensor supplied with the kit. The code can also be found in the downloadable zip file for this review. If you compare the sketch with the one from my last review, you can see the changes I made to the GUI functions (an RGB LED instead of a display). Instead of MQTT, I use HTTP which simplifies the main loop. The WiFi SSID, password and the API key do not need to be hard-coded in my second example, but I can use the familiar web interface from my series. Enter the ThingSpeak API key under SENSOR ID / TOKEN. Under 'BROKER ADDRESS' enter 'api.thingspeak.com'. The files in the libraries download folder need to be placed into your Arduino-Libraries folder, as well as the libraries necessary for addressing the DHT sensor (from Adafruit, see book).

ESP32 for professionals
As you get further into the book the chapters cover complex applications such as web server projects and in chapter 13 the use of the ESP32’s Bluetooth capability — I found these very interesting and plan to cover them in more detail in an upcoming review.In the last three chapters Dogan Ibrahim leaves the Arduino IDE behind and introduces coding with MicroPython using Espressif’s IoT Development Framework (esp-idf). This uses FreeRTOS to make better use of the two high speed processors and manage the built-in peripherals with a task-based approach. This subject is only touched on in a few pages and its one that really deserves a whole book dedicated to it to explore the full power of the hardware. I am not sure if such a book is available yet.
My thoughts
To sum up, this book provides a comprehensive guide which (together with the component kit) I can highly recommend especially for beginners interested in measurement and control projects. It is also a good starting point for newcomers migrating from Arduino boards such as the UNO who want to get to know the more powerful ESP32 platform. If your focus is on network programming and cloud projects, there are other books available which cover these topics.
Read full article
Hide full article


Discussion (0 comments)