Geekworm KVM-A3: Turn Your Raspberry Pi 4 into a KVM-over-IP System
Want full remote control of your PC, even when it’s off or crashed? Discover how the Geekworm KVM-A3 Kit turns a Raspberry Pi 4 into a practical KVM-over-IP.
A KVM-over-IP system, which stands for Keyboard, Video, Mouse over IP, allows you to remotely control a computer through a network connection as if you were physically using its keyboard, mouse, and monitor. As it operates independently of the remote computer’s operating system, you can access the machine even if it is powered off, stuck in the BIOS, has crashed, or doesn't have an operating system installed at all. The Geekworm KVM-A3 Kit allows you to turn a Raspberry Pi 4 into such a KVM-over-IP system.
What’s Included in the Geekworm KVM-A3 Kit
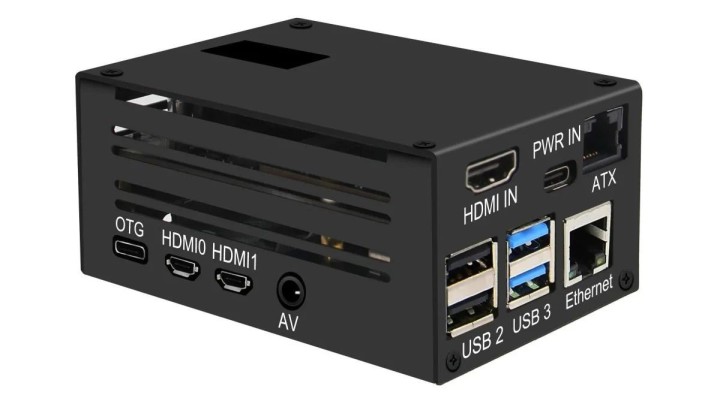
The Geekworm KVM-A3 kit contains a Raspberry Pi expansion board (a hat) providing Ethernet, a fan, a real-time clock (RTC), power input, etc., an HDMI-to-CSI-2 module for video capture, and a little 0.96-inch OLED display. There is also an adapter board which is to be installed inside the target PC. An Ethernet and a USB OTG cable to connect to the target PC are included too. Finally, there is a strong, aluminum case for Raspberry Pi 4. Note that the Raspberry Pi 4 is not included. The completely assembled KVM-A3.
The Geekworm KVM-A3 kit Is Easy to Assemble
Assembling the kit is easy enough as long as you start by inserting the short FCC cable for the video capture module into the Raspberry Pi’s camera connector. Then mount the expansion hat on the Raspberry Pi while passing the FCC cable through the slot. The video capture module is now fixed on the hat and connected to the HDMI audio port and the FCC cable. Don’t forget to insert the button cell before you mount the OLED display. When the board assembly is ready, it can be mounted inside the enclosure. All the nuts, bolts and standoffs to secure everything are included in the kit.
PC Adapter Board
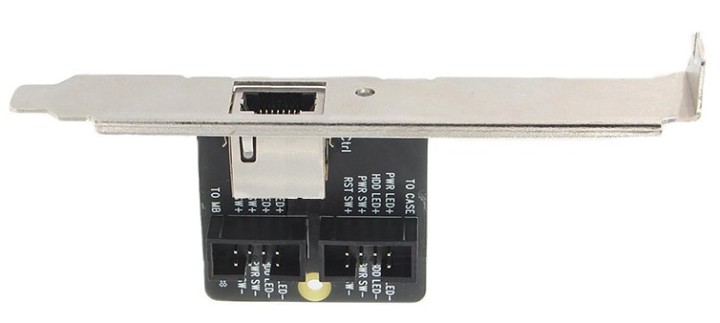
The adapter board, mounted on a bracket, must be installed inside the target PC. It connects to the target computer’s motherboard front panel connector and allows the KVM-A3 kit to push its power and reset buttons and keep an eye on the LEDs. Therefore, your target PC must have room for the adapter board and provide the panel connector. This will be the case for a standard ATX-compatible PC, but not for e.g. a laptop computer. The PC adapter board. A low-profile bracket is included in the kit too.
The Ethernet cable included in the kit connects the KVM-A3 to the adapter board. Remote keyboard and mouse emulation are enabled by connecting a USB cable between the KVM-A3 and the PC.
Additional Requirements and Limitations
An HDMI cable is required to capture the PC’s video output. For some reason, such a cable is not included in the kit. Video capture works for resolutions up to 1920 × 1080 at 50 Hz.
A power supply for the KVM-A3 is not included either. This must be a 5 V, 3 A minimum PSU with a USB-C connector.
The kit is compatible with the open-source PiKVM V3 software, which handles the backend and provides a polished web interface. An SD card to install it on is not included in the kit, so bring your own. It should have a size of 32 GB minimum and Class 10 is recommended. Full installation instructions and documentation are available on the Geekworm Wiki.
The Geekworm KVM-A3: A Practical KVM-over-IP Solution
The Geekworm KVM-A3 Kit is a practical kit for people looking to build a Raspberry Pi–based KVM-over-IP solution. With support for HDMI video capture, USB device emulation, and ATX power control, it enables full remote access to a connected PC—even when the operating system isn’t running. Combined with the open-source PiKVM software, it offers a powerful tool for remote management, system recovery, and DIY experimentation.
But what if your KVM needs remote control?
Subscribe
Tag alert: Subscribe to the tag Review and you will receive an e-mail as soon as a new item about it is published on our website!
Read full article
Hide full article
Add a rating to this article
★★★★★
★★★★★
Page 1 / 1
Login
No account yet?Register for free!
Forgot password?
Please enter your email address. Instructions for resetting the password will be emailed to you now.


Discussion (0 comments)