Review: Flip & click board - Hardware that isn't hard
Bottom Side Up
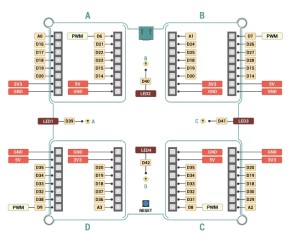
On the white side of the board are four blue LEDs A, B, C & D that are connected to Arduino pins 38 (PC6), 37 (PC5), 39 (PC7) & 40 (PC8), in that order.
Although the mikroBus slots are intended for click Boards, they do have a convenient pitch and may be used for your own extensions. If you do, then you might want to know how their pins map to Arduino pins. The tables below show what I extracted from the file
[arduino-1.7.11]\hardware\arduino\sam\variants\arduino_due_x\variant.cpp
Be careful, I may have made a mistake somewhere.
Slot A
| Port | Pin | Name | Port | Pin | Name |
| PA16 | 54 | A0 | PC24 | 6 | |
| PC1 | 33 | PD1 | 26 | ||
| PA28 | 77 | PA10 | 19 | RX1 | |
| PA27 | 76 | PA11 | 18 | TX1 | |
| PA25 | 74 | PA18 | 71 | SCL1 | |
| PA26 | 75 | PA17 | 70 | SDA1 |
Slot B
| Port | Pin | Name | Port | Pin | Name |
| PA24 | 55 | A1 | PC23 | 7 | |
| PC2 | 34 | PD2 | 27 | ||
| PA29 | 4 | PA12 | 17 | RX2 | |
| PA27 | 76 | PA13 | 16 | TX2 | |
| PA25 | 74 | PA18 | 71 | SCL1 | |
| PA26 | 75 | PA17 | 70 | SDA1 |
Slot C
| Port | Pin | Name | Port | Pin | Name |
| PA23 | 56 | A2 | PC22 | 8 | |
| PC3 | 35 | PD3 | 28 | ||
| PB21 | 52 | PD5 | 15 | RX3 | |
| PA27 | 76 | PD4 | 14 | TX3 | |
| PA25 | 74 | PB13 | 21 | SCL | |
| PA26 | 75 | PB12 | 20 | SDA |
Slot D
| Port | Pin | Name | Port | Pin | Name |
| PA22 | 57 | A3 | PC21 | 9 | |
| PC4 | 36 | PD6 | 29 | ||
| PB23 | 78 | PD5 | 15 | RX3 | |
| PA27 | 76 | PD4 | 14 | TX3 | |
| PA25 | 74 | PB13 | 21 | SCL | |
| PA26 | 75 | PB12 | 20 | SDA |
The reset button, located between slots C and D is not very accessible, especially not when you have the blue side up.
Python lovers, eat your heart out!
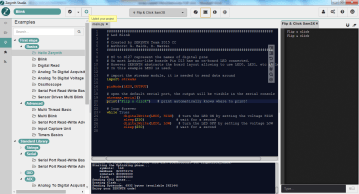
Install Zerynth Studio, it is free. This is quite quick, but only because the real installation starts when you run it for the first time. You have time to get a cup of coffee (or two) while it works its way through tons of downloads. When it is ready and you connect the Flip & click to your PC, it is detected as either an Arduino Due or as a Flip & click. After you install the virtual machine (“Virtualize your board” with the ‘Z’ button) or when you bought the Python version the board is immediately recognized as a Flip & click. You can now create Python programs for the board.Lots of functions are available, demonstrated by a long list of example programs. When you find one that you would like to have a play with, you must clone it. Digital I/O uses Arduino-style functions like pinMode and digitalWrite, but the pin numbers seem to be different. Not for digital pins 0 to 13 and analog pins A0 to A5, but for the others, yes. The four LEDs on the white side for example are now on D39 to D42. Luckily the IDE includes a nice pin map (“Show board pinmap” button) to help you out.


It is not clear to me how click boards are supported in Python.
From Python (back) to Arduino is easy enough: just upload a sketch. If, in the end, you prefer Python, do not forget to re-virtualize your board. Yes, it is that easy.

Read full article
Hide full article


Discussion (0 comments)