Mixer Geek Theremin+ Low-Cost Music Synthesizer (Review)
The theremin is an electronic musical instrument that you play without touching it. It uses two metal antennas to sense the position of the performer’s hands, controlling pitch and volume. The result is a typically haunting sound often heard in sci-fi movies. In this review, we will examine the Theremin+ from Mixer Geek, a device with a graphical color display and powered over USB-C.
The Mixer Geek Theremin+ is an electronic musical instrument that you play without touching it. It uses two metal antennas to sense the position of the performer’s hands, controlling pitch and volume. The result is a typically haunting sound often heard in sci-fi movies.
The theremin was invented by Léon Theremin in 1920 but never really caught on because it is so difficult to play. Over the years, however, it did gain popularity, in particular among electronics enthusiasts. Today, theremins are readily available in larger music stores. In this review, we will examine the Mixer Geek Theremin+, a device with a graphical color display and powered over USB-C.
First Impressions of the Mixer Geek Theremin+
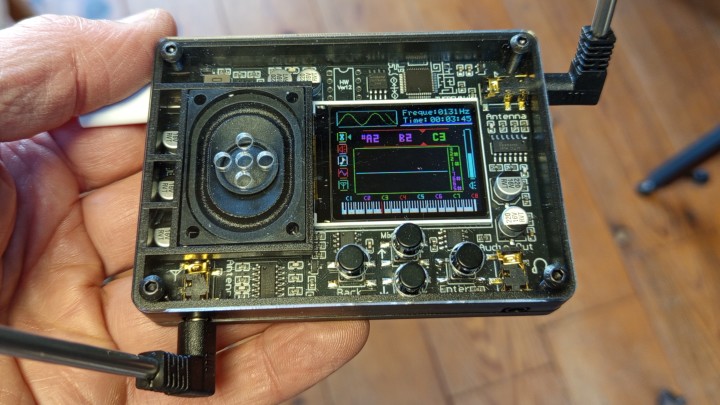
The Theremin+ has “Mixer Geek” printed on its PCB, and that might be the manufacturer or the designer, or even both (or neither). Mixer Geek is also shown on the splash screen when the device is powered on. It has everything of an open-source project, except that it doesn’t seem to be one. The PCB has some artistic graphics on it, typical for open-source designs, but the microcontroller has been carefully anonymized. The Mixer Geek Theremin+ has a transparent front panel.
Now that we’re studying the PCB, we might as well have a real close look. This is easy as the front panel is transparent.
Electronics and Sound Generation
Being a theremin, there are two antenna inputs, one for pitch and the other for volume. Each antenna, a 22 cm telescopic device, is connected to a 4069 hex inverter IC. We may therefore assume, encouraged by the PCB tracks and the parts around it, that they each control the frequency of a square wave oscillator by influencing their timing capacitors. The MCU probably precisely measures both frequencies and uses these values to control the frequency and amplitude of the output signal. The digital output signal is converted to analog by a 16-bit DAC, a TM8211, and then amplified by an 8002B. The sound can be heard either through the built-in loudspeaker or by connecting headphones.
Timbre and Sound Quality
The output signal can be one of many sounds, selectable from the Settings menu, but you can also walk through them using the Timbre button. Sounds range from sine and saw waves to sampled guitars and traditional Chinese instruments. There are 80 different sounds in total. The sound quality isn’t spectacular, and long samples are abruptly cut off before they end, but it is fun to play with.
Performance and Playability of the Mixer Geek Theremin+
The antennas provide quite precise control, especially after calibrating them. You do this by placing the Theremin+ in its playing position, on a table or so, selecting the antenna calibrate option, and removing your hands. It takes about two seconds in total. Frequency changes smoothly until it gets high, and quantization steps become audible. Even though I tried hard, I couldn’t hear quantization steps in the amplitude control. I did find the amplitude attack a bit slow when you remove your hand quickly. Percussive sounds are therefore complicated to produce, unless you choose a percussive sample like a bell or piano.
There are two playing styles, depending on the sound selected. Presets marked with a ‘*’ are played by pulling your hand away from the volume antenna (like plucking), while others use the traditional method: moving your hand closer to decrease volume. The right hand controls the pitch in both cases. (Left-handed players can turn the Theremin+ upside down.) The Theremin+ presents the same information in many ways.
Interface and Display
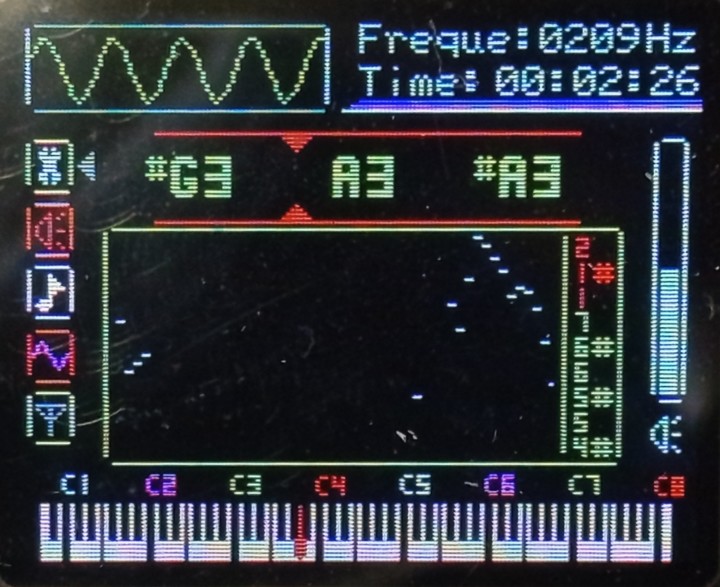
The Theremin+ is as difficult to play as any theremin, but its user interface is pretty neat. In normal playing mode, the display shows a horizontal piano keyboard and a piano roll together with a numerical value of the note you (almost) played. The piano keyboard shows the key closest to the frequency, and the scrolling piano roll shows this on a vertical scale and over time. At the top of the screen is a small oscilloscope window that shows the output waveform. Next to it is the current frequency as a numerical value. For some reason, the time since power-on is also shown (you can disable it in the settings, as can the frequency value).
On the left side of the screen are five buttons that you navigate with the 4-key keyboard. They provide access to the settings, volume, pitch, timbre (i.e., the sound), and antenna calibration. On the right side of the screen is a volume bar. Pressing the Back button toggles between mute and unmute, a very pleasant function indeed when in loudspeaker mode.
Of course, one can wonder why the Theremin+ has a display as musical instruments in general don't need one and the information shown isn't really useful, but it gives the device its unique touch that justifies the ‘+’ in its name.
Saving the Mixer Geek Theremin+'s Settings and Power Control
There are several calibration and sensitivity settings that you can try, but probably more important is that you have to go through this menu to save your settings. Otherwise, they will be lost as soon as the power is removed. The settings menu also has a power-down option to switch the device off without pulling the power cord. Pressing one of the keys will switch the Theremin+ back on. Note that the Theremin+ runs a bit warm.
Conclusion
So, what to think of the Mixer Geek Theremin+? Is it more than just a gadget? I am not sure. It definitely is a fun device to play with, and its price shouldn’t stop you from trying. But will it have a long, active studio life? I doubt it. On the other hand, if you are thinking of investing in an expensive professional theremin, the Theremin+ is a cheap way to start learning how to play one. Being very portable, you can easily take it along on any trip and enjoy theremin playing around the campfire.
Read full article
Hide full article
Add a rating to this article
★★★★★
★★★★★
Page 1 / 1
Login
No account yet?Register for free!
Forgot password?
Please enter your email address. Instructions for resetting the password will be emailed to you now.


Discussion (0 comments)