

Plug and Make Kit – A New Way of Doing Arduino
on
About fifteen years ago emerged the original concept of Arduino, which was based on a microcontroller board with extension boards (“Shields”) plugged on top of it. A shield adds functionality in the shape of a sensor, a motor driver, a relay, or something else entirely, like a display. Shields can be stacked on top of each other to create a compact, stacked microcontroller system. This made and still makes Arduino practical for rapidly prototyping applications. Over the years, hundreds, if not thousands, of shields have been created by Arduino users.
The Rise of I²C
However, technology keeps evolving, and the I²C bus, a somewhat dusty and forgotten communication bus when Arduino was born, has since become a de facto standard for connecting all sorts of components to microcontrollers. Today, a plethora of I²C-based extension modules is available that let you build applications quickly by connecting them to the I²C port of a microcontroller.
Only Fools Never Change Their Minds
The Arduino UNO has always had an I²C port. Initially, it was a bit like a peripheral that happened to be available before getting its own pins on the extension header. In the latest iteration, the UNO R4 WiFi, the I²C port also got its own connector (compatible with SparkFun’s Qwiic specification). Now, with their new Plug and Make Kit, Arduino has fully embraced the I²C method of rapid prototyping. Stacking shields is, of course, still possible as well.
Plug and Make Kit
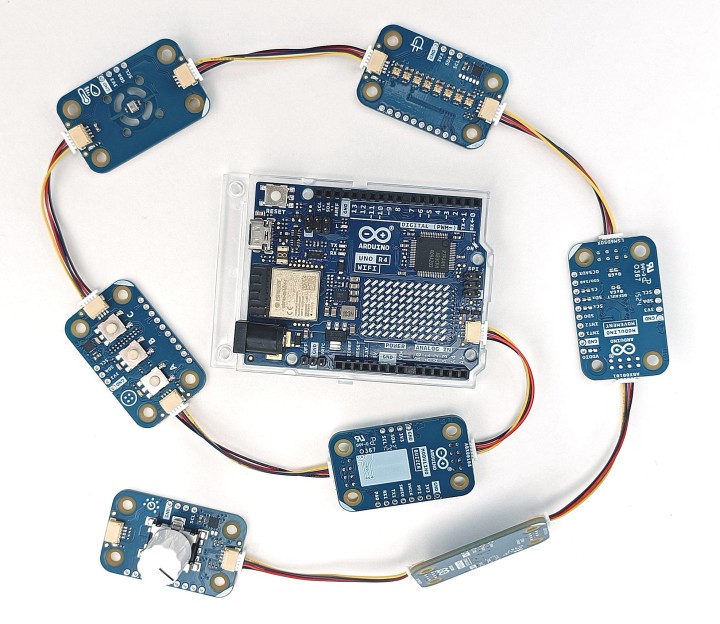
The Plug and Make Kit is based on the Arduino UNO R4 WiFi and a family of extension modules called “Modulino®.” A Modulino provides a function like a sensor, a button, one or more LEDs, etc. At the time of writing, there are seven of them: Buttons, Buzzer, Distance, Knob, Movement, Pixels, and Thermo. Modulino (note that plural doesn’t take an “s”) do not plug into the shield extension connectors but instead connect to the Qwiic I²C port of the UNO R4 WiFi. Modulino can be daisy-chained to create more complex applications (Figure 1).
Cloud Support and IoT with the Plug and Make Kit
While similar systems have been around for several years now, Arduino’s Plug and Make Kit takes the concept a bit further. First of all, given Arduino’s educational origins, the Plug and Make Kit is supported by a cloud-based teaching environment. Not only is this intended to help the user get started quickly, but it is also the base camp for the user’s IoT applications. Clearly, a lot of effort has gone into making the cloud as easy to use as possible.
Modulino Features
The second difference with other I²C-based prototyping systems is that Modulino nodes can also be used with other Arduino boards and third-party systems, since the tiny Qwiic connector can be bypassed thanks to a footprint for a 4-way 0.1"-pitch connector. Therefore, if needed, you can simply connect a Modulino to another system by soldering wires (keeping in mind that Modulino require 3.3 V).
Wait a Minute, There is Another MCU…
A third interesting difference is that Modulino featuring a device that does not have an I²C port, such as a pushbutton or a buzzer, are equipped with an STM32C011F4 ARM Cortex-M0 microcontroller to provide the I²C port. Some of the pins of this MCU are accessible through a row of contacts on the side of the Modulino. Therefore, these Modulino can be used independently and even as the main controller in a Modulino chain.
Stack Anyway
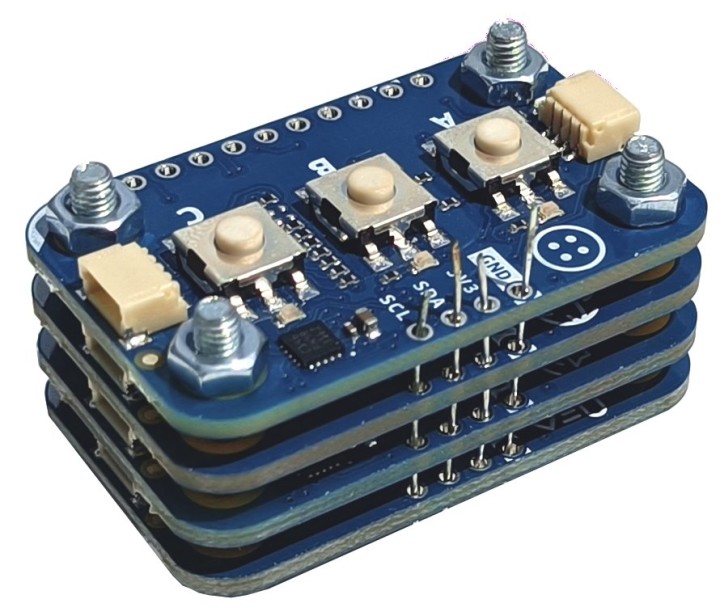
Finally, Arduino did not drop the stacking concept altogether, because Modulino can be stacked too. This is possible as they all have the same footprint (form factor, if you prefer) with the solderable I²C port mentioned before in the same position. This way, you can create a small, stacked device comprising, for example, Buttons, Buzzer, Movement, and Thermo Modulino (Figure 2). The application program can execute on the MCU of either Buttons or Buzzer (or on both).
Get Started with the Plug and Make Kit
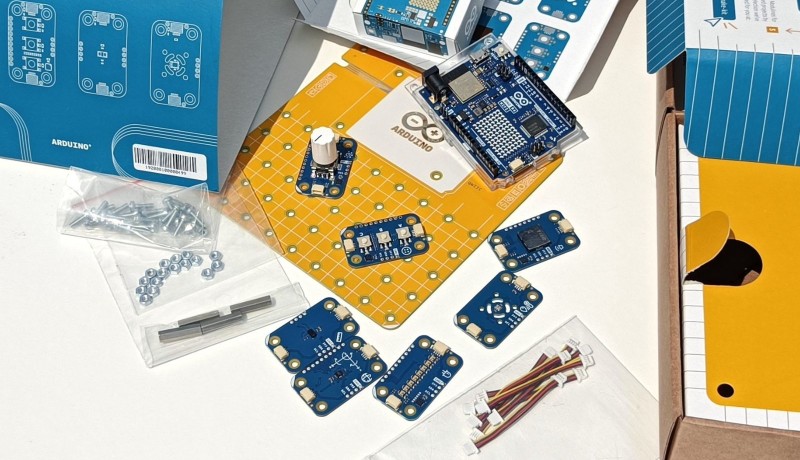
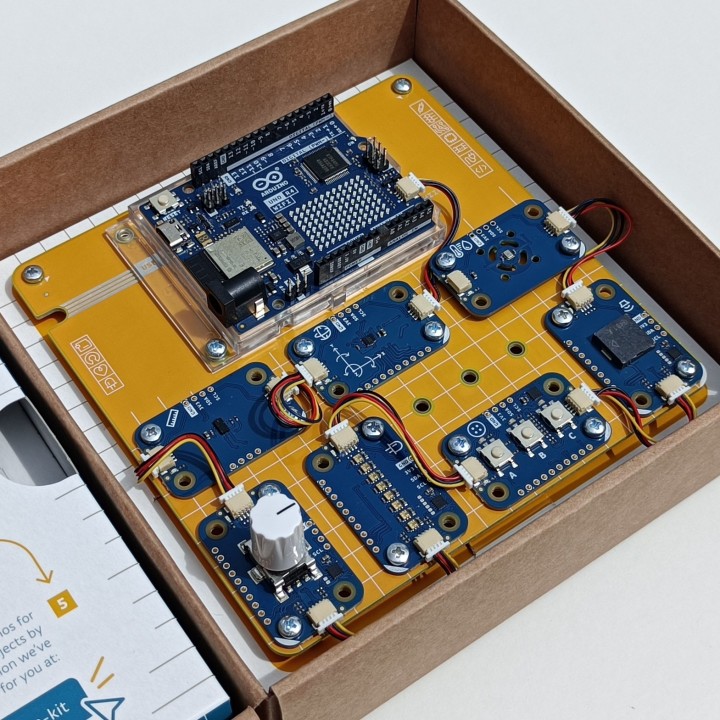
To get started with this new concept, Arduino put together a kit combining an Arduino UNO R4 WiFi, the seven Modulino mentioned above, and a Modulino Base. The base is a square 14 cm by 14 cm board on which you mount the UNO R4 WiFi and the Modulino needed for your application. Bolts, nuts, and four spacers are included. The kit also contains Qwiic interconnection cables and a USB-C cable (with USB-C-to-A adapter, not shown in Figure 3).
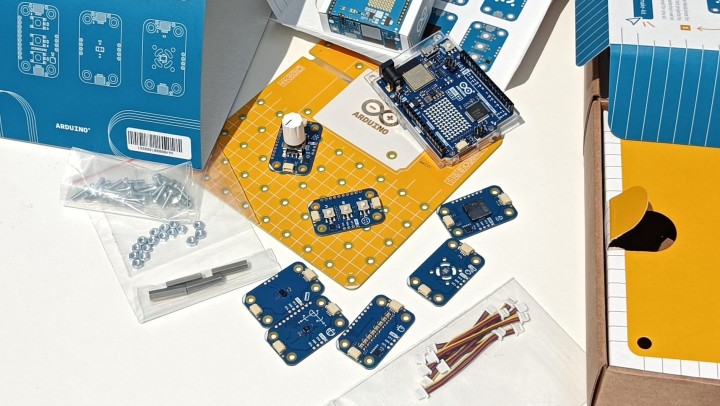
Quality Shows in Details
Arduino tends to spend a lot of time and effort on design quality, looks, and details, and the Plug and Make Kit is no exception. You’ll notice it as soon as you open the box. Everything looks great, fits perfectly, and nothing seems cheaply made. For example, the knob on the Knob Modulino is well-designed. The print on the boards is clean and readable. All the boards have orientation marks (a white corner). The cardboard support for the Modulino Base has holes and cutting marks, allowing you to use it for storing your assembled project inside the box it came in (Figure 4).
Kudos for PCB Artwork
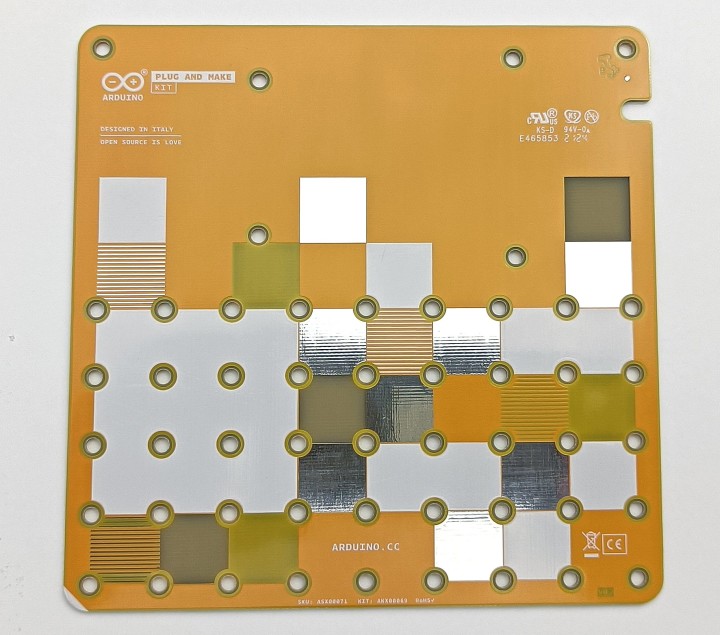
Being an engineer with a strong interest in PCB design, I couldn’t help but notice the artwork on the backside of the Modulino Base (Figure 5). It features a colorful geometric pattern built from squares. The color of a square is determined by the PCB (plated) copper layer, the solder mask, and two silkscreen layers instead of applying full-color silkscreen (which some pooling services have started to propose). Some colors are obtained by “mixing” layers. I like it a lot.
Modulino Base Space is a Bit Tight
All Modulino nodes can be connected together, but none of the initial projects suggested requires using all of them at once. That’s why the baseboard might seem a bit tight, if trying to mount all seven Modulino and connect them (Figure 6). For the same reason, there aren’t enough bolts (24) and nuts (20) to secure all 36 mounting holes (counting the four standoffs). This is not a problem, however, as two bolts per Modulino and UNO R4 WiFi are enough. Keep in mind that if you develop your own idea including all seven Modulino, you have to fix two of them to standoffs in a corner. Once you have bolted them to the base, connecting them together will become a bit of a challenge as space is tight. As mentioned before, it can be done, but you can also re-bolt only the Modulino you need when you change configuration.

Plug and Make Kit in the Cloud
I connected my all-singing, all-dancing Plug and Make Kit to my computer and then pointed my browser to the Arduino Plug and Make content platform. To access it requires logging in to your Arduino Cloud account. If you don’t have one, you can create an account for free.
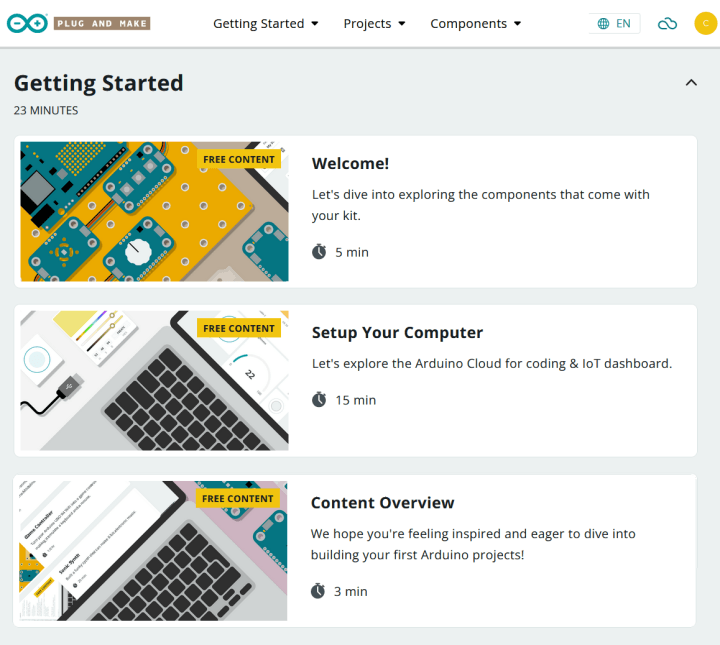
In the cloud, I simply clicked Welcome (Figure 7). This guided me through the process of setting up my kit, or to be more precise, the UNO R4 WiFi board. I did not encounter any difficulties worth mentioning and went on to importing my first template. This too went smoothly, and I found myself with a Pixels Modulino showing a colorful rainbow. Turning the knob moved the rainbow up and down and also moved the striped pattern shown on the UNO R4 WiFi’s LED matrix to the left or right. The only thing I had to type to get this far was the credentials for my Wi-Fi network.
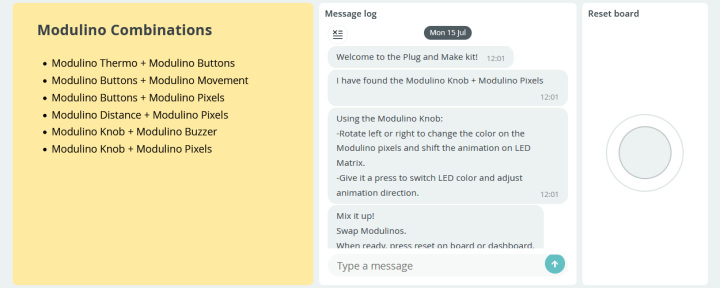
BTW, it is interesting to note that I ended up with this demo, and not another, as there are six to choose from (Figure 8). You choose a demo by connecting two Modulino from a list of possible combinations. As I had all seven connected, I had selected every possible combination. The demo I got is (coincidentally?) the last one in the list.
Trying Out a Plug and Make Kit Project
Now it was time to try out a demo project. There are seven of them, and I opted for Sonic Synth. For each demo, an estimate is given of the time it will take to complete a project. Sonic Synth takes about 35 minutes.
Sonic Synth uses only four Modulino (Buttons, Buzzer, Knob, and Pixels) but I tried with all seven strung together. To load the demo, you must import the corresponding template, detach from the current project, and associate the UNO R4 WiFi to the new template. This means re-entering your network credentials. After going through all the steps, nothing happened. No sound. After removing the superfluous Modulino and rebooting the kit, there was still no sound.
Fixed It
Trying to reload the template again was not possible as I had reached my free cloud plan limits. Deleting the first demo template solved this problem. A beginner user would not face the same issue, as they would not have used up their free Arduino Cloud allowance, like I had from tinkering with other projects. After going through the project steps once more, I finally got sound when pressing the pushbuttons. The tone’s frequency and duration are controlled by sliders in the cloud dashboard. Even though listed at the start of the project, Knob and Pixels come into play only in the second step of the project.
Plug and Make Kit User Experience
Fiddling around with this demo showed me two things:
1. With Plug and Make Kit, the objective is to build a clever connected gadget in a few minutes without having previous knowledge about IoT and programming. As much as Arduino has simplified the experience, if something goes wrong you still need to be comfortable diving into the cloud environment to find clues and ways to fix the problem.
2. Personally, I feel the Modulino Base is more in the way than it is helpful when experimenting and playing around. In a classroom, it may help to protect the hardware, but reconfiguring the system is a bit tedious. Shorter bolts would help, but ideal would be some sort of clipping system. Also, the UNO R4 WiFi is positioned too much to the right for the short Qwiic cables. Therefore, I preferred working without the baseplate.
Classic Arduino
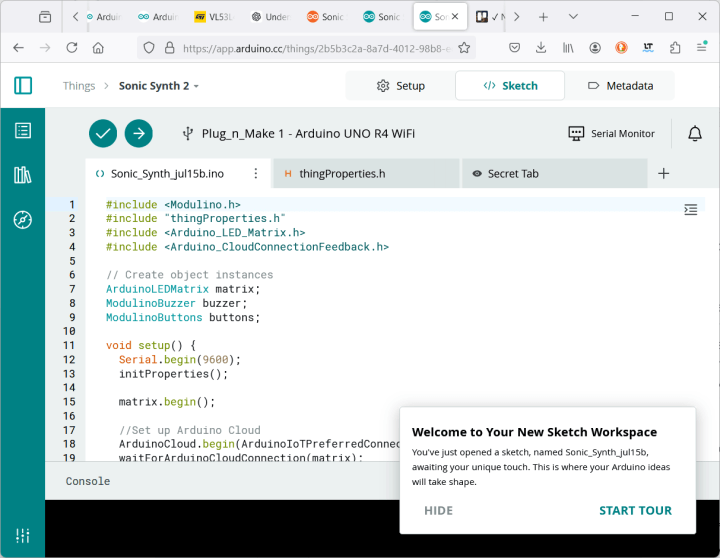
The Arduino Plug and Make Kit is targeted at cloud-connected IoT applications. Behind Arduino Cloud shines the Arduino programming environment. You can inspect and modify the source code of your applications by opening the sketch tab. Doing this for the Sonic Synth project reveals a rather simple Arduino sketch that imports a Modulino library (Figure 9). This library is also available in the library manager of the classic offline Arduino IDE. Therefore, nothing obliges you to develop cloud-based IoT applications with the Plug and Make Kit. You are free to do with it whatever you want.
Competition
As said at the beginning of this article, the concept of Arduino’s Plug and Make Kit is not new but it adds a few interesting things. Probably the first I²C-based prototyping system is Grove from Seeed Studio (it is a bit more, actually). The main problem of the Grove system is the proprietary connector it uses with a 2-mm pitch. Grove has been copied by other manufacturers, who all replaced the Grove connector with their own non-standard or difficult-to-solder/cable/find connector. Examples are Adafruit’s Stemma and Sparkfun’s Qwiic, but there are more. Arduino has done the community a favor by equipping the Modulino nodes also with a normal (read: maker accessible) I²C connector besides a Qwiic connector.
BBC micro:bit?
While playing around with the Plug and Make Kit, I couldn’t help but think of the BBC micro:bit. This is a small microcontroller board designed to introduce children to programming and electronics. It targets an even younger audience (10+) than the Plug and Make Kit (14+). Both boards/systems have similar features: an ARM Cortex-M4 microcontroller, wireless capabilities, an LED matrix, several sensors connected to an I²C bus, a buzzer, pushbuttons, and cloud-based programming and IoT applications. The main difference is that the BBC micro:bit integrates all this onto a single board, whereas the Plug and Make Kit consists of eight boards (the baseplate does not count as it has no electrical functionality, and only serves as a structure to organize projects). So, if you want something smaller, take a look at BBC micro:bit.
New Way of Using Arduino
The Arduino Plug and Make Kit introduces a new way of using Arduino. Instead of stacking shields on a baseboard, extension modules (“Modulino”) are daisy-chained on an I²C bus. This bus is provided by the kit’s Arduino UNO R4 WiFi. A Modulino Base is included for securing the various Modulino and the UNO R4 WiFi, creating a transportable system.
The Plug and Make Kit embodies everything we have come to expect from Arduino: aesthetics, and high-quality hardware and software (even though it wasn’t yet 100% up to speed at the time of writing, as I received an advanced sample of the product before launch). Targeted at electronics newbies, hobbyists, and makers, the kit is supported by a good amount of online documentation, example projects and tools in Arduino Cloud.
The new Modulino product line may have some potential, I believe, especially if support for the STM32 microcontroller used on some of them is provided (schematics, libraries, bootloader). Arduino is planning to release more Modulino nodes in the future, but cannot confirm any further details at the moment. Competition is fierce in the I²C arena.


Discussion (0 comments)