When I was asked to review the Zeeweii DSO3D12 oscilloscope, I was quite excited. A 120-MHz scope, a multimeter (DMM) and a signal generator all in one small package. Nice! Here are my findings.
The Zeeweii DSO3D12 is a small neat unit, 14.5 × 8.6 × 3.2 cm, with a 3.2-inch screen (that’s what they say, it works out to just over 8 cm). It has a fold out stand on the back to position it on a bench. On the top it has two BNC sockets for the ’scope probes, two small lugs for the signal generator output, a USB-C charging port with charging light, and an on-off switch. Below the screen are the multimeter connections, common, one for volts/ohms and capacitance, and two for current – 10 A and 600 mA, both unfused, which is a bit of a worry. The rest of the front panel is taken up with a keyboard, with Navigation keys, function keys and scope setting up/down bars (Figure1).
Figure 1. The DSO3D12. (Source: Zeeweii)
Limited Sample Rate?
While I was going through the specs, I noticed something. The sampling rate of the ’scope is only 250 Megasamples per second (MSa/s) – only just over twice the maximum signal frequency. This raised alarm bells.
In 1928, a brilliant mathematician called Harry Nyquist, and in 1948/49 another called Claude Shannon, were working on information theory. They came up with the Sampling Theorem, which basically states that to transmit and reconstitute a signal, it needs to be sampled at a minimum of two times the signal frequency. The mathematics is complex, but in practice, especially when you want a reasonable representation of the sampled signal, you need to sample at a lot more than two times the signal frequency. If you don’t do this, you can get results that look like your signal frequency modulated at a frequency, which is the difference between the sampled and sampling frequency. Alternatively, you might see a signal that resembles the difference between the two frequencies. This phenomenon is called Aliasing. Any sampling system, whether used in oscilloscopes or digital communications links, will usually have an anti-aliasing filter, which is a low-pass filter that prevents any signal frequencies greater than the highest one of interest passing through the system.
A really good oscilloscope will sample at 10 or more times the signal frequency. But my best oscilloscope at home is a Hantek DSO8060 – a dual-channel 60-MHz unit which also samples at 250 MS/s, and whose performance I have found quite adequate. Therfore, I was keen to see what sort of results the DSO3D12 gave at around 120 MHz. Zeeweii do note that the bandwidth when using two channels is only 60 MHz.
Generating Test Signals
My next problem was to get test signals at these frequencies. I have a large collection of crystal oscillator modules at frequencies going up to 120 MHz or more – and they will give a square wave signal with lots of harmonics. So using one of those I should be able to get a good idea of the DSO3D12’s performance.
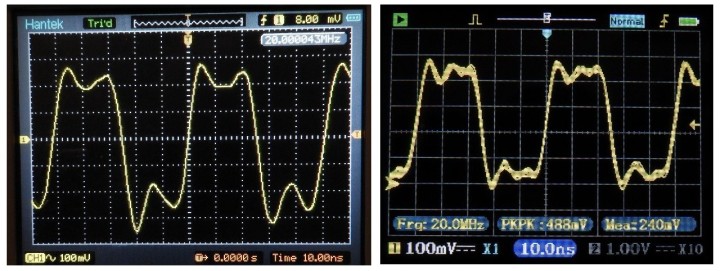
My first test involved looking at the output of a 20 MHz oscillator module. Initially, I was seeing something like a cross between a triangular and sine wave, but I remembered that most ’scopes give better performance at frequencies near their limits using a divide by 10 probe, so I set the probes to divide by 10. Bear in mind that a 20-MHz square wave is composed of the fundamental 20 MHz, plus odd harmonics, so third harmonic at 60 MHz and fifth harmonic at 100 MHz. Let’s have a look at what I observed (Figure 2): Figure 2. 20-MHz square wave from oscillator module displayed on my 60-MHz Hantek scope (left) and on the 120-MHz DSO3D12 scope (right). Both signals exhibited a bit of jitter, more apparent on the DSO3D12 trace at right. Bear in mind, the Hantek screen is about four times the size of the DSO3D12’s.
My 60-MHz Hantek does not have much detail on the top and bottom peaks, though the third harmonic is very obvious. On the 120-MHz DSO3D12 there is a bit more detail and the waveform is a slightly better approximation to a square wave, probably due to inclusion of the 100-MHz fifth harmonic. Score one for the DSO3D12, and I am impressed.
Observing Switch Bounce
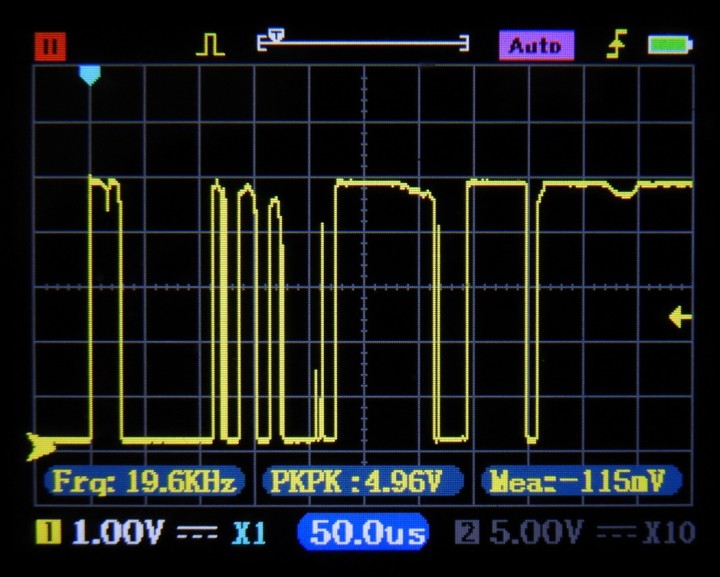
Some years ago, I had to write some articles on switch bounce. The scopes I had at the time were hopeless at catching one-shot events. Therefore, I purchased the Hantek scope, which handled them very well. So whenever I test a new scope, getting it to display switch bounce is one of my standard tests. This needs a one-shot trigger facility, and preferably the ability to scroll the captured signal so that the first bounce event is easily visible, and not right at the left edge of the screen. The DSO3D12 proved itself quite up to the job. Set the time base to 50 µs per division, press the ‘Single’ button, click the switch (which was from +5 V to a 1 kΩ resistor to ground) and I had the trace I wanted (Figure3). Figure 3. Switch bounce captured on the DSO3D12.
The trace defaults to starting in the center of the screen, but pressing the left navigation key moves it to the left, so you get the maximum detail on the bounce. The Shift button followed by the Up or Down navigation keys shifts the trigger level (yellow arrow at the right of the screen) to where you want it. Straightforward to set up, and again, I’m impressed. You can save screenshots, but I couldn’t find out how to get them on a PC screen.
Paper Manual
The paper manual that comes with the DSO3D12 is well written and covers most things that you’d need to know. The trigger adjustments are what you’d expect of a good scope, and there is an X-Y mode if you need it. The on-screen information is good and useful. So pretty much full marks for the scope.
Signal Generator
The signal generator is accessed using the GEN button and appears in a small window in the middle of the screen. It does not appear to interfere with the scope. (You press the GEN button again, and it goes off-screen, but the settings and output are retained – useful for signal tracing.) There is a wide range of waveforms – sine, square (with variable duty cycle) triangle and sawtooth, half- and full-wave rectified sine waves, and noise. The sine wave can go up to 5 MHz, the others to 2 MHz. The output level is fixed at 2.5 V and is connected to a pair of small lugs next to the BNC probe connectors. I would have liked a better output connector and a variable voltage level, but all in all, it is pretty versatile.
Digital Multimeter (DMM)
The DMM comes with a set of good quality probes with the usual 4-mm banana connectors, so you can easily use your own. There are AC and DC voltage and current ranges, resistance, capacitance, and diode test ranges and even a continuity beeper. I measured a few batteries, resistors, and capacitors and compared the results with my Hantek, which has almost identical ranges, and both were in close agreement to within less than 1% on most measurements. Range selection is easy (Figure 4) and it even indicates which sockets you need to use. A good multimeter which compares well to most mid-range handhelds. My only reservation, as above, is that lack of fuses on the current ranges. You just need to be careful. The DMM normally opens in a small window but Shift then DMM opens it up full screen. Figure 4. DMM range selection screen.
Voice Recognition
Lastly, I did a quick test of the DSO3D12’s voice recognition. This is an undocumented feature, not mentioned in the manual. You switch it on and off with Shift, then CH1 V. Start the voice recognition by saying ‘Hello Zeeweii’ and it gives you a friendly greeting and waits for your commands. It’s not foolproof, but you can change settings, switch to the DMM, etc. There is a good demo video and a longer one which shows many other features of the unit. There are many other undocumented features – for instance you can do a quick press of the On/Off switch to get a menu of the functions, select one then click Auto to select it in full-screen mode. The enclosed manual is not bad, but a proper full manual online would be good.
Summary
Pros:
A very capable multifunction unit, excellent value for money.
Usable screen and good range of functions, easy to use.
Cons:
Sampling rate maybe a bit low for upper frequency limit.
Keyboard not too intuitive (but OK once you know your way around).
Signal generator output a bit limited (connectors/fixed output level).
No comprehensive manual available, many undocumented features.
Read full article
Hide full article
Add a rating to this article
★★★★★
★★★★★
Page 1 / 1
Login
No account yet?Register for free!
Forgot password?
Please enter your email address. Instructions for resetting the password will be emailed to you now.


Discussion (2 comments)
A A 5 months ago
ZOYI ZT-703S
Zeeweii DSO3D12
FNIRSI 2C53T
David Ashton 5 months ago