Wemos Lolin = ESP32 + OLED on one board
February 14, 2019
on
on

For the long series of articles documenting My Journey into the Cloud I used two small evaluation boards, equipped with an ESP32 32-bit controller, an antenna and a micro USB socket (the latter also serves for power supply input and provides a path for uploading programs). For newcomers, the controller can be programmed using the intuitive Arduino IDE, because the board manufacturer Espressif has provided a library package (ESP32 Arduino Core) for this purpose. You can thus access the ESP32 pins using the well-known Arduino functions such as digitalWrite(...) and analogRead(...) which can be assigned to pin numbers on the header strips. Wrappers have also been written for Wi-Fi functionality, so that an ESP32 can connect to a server, for example, using the usual WifiClient.connect(server,port) command.
During program development you can use some LEDs mounted on an external prototyping board to indicate what is happening in the code and I used this method several times in the course of my journey. Of course a small display screen built into the ESP32 development board would have been really useful. When I found out that we stock the Wemos Lolin ESP32 OLED Display Module in the Elektor Store I couldn’t wait to get my hands on it. The OLED on the 'Wemos Lolin ESP32 OLED' board is driven by an SSD1306 controller which receives commands from the ESP32 via an I²C interface. The monochrome OLED has a resolution of 128 x 64 pixels.

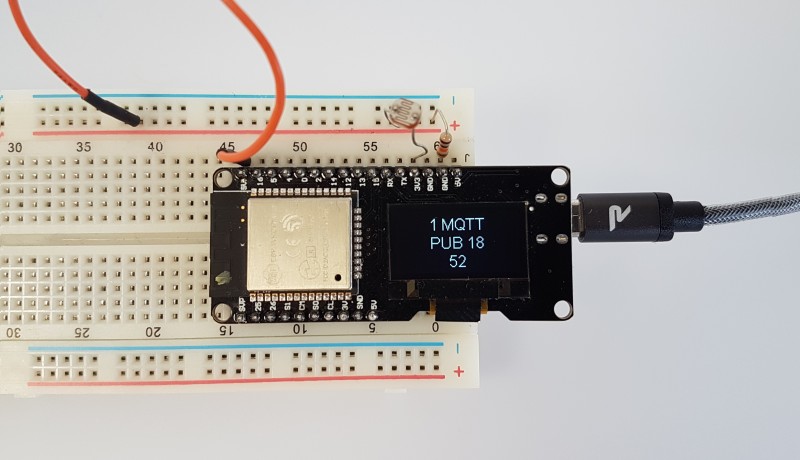
After soldering the strips in place plug the board into a breadboard. The board is so wide that (using the standard breadboard we have lying around in the lab) there is only one row of sockets on one side of the board available for connections. You need to decide how to plug it in so you can access the necessary pins.

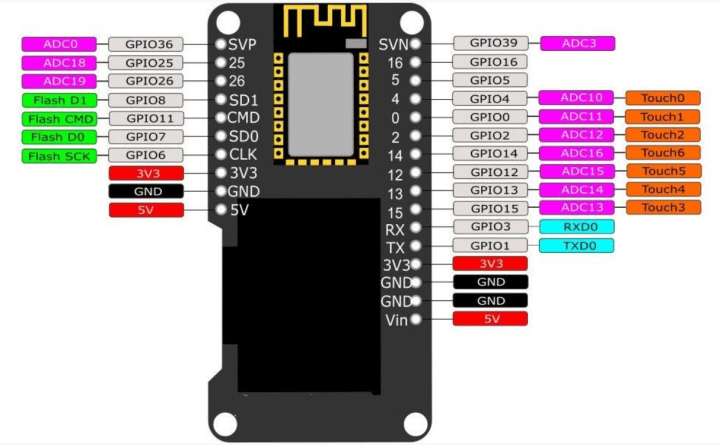
A look at the pinout (see picture) shows that the upper side should have enough analog and digital I/Os available for loads of experiments. The reset button is located on the underside and is only accessible if you let the board overhang the edge of the plug board. I found that I did not need to use it during operation; programs always ran reliably after each new upload and after every power interruption.
I connected an LDR between 3.3 V supply and GPIO pin 39 (pin 39 has an internal 10 k resistor to ground).
After compiling and uploading the demo program from johnnyfrx, the OLED display showed the sampled values, brilliant and sharp, as you would expect from a display with emissive electroluminescent layers.
I contained the whole sequence in one function called void DisplayPrint(String DisplayText).
A look at the library showed that it only supports the Arial font, but there are three font sizes to choose from. The size can be defined using the keywords ArialMT_Plain_24, ArialMT_Plain_16 and ArialMT_Plain_10. If you choose ArialMT_Plain_16, you will be able to display 3 lines of 12 characters. The characters are really sharp and easily readable even if, like me, your near vision is not as good as it once was.
A line feed can be inserting using the ‘\n’ character at the appropriate position in the string.
You may also remember that I was able to enter the address of the test broker, the SensorID for OpenSenseMap, and the topic and payload format for the MQTT messages on a small configuration webpage. The ESP32 supplies this over a web server via its own local Wi-Fi network (by entering address 192.168.4.1 in the browser address field).
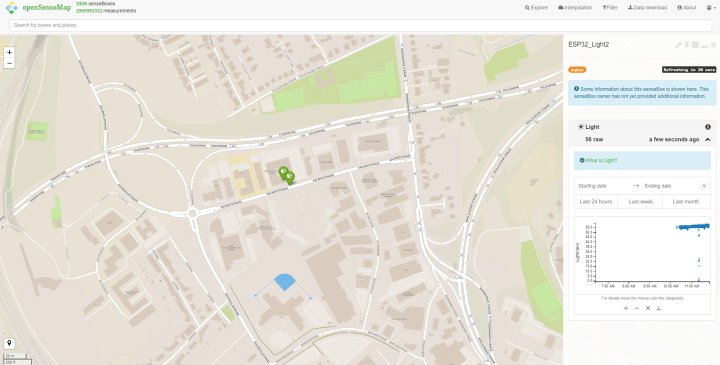
I have already connected an LDR, I only need to correct the pin number in the code for my application to run on the Lolin board also. After uploading the program, I noticed that values were being sent to the MQTT broker (MQTT Dash is a useful smartphone app to check that out). The values were however not updated on OpenSenseMap; the icon of my previously used SenseBox was also greyed-out on the map. I therefore decided to create a new SenseBox, which I located in our editorial office in Aachen. After entering the new SensorID in my configuration form, the values are now displayed on OpenSenseMap. The screenshot shows my SenseBox in Aachen (next to the Weather Station SenseBox used by my lab colleagues).

and
are continuously sent to the OLED. I also added a new variable called TCPClient_Connected, to indicate whether the TCP connection to test.mosquitto.org was successful. In MQTTClient_LastCommandstores the latest MQTT command that has been executed (CONNECT, PUBLISH or the regular PING). In addition the OLED displays a counter of the messages published to date (MQTTClient_PublishCount) and the latest recorded sensor value (SENSOR_LastValue).
Each time I execute the main loop I also increment a Byte-counter and write the value of its LSB (0 or 1) to the display. This is instead of dimming the RGB LED, which I previously used to indicate that the ESP32 is still ‘alive’ between sending MQTT messages.
To be prepared for future projects, where one or more LEDs or even another display may be used to form a rudimentary ‘Graphical User Interface’, I have written three functions that execute this status indicator function. GUI_Setup() prepares the GUI — in this case the OLED. GUI_Update() outputs the latest status information, while GUI_Heartbeat() makes any output that provides the vital signs that the ESP32 is active. These functions are now used in the latest display code. These GUI functions will now be called by all the other functions in the software which take care of TCP, MQTT or the connection status, so now there is no explicit reference to an RGB LED.
As always, you are free to build my small IoT device. In my last review, you will find instructions on how to set up a SenseBox and how to set the ESP32 sensor node via the configuration website.
The new Arduino sketch can be downloaded below. You should drag the subfolder library files into the Arduino libraries subfolder. You need the SSD1306 library as well — you can do as I did and download the ZIP file from GitHub and put the extracted folder in libraries as well.
Have fun experimenting with and modifying my IoT OLED project!
During program development you can use some LEDs mounted on an external prototyping board to indicate what is happening in the code and I used this method several times in the course of my journey. Of course a small display screen built into the ESP32 development board would have been really useful. When I found out that we stock the Wemos Lolin ESP32 OLED Display Module in the Elektor Store I couldn’t wait to get my hands on it. The OLED on the 'Wemos Lolin ESP32 OLED' board is driven by an SSD1306 controller which receives commands from the ESP32 via an I²C interface. The monochrome OLED has a resolution of 128 x 64 pixels.
Plug it in the Breadboard
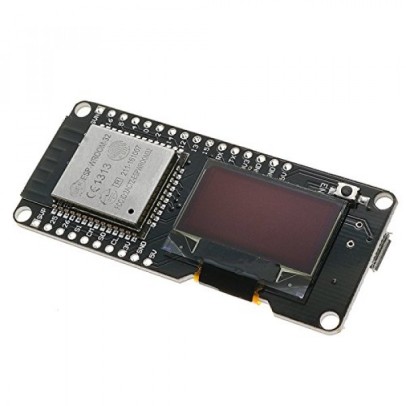
The photo shows how compact the board is. Pinheader strips are also included.
After soldering the strips in place plug the board into a breadboard. The board is so wide that (using the standard breadboard we have lying around in the lab) there is only one row of sockets on one side of the board available for connections. You need to decide how to plug it in so you can access the necessary pins.

A look at the pinout (see picture) shows that the upper side should have enough analog and digital I/Os available for loads of experiments. The reset button is located on the underside and is only accessible if you let the board overhang the edge of the plug board. I found that I did not need to use it during operation; programs always ran reliably after each new upload and after every power interruption.
The OLED wakes up
I was keen to fire up the OLED as soon as possible. Googling for demo programs, I first came across the Project from johnnyfrx. The program measures the voltage level produced across a Light Dependant Resistor (LDR) connected to an analogue input and displays the value on the OLED. John used routines from the SSD1306.h, library to drive the OLED which is available at GitHub. To ‘install’ the library, all I had to do was download the (esp8266-oled-ssd1306-master) ZIP file from GitHub extract it and drag it into the Libraries folder of the Arduino IDE.I connected an LDR between 3.3 V supply and GPIO pin 39 (pin 39 has an internal 10 k resistor to ground).
After compiling and uploading the demo program from johnnyfrx, the OLED display showed the sampled values, brilliant and sharp, as you would expect from a display with emissive electroluminescent layers.
Simple OLED control
Now I could take a look at the code in the sketch. To display a text string, the following functions of the SSD1306 lib are called:display.clear();
display.setColor(WHITE);
display.setTextAlignment(TEXT_ALIGN_CENTER);
display.drawString(64, 5, DisplayText);
display.setFont(ArialMT_Plain_24);
display.display();
display.setColor(WHITE);
display.setTextAlignment(TEXT_ALIGN_CENTER);
display.drawString(64, 5, DisplayText);
display.setFont(ArialMT_Plain_24);
display.display();
I contained the whole sequence in one function called void DisplayPrint(String DisplayText).
A look at the library showed that it only supports the Arial font, but there are three font sizes to choose from. The size can be defined using the keywords ArialMT_Plain_24, ArialMT_Plain_16 and ArialMT_Plain_10. If you choose ArialMT_Plain_16, you will be able to display 3 lines of 12 characters. The characters are really sharp and easily readable even if, like me, your near vision is not as good as it once was.
A line feed can be inserting using the ‘\n’ character at the appropriate position in the string.
MQTT and OpenSenseMap
Of course I was keen to try ‘something with Wi-Fi’. Some might say I’m lazy but I prefer to think it's just more efficient if I grab the demo application for my recent review, using openSenseMap where I used the ESP32 Pico Kit. The random light-level values that the ESP32 sampled via a LDR were sent there via MQTT to the freely-accessible test broker test.mosquitto.org. Using openSenseMap.org I created a 'SenseBox' with a sensor called 'Light_ESP32'. There you can set up how the values via MQTT from any desired broker are saved and displayed, these values can also be plotted as a graph against time.You may also remember that I was able to enter the address of the test broker, the SensorID for OpenSenseMap, and the topic and payload format for the MQTT messages on a small configuration webpage. The ESP32 supplies this over a web server via its own local Wi-Fi network (by entering address 192.168.4.1 in the browser address field).
I have already connected an LDR, I only need to correct the pin number in the code for my application to run on the Lolin board also. After uploading the program, I noticed that values were being sent to the MQTT broker (MQTT Dash is a useful smartphone app to check that out). The values were however not updated on OpenSenseMap; the icon of my previously used SenseBox was also greyed-out on the map. I therefore decided to create a new SenseBox, which I located in our editorial office in Aachen. After entering the new SensorID in my configuration form, the values are now displayed on OpenSenseMap. The screenshot shows my SenseBox in Aachen (next to the Weather Station SenseBox used by my lab colleagues).

Status information on the OLED
What I have not connected so far is an RGB LED, which in my previous project was used to indicate the connection status. But hang on, I’ve got OLED display now, I can use that! I rewrote the program so that the current value of the global variablesbyte RouterNetworkDeviceState; // logged in or not
and
byte MQTTClient_Connected; // connected with the Testbroker?
are continuously sent to the OLED. I also added a new variable called TCPClient_Connected, to indicate whether the TCP connection to test.mosquitto.org was successful. In MQTTClient_LastCommandstores the latest MQTT command that has been executed (CONNECT, PUBLISH or the regular PING). In addition the OLED displays a counter of the messages published to date (MQTTClient_PublishCount) and the latest recorded sensor value (SENSOR_LastValue).
Each time I execute the main loop I also increment a Byte-counter and write the value of its LSB (0 or 1) to the display. This is instead of dimming the RGB LED, which I previously used to indicate that the ESP32 is still ‘alive’ between sending MQTT messages.
To be prepared for future projects, where one or more LEDs or even another display may be used to form a rudimentary ‘Graphical User Interface’, I have written three functions that execute this status indicator function. GUI_Setup() prepares the GUI — in this case the OLED. GUI_Update() outputs the latest status information, while GUI_Heartbeat() makes any output that provides the vital signs that the ESP32 is active. These functions are now used in the latest display code. These GUI functions will now be called by all the other functions in the software which take care of TCP, MQTT or the connection status, so now there is no explicit reference to an RGB LED.
As always, you are free to build my small IoT device. In my last review, you will find instructions on how to set up a SenseBox and how to set the ESP32 sensor node via the configuration website.
The new Arduino sketch can be downloaded below. You should drag the subfolder library files into the Arduino libraries subfolder. You need the SSD1306 library as well — you can do as I did and download the ZIP file from GitHub and put the extracted folder in libraries as well.
Have fun experimenting with and modifying my IoT OLED project!
Read full article
Hide full article


Discussion (1 comment)